All BD-1 parts in Star Wars Jedi: Survivor
Here’s where you can find each BD part, so you’re best friend can look just as fly as you do.

Image credit:Official screenshot | Star Wars Jedi: Survivor, EA

Star Wars Jedi: Survivor has many great aspects to it, but BD-1 has got to be one of the highlights. If you’re looking to keep your best bud as good looking as Cal, you’ll want to track down all BD parts scattered around the many planets you venture to.
This guide will take you through the location of each BD-1 part, planet by planet, so that you can collect them all. If you want to jump to a specifc planet, you can use the quick menu below to hop to your chosen planet.
Watch the launch gameplay trailer for Star Wars Jedi: Survivor here!
Star Wars Jedi: Survivor all BD parts
You’ll find BD parts scattered around the galaxy. For the most part, they will be found in chests that you’ll have to track down and open. Once you have new BD-1 parts you’ll be able to equip them at any workbench, same as if you were going to change up your lightsaber parts .
These BD-1 parts don’t effect the power or in-game abilities of BD-1, they are purely cosmetic. So swap them out and slap them on to your hearts’ content!
- Coruscant BD-1 parts
- Jedha BD-1 parts
- Nova Garon BD-1 parts
Coruscant BD-1 parts
Coruscant paint material
Found in Renovation Site 4733. Use wall running to climb up past the giant slope near where Bode first notices storm troopers, then you’ll find a door BD can slice open. Once he does so, you’ll find a chest inside with the lightsaber part.
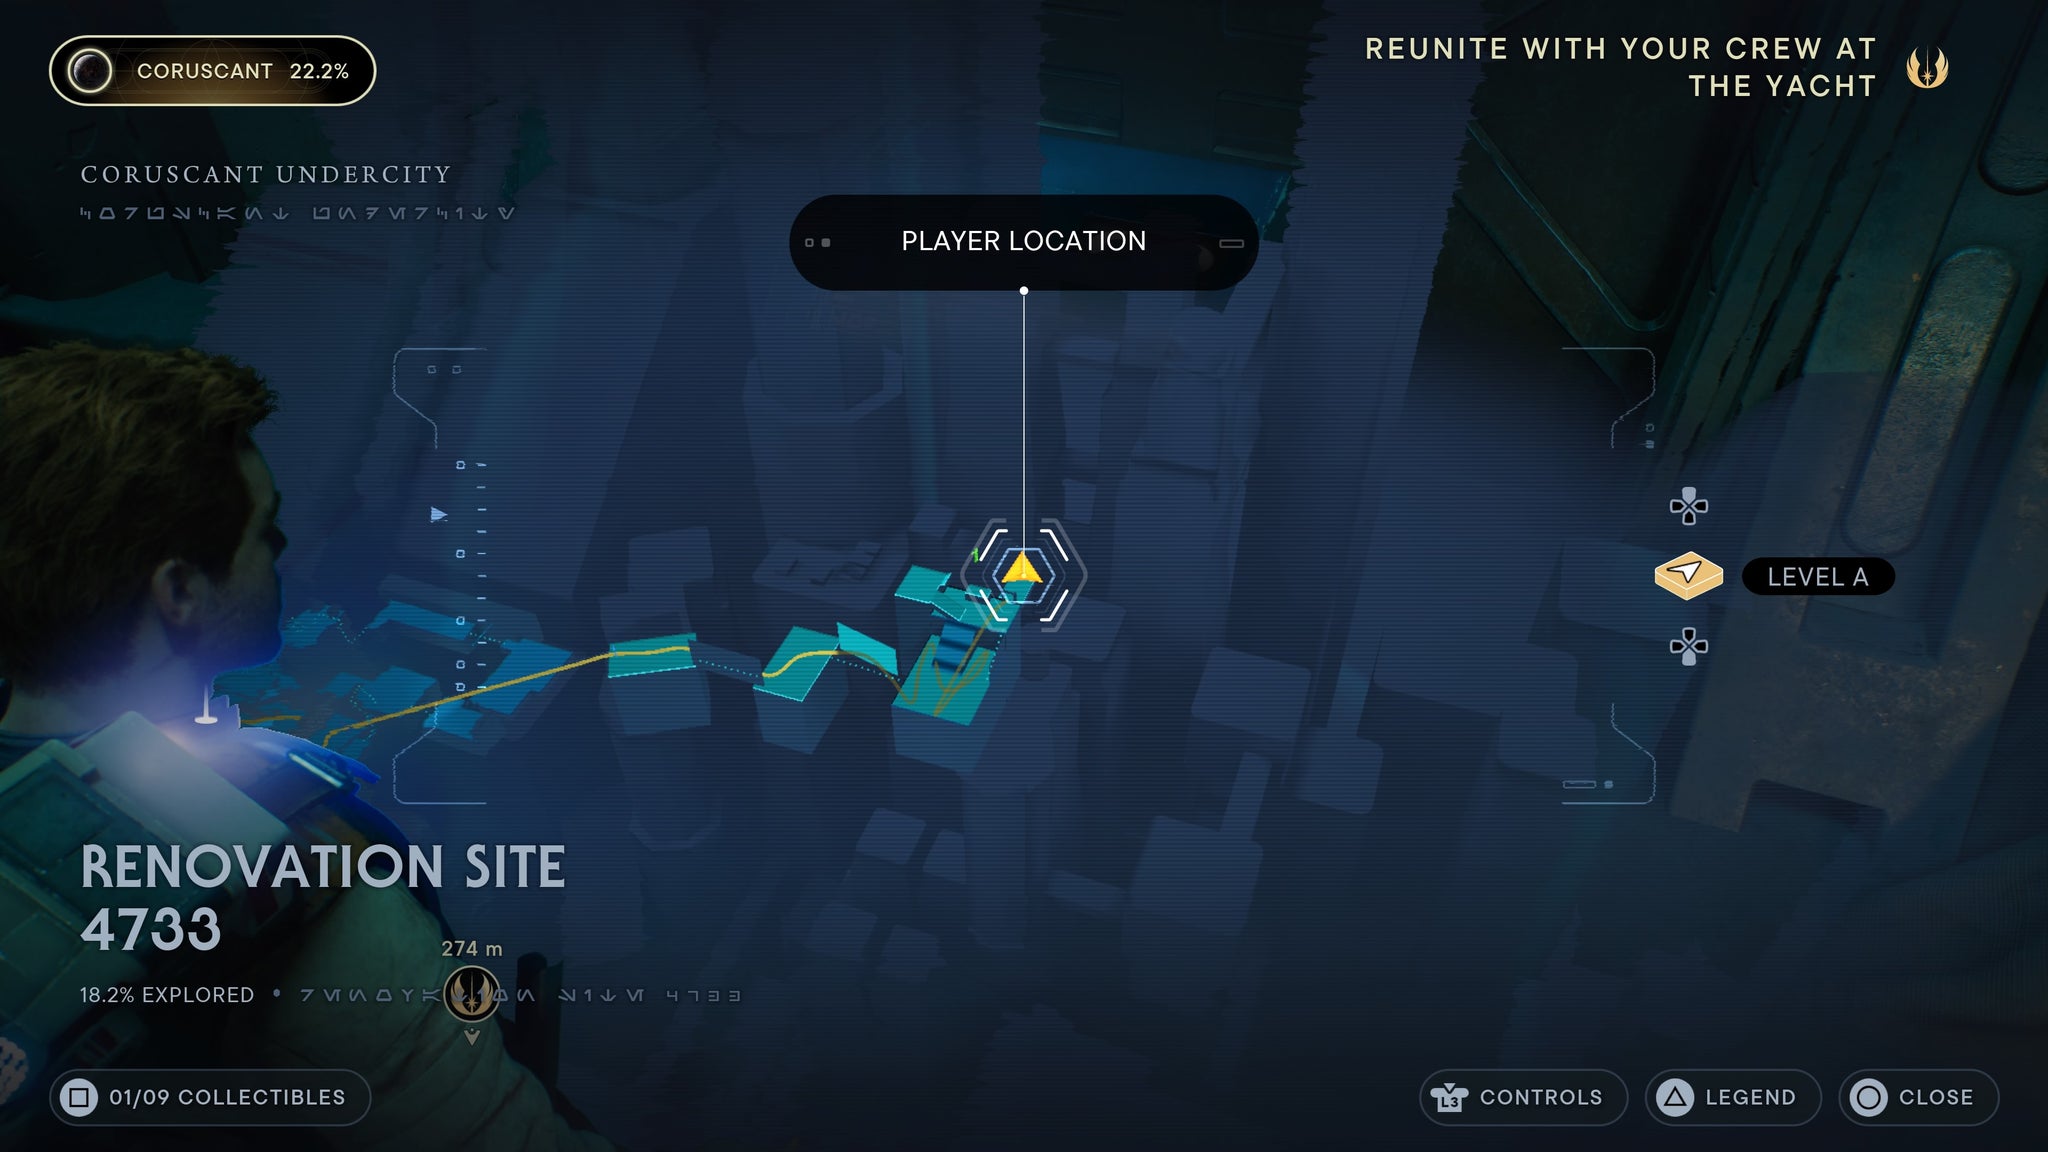
Wall run up past the ramp, then slice open the door tofind the chest.
Assembly parts
Found on The Mantis. When you leave Coruscant for the first time, pick up the Assembly parts from the table near the kitchen.

Available as soon as you get on The Mantis.
Koboh all BD-1 parts
Scrapyard Photoreceptors
Found in the Gorge Crash Site. From the meditation point, look left of the locked door and you’ll see a higher platform you can grapple to. Jump up there, and you’ll find a blue chest with the scrapyard photoreceptors inside.
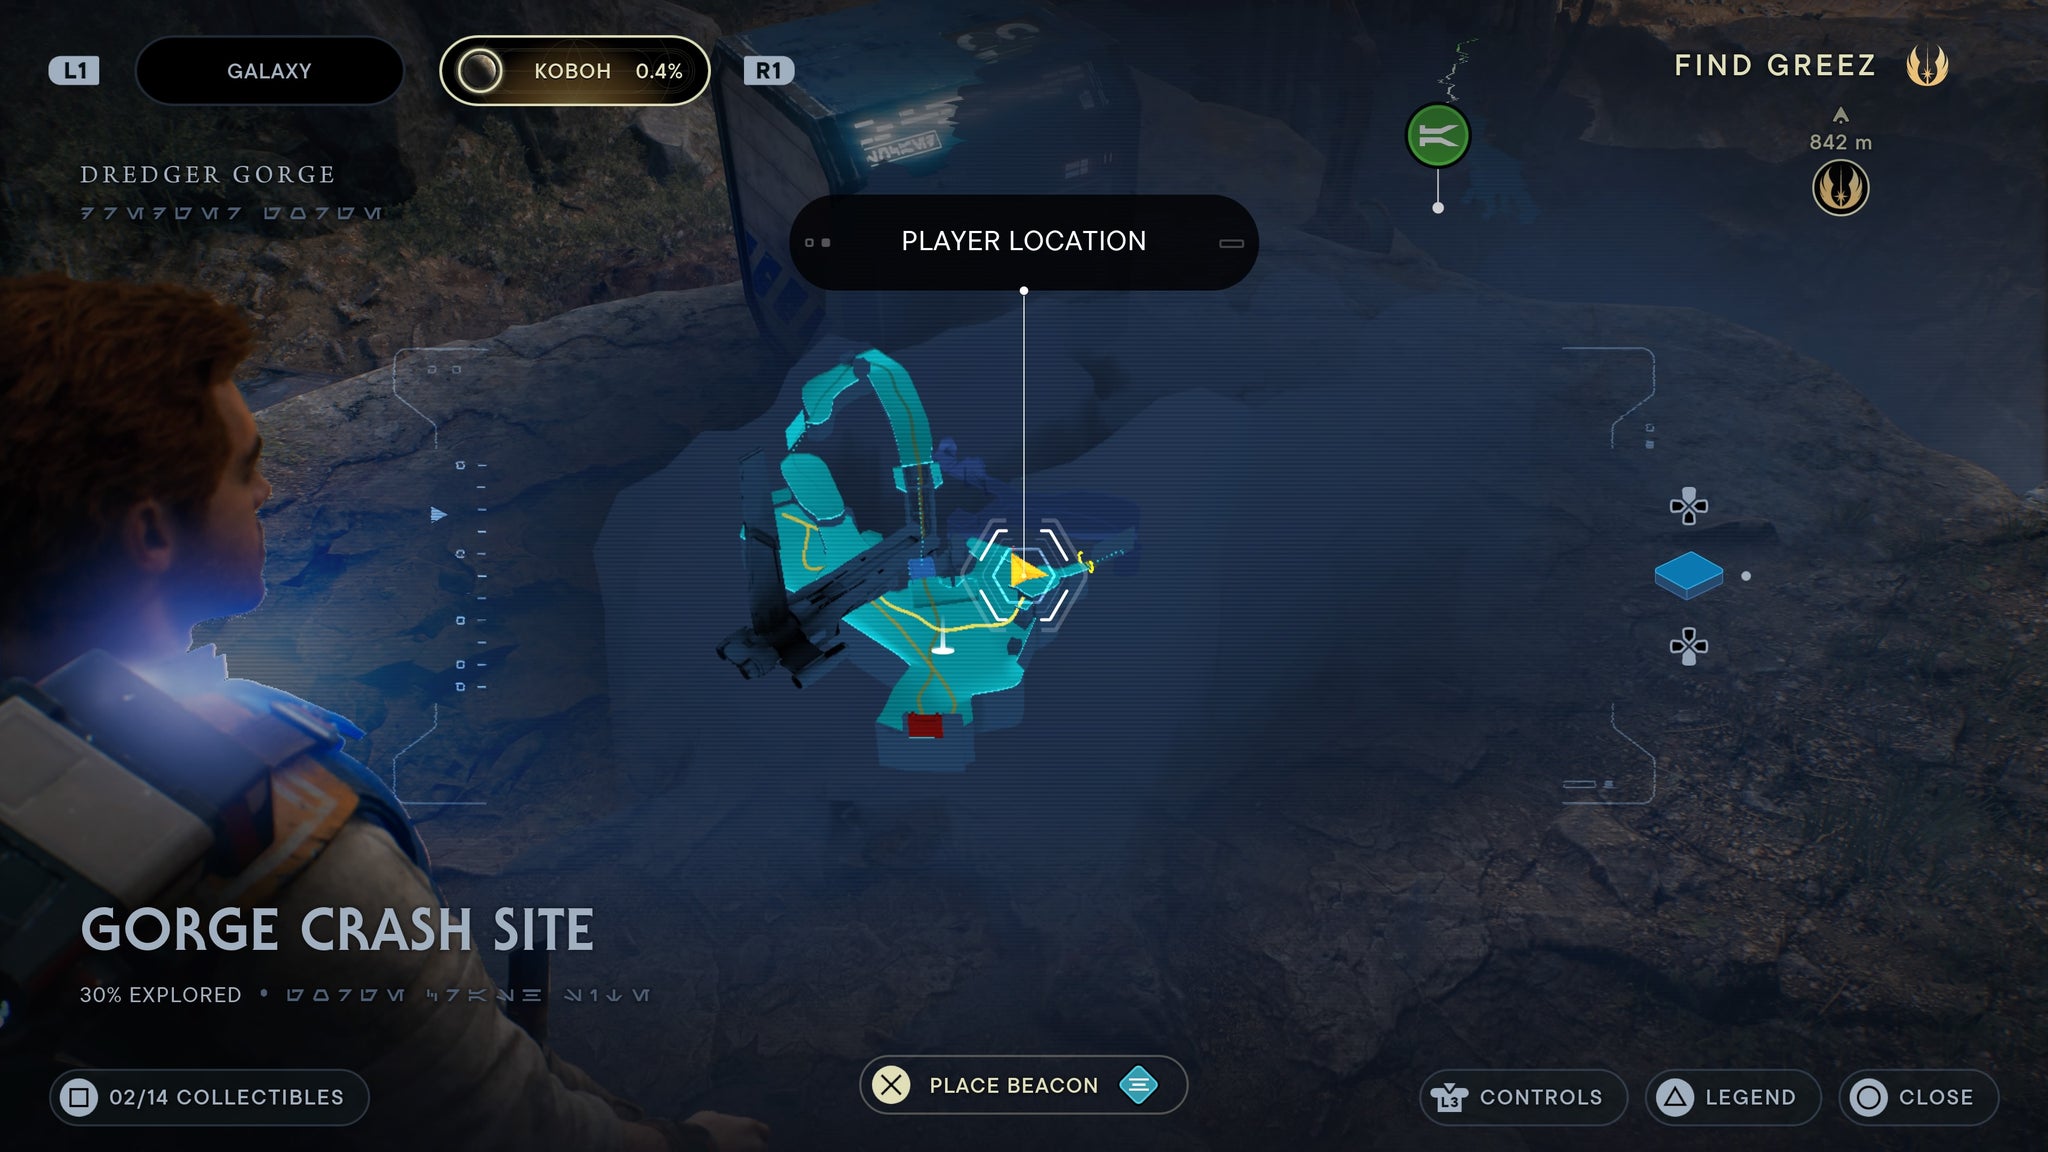
Up on the higher platform, overlooking the crash site.
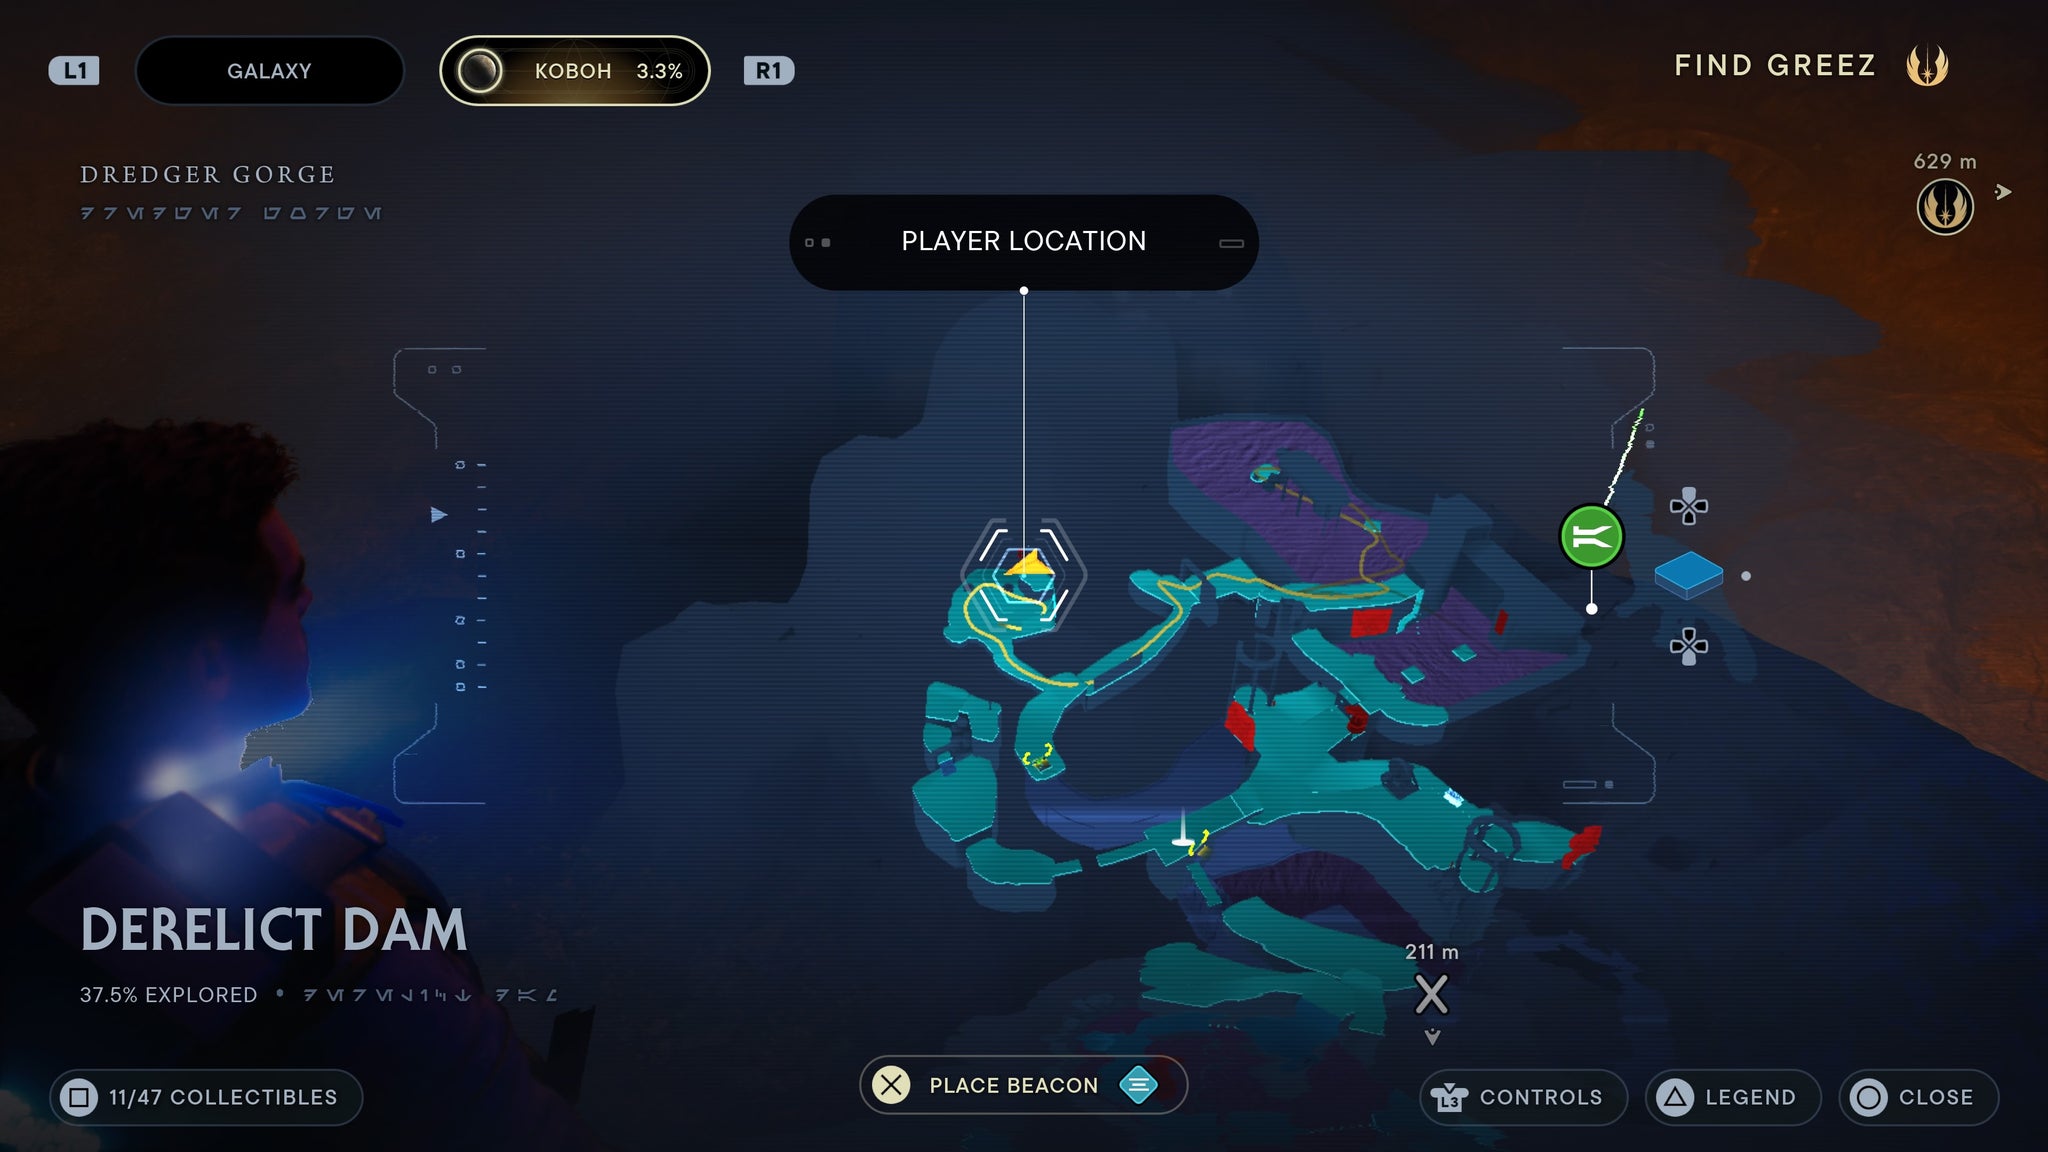
Scrapyard Body
Found in the Derelict Dam. From the meditation point, drop down to the area below via the vines right next to the meditation point. Proceed through the wreckage opposite the vines, and you’ll find a chest with the BD part inside.

In a blue chest, overlooking a crater.
Anodized Metal Material
Found in the Derelict Dam. Inside the cave where you fight your first commando droid, you can enter a large fire-lit room. In this room, wall run up to the platform right near the ceiling, and a chest will be waiting for you.
All the way up at the top of the lit room.
Scrapyard head
Found in the Derelict Dam. As you take the lift down past the giant creature, you’ll be able to force push / pull a box next to a wall you can run across. Jump on the box, run across the wall, and jump up to a higher platform where a chest containing the scrapyard head is located.

Just following the lift down towards the Southern reaches.
Light Metal Material
Found in the Hunter’s Quarry. Walk to the far end of the Hunter’s Quarry, keeping to the surface. You’ll see the entrance to a huge, destroyed building built into the rock wall. Inside, in a blue chest, is your BD part.

Inside the large doorway in Hunter’s Quarry.
Scrapyard legs
Found in the Sodden Grotto. As you make your way into the Grotto, you’ll come to a large jump with a robot taunting you at the other side. Make the jump, then run to your left. There, you’ll find a very dark corridor, two enemies, and a chest with the Scrapyard legs inside.
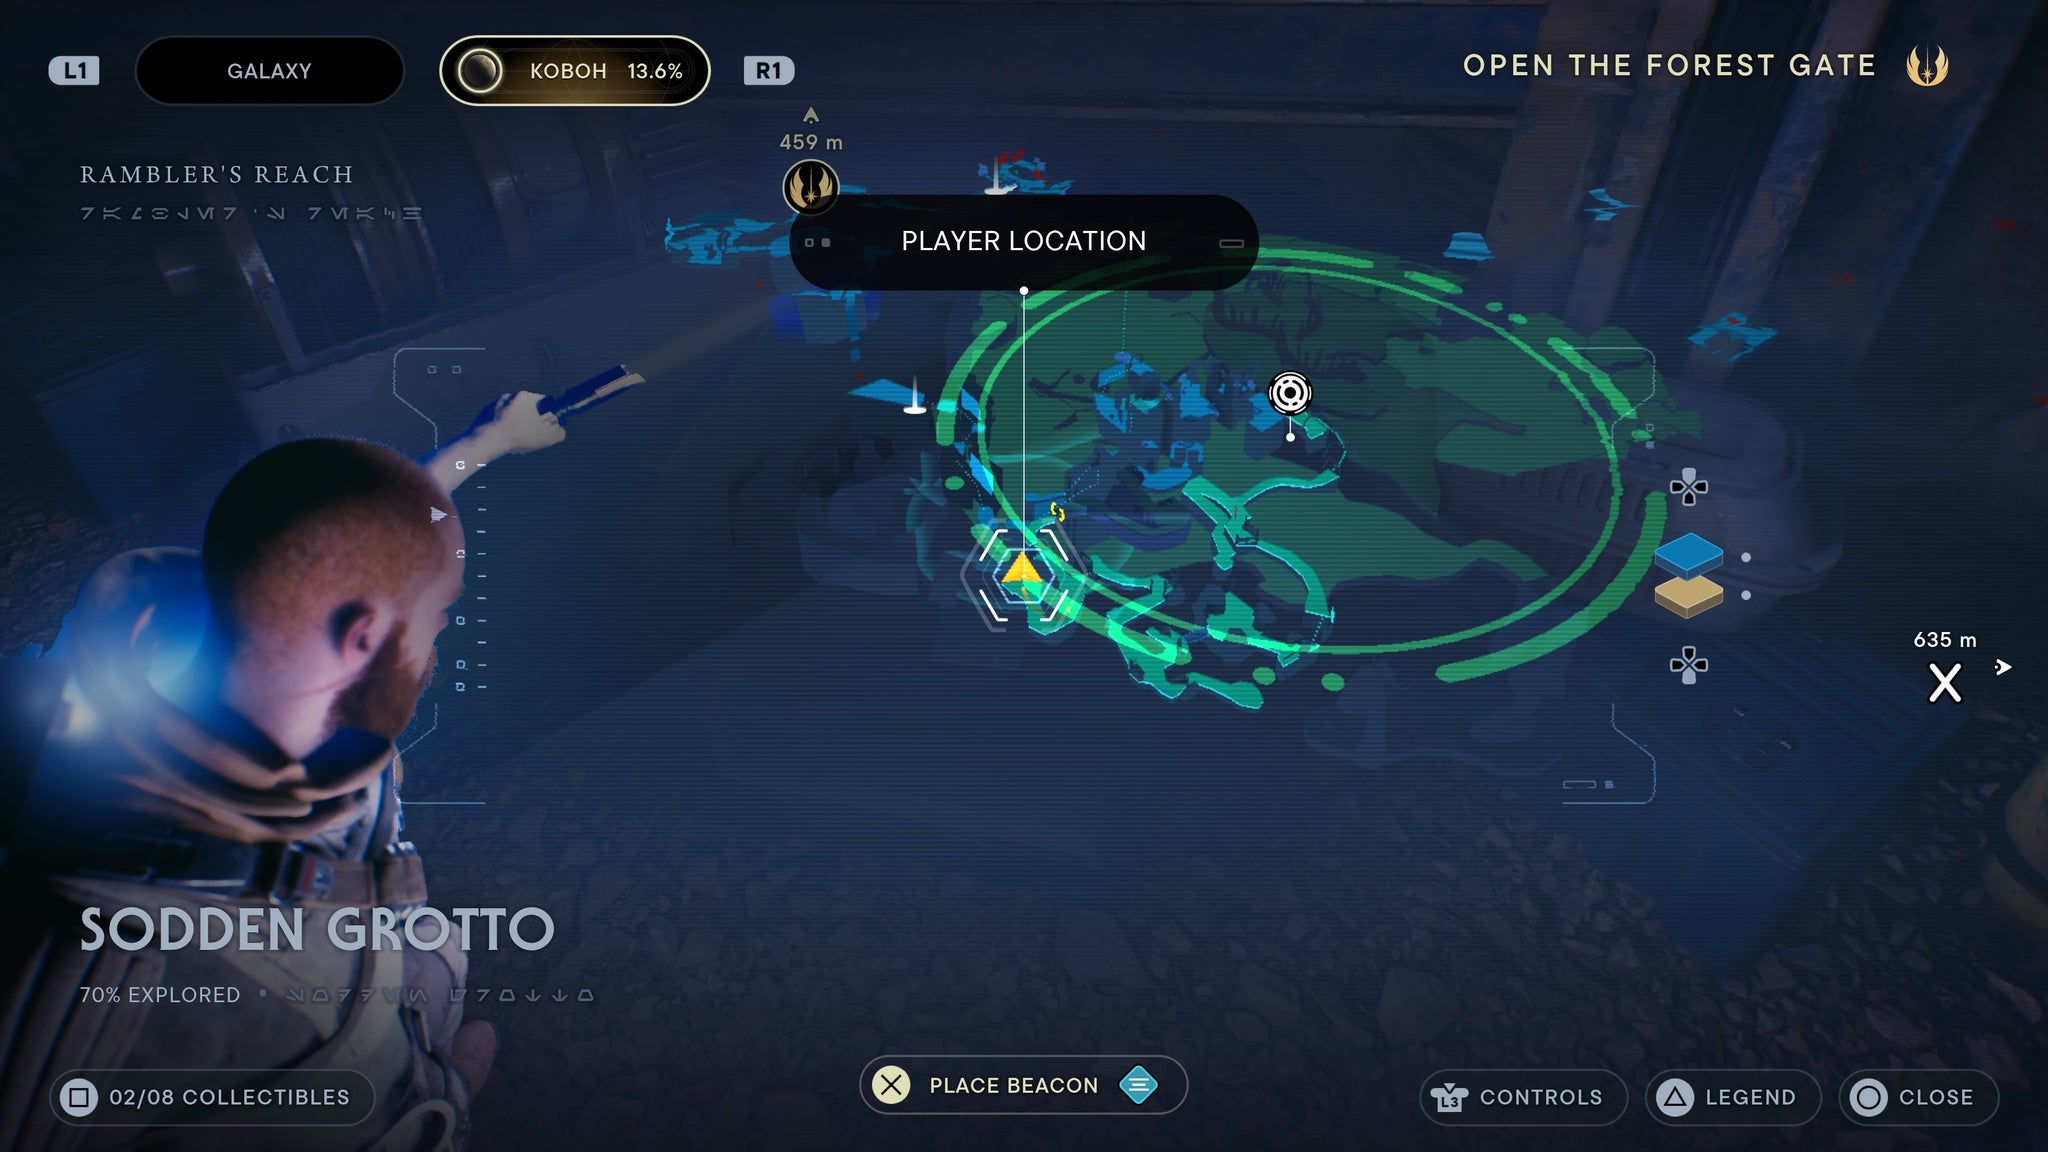
Pull out your lightsaber for better visibility.
Geonosian Audio Sensors
Found in the Untamed Downs. Climb through the hole in the cliff wall to enter a dark cave. Climb up to the top of the cave via the vines on the ceiling, then you’ll find a mogu. Kill it, then exit the cave through the hole the mogu was looking at. Turn right, then wall run over to a chest containing the Geonosian Audio Sensors

Overlooking the ranch is the chest you’re looking for.
Swooper Head
In the Forest Array. From the meditation point, walk right and climb through the building. Once on the soil, turn right and stick to the right wall on the grassy path. You’ll find a hidden cave lit by a torch. Go inside and crawl through the gap. Once through, push down a beam and use it to hop across to the chest nearby.

Hidden under the building right of the meditation point.
Swooper Body
Found in the Nekko Pools. Once you have your Neeko mount, use it to get to the large blue door at the top of the slope. Once at the door, look right and you’ll see a cave you can climb into. Climb in there, follow the path forward, and you’ll come to a chest.
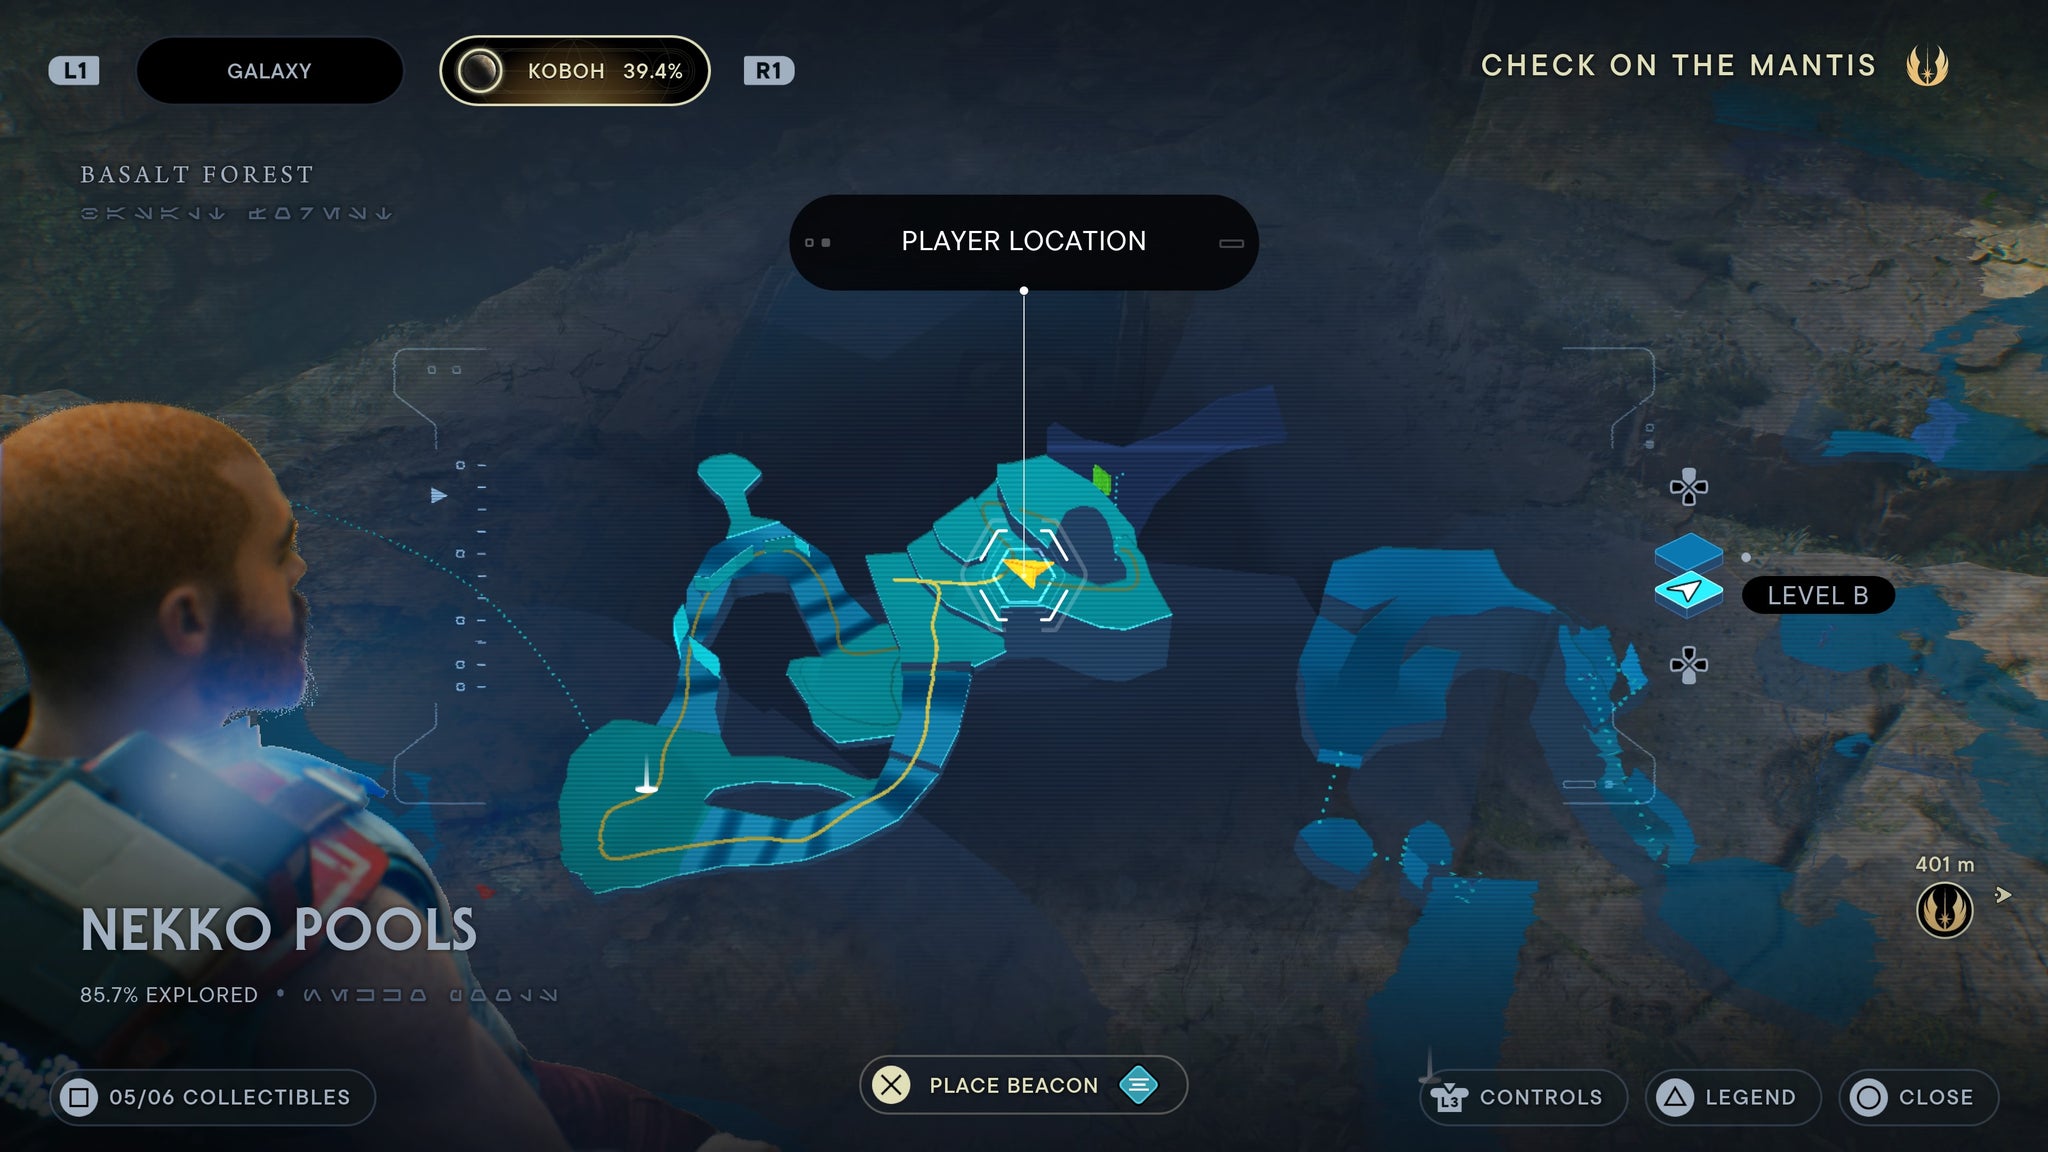
Jump up before you leave!
Genosian Head
Found in the Bygone Settlement. Use your Nekko to jump up to zipline on the ground floor of the settlement. This will let you wall run, jump and swing to another zipline that goes over the entrance to the zone. At the other side is a Retler and a blue chest.
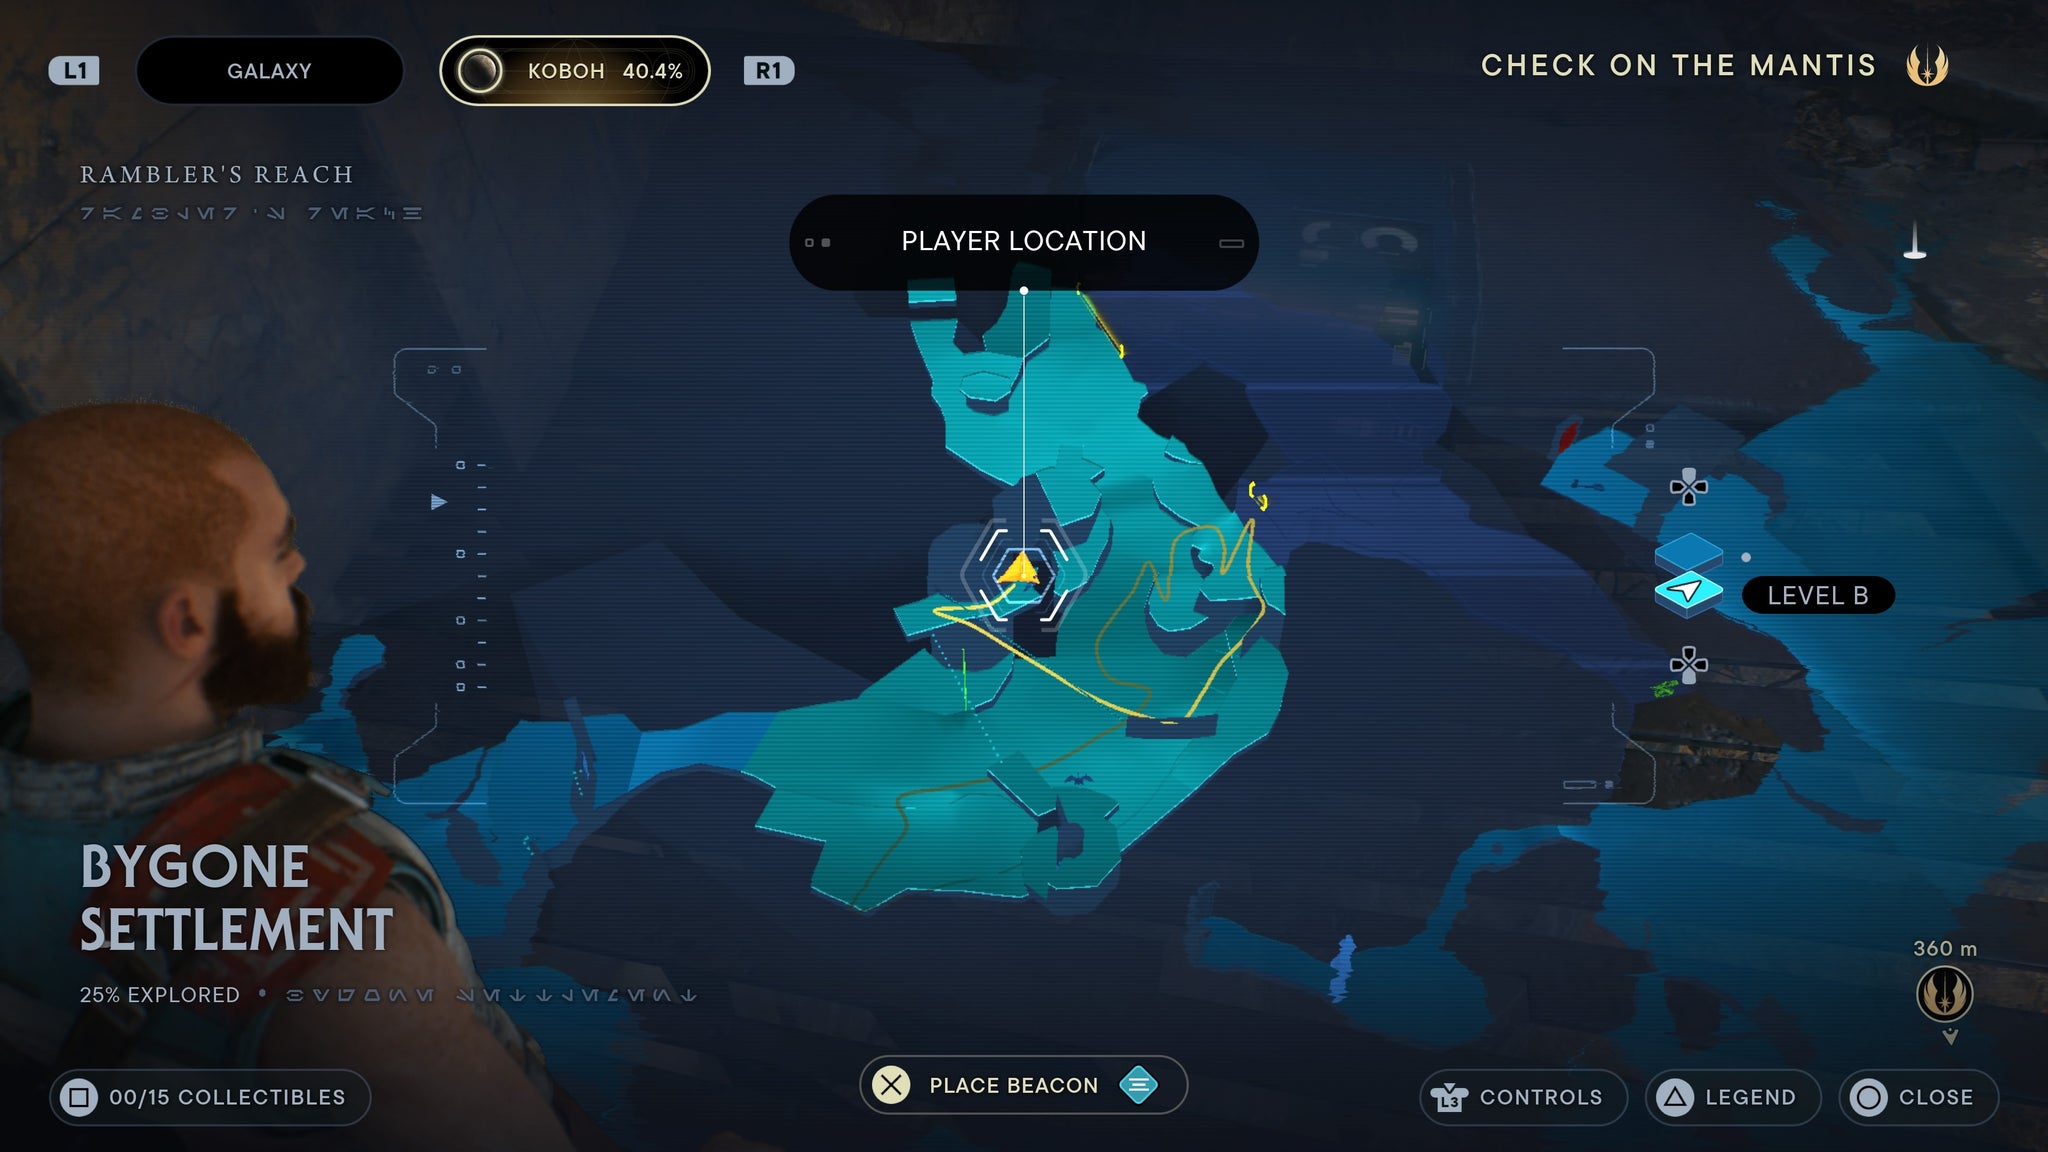
Requires some parkour
Swooper Audio Sensors
Bought from Zee’s Shop on Koboh, on the 2nd floor of Pyloon’s Saloon once The Mantis is fixed. It costs 2 datadiscs.
Swooper Photoreceptors
Bought from Zee’s Shop on Koboh, on the 2nd floor of Pyloon’s Saloon once The Mantis is fixed. It costs 2 datadiscs.
Kaminoan head
Bought from Zee’s Shop on Koboh, on the 2nd floor of Pyloon’s Saloon once The Mantis is fixed. It costs 2 datadiscs.
Kaminoan Body
Bought from Zee’s Shop on Koboh, on the 2nd floor of Pyloon’s Saloon once The Mantis is fixed. It costs 2 datadiscs.
Nocular Legs
Bought from Zee’s Shop on Koboh, on the 2nd floor of Pyloon’s Saloon once The Mantis is fixed. It costs 2 datadiscs.
Droid Paint Material
Basic Metal Material
Bought from Zee’s Shop on Koboh, on the 2nd floor of Pyloon’s Saloon once The Mantis is fixed. It costs 2 datadiscs.
Textured Rubber Material
Bought from Zee’s Shop on Koboh, on the 2nd floor of Pyloon’s Saloon once The Mantis is fixed. It costs 2 datadiscs.
Hard Plastoid Material
Bought from Zee’s Shop on Koboh, on the 2nd floor of Pyloon’s Saloon once The Mantis is fixed. It costs 2 datadiscs.
Worn Metal Material
Bought from Zee’s Shop on Koboh, on the 2nd floor of Pyloon’s Saloon once The Mantis is fixed. It costs 2 datadiscs.
Geonosian legs
Requires air dash. Found in the Bygone Settlement. Make your way up to the Jawwa room, then jump on the hanging box to cross ove to a grate on the other side. Once on the grate, jump left and enter the dark room. In this dark room is a chest.
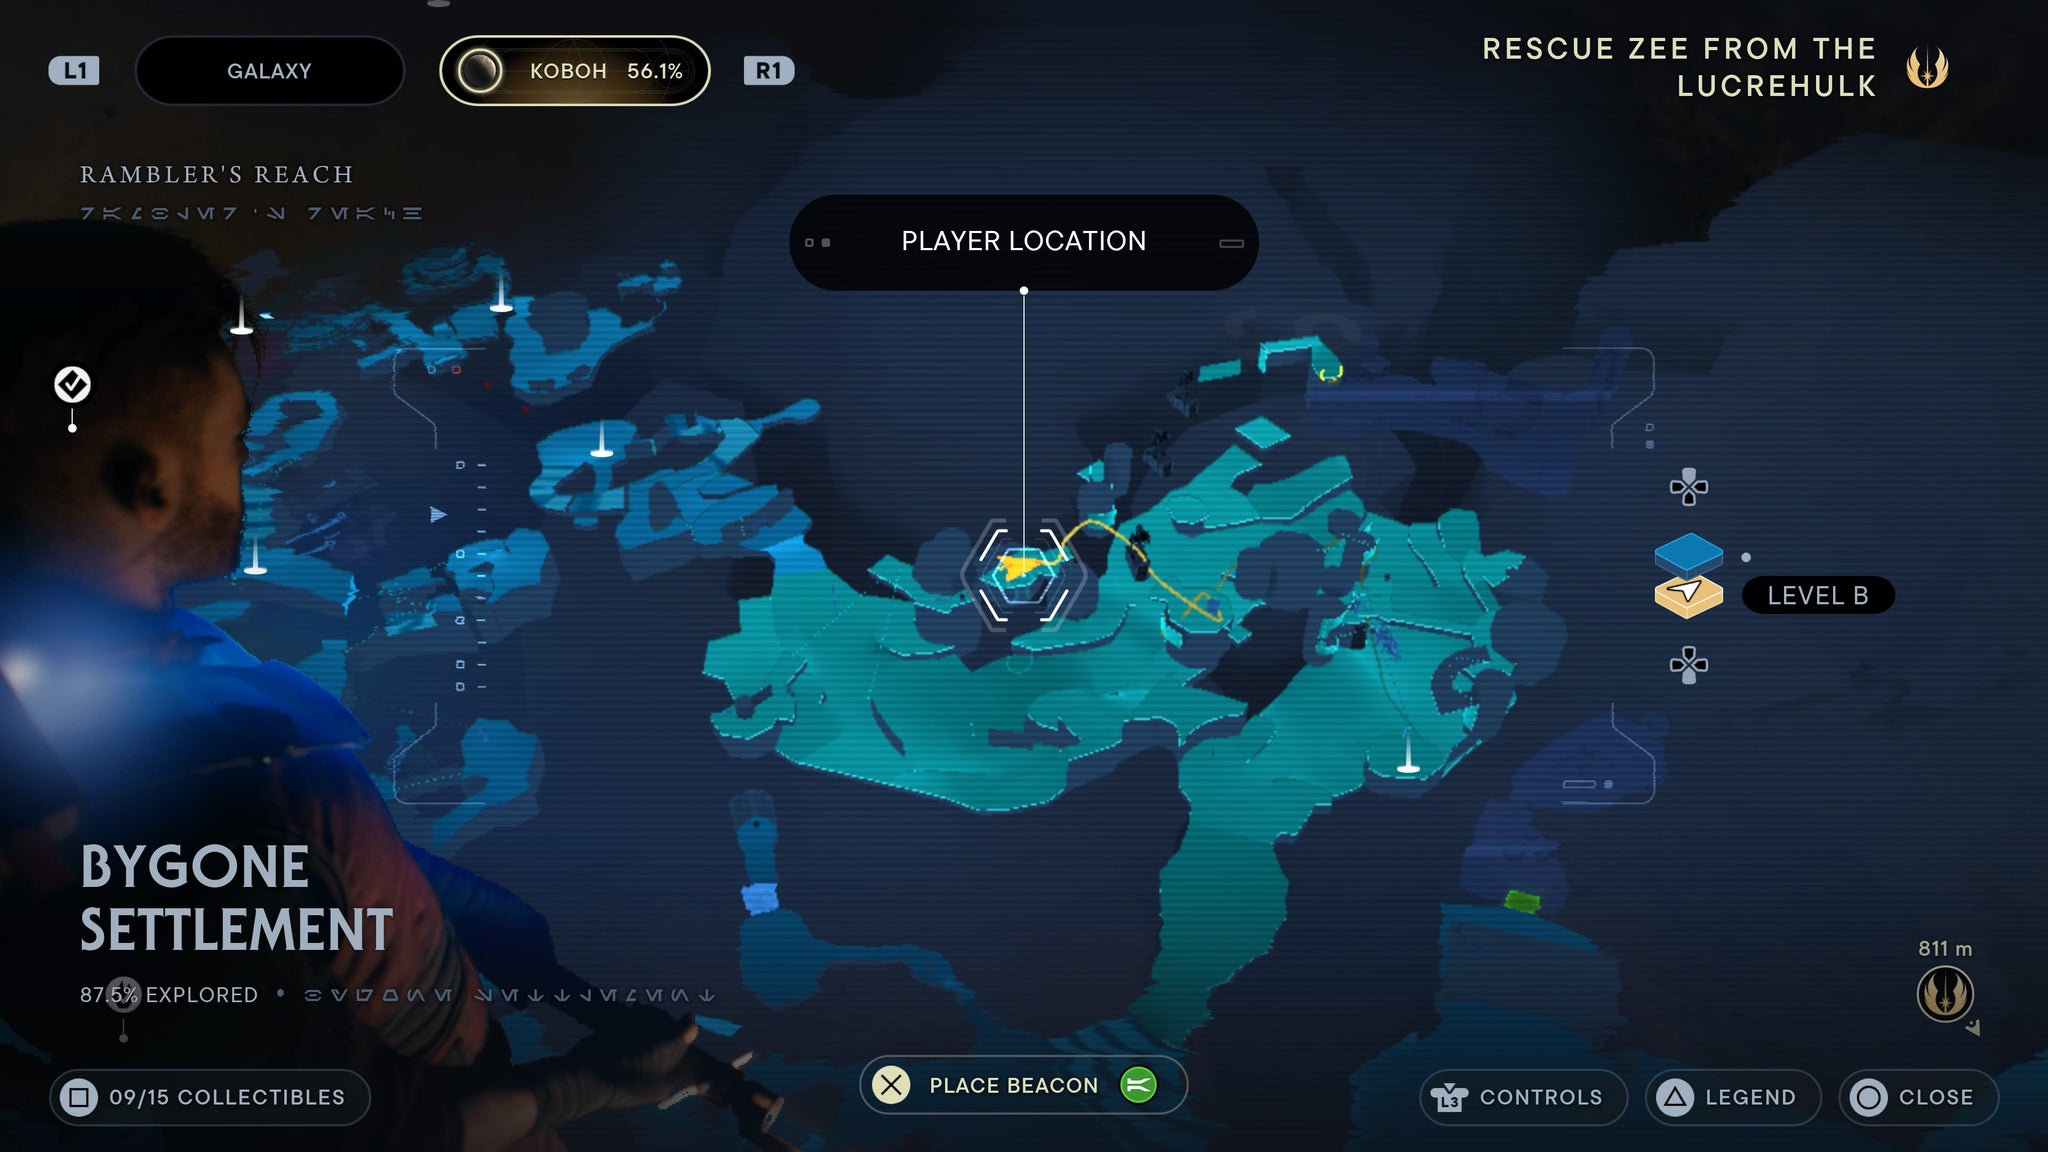
Look carefully in the dark room.
Jedi Paint BD-1 material
Found in Chamber of Detachment. Pull the second box from the wall, then you’ll find a chest in the hole it leaves.
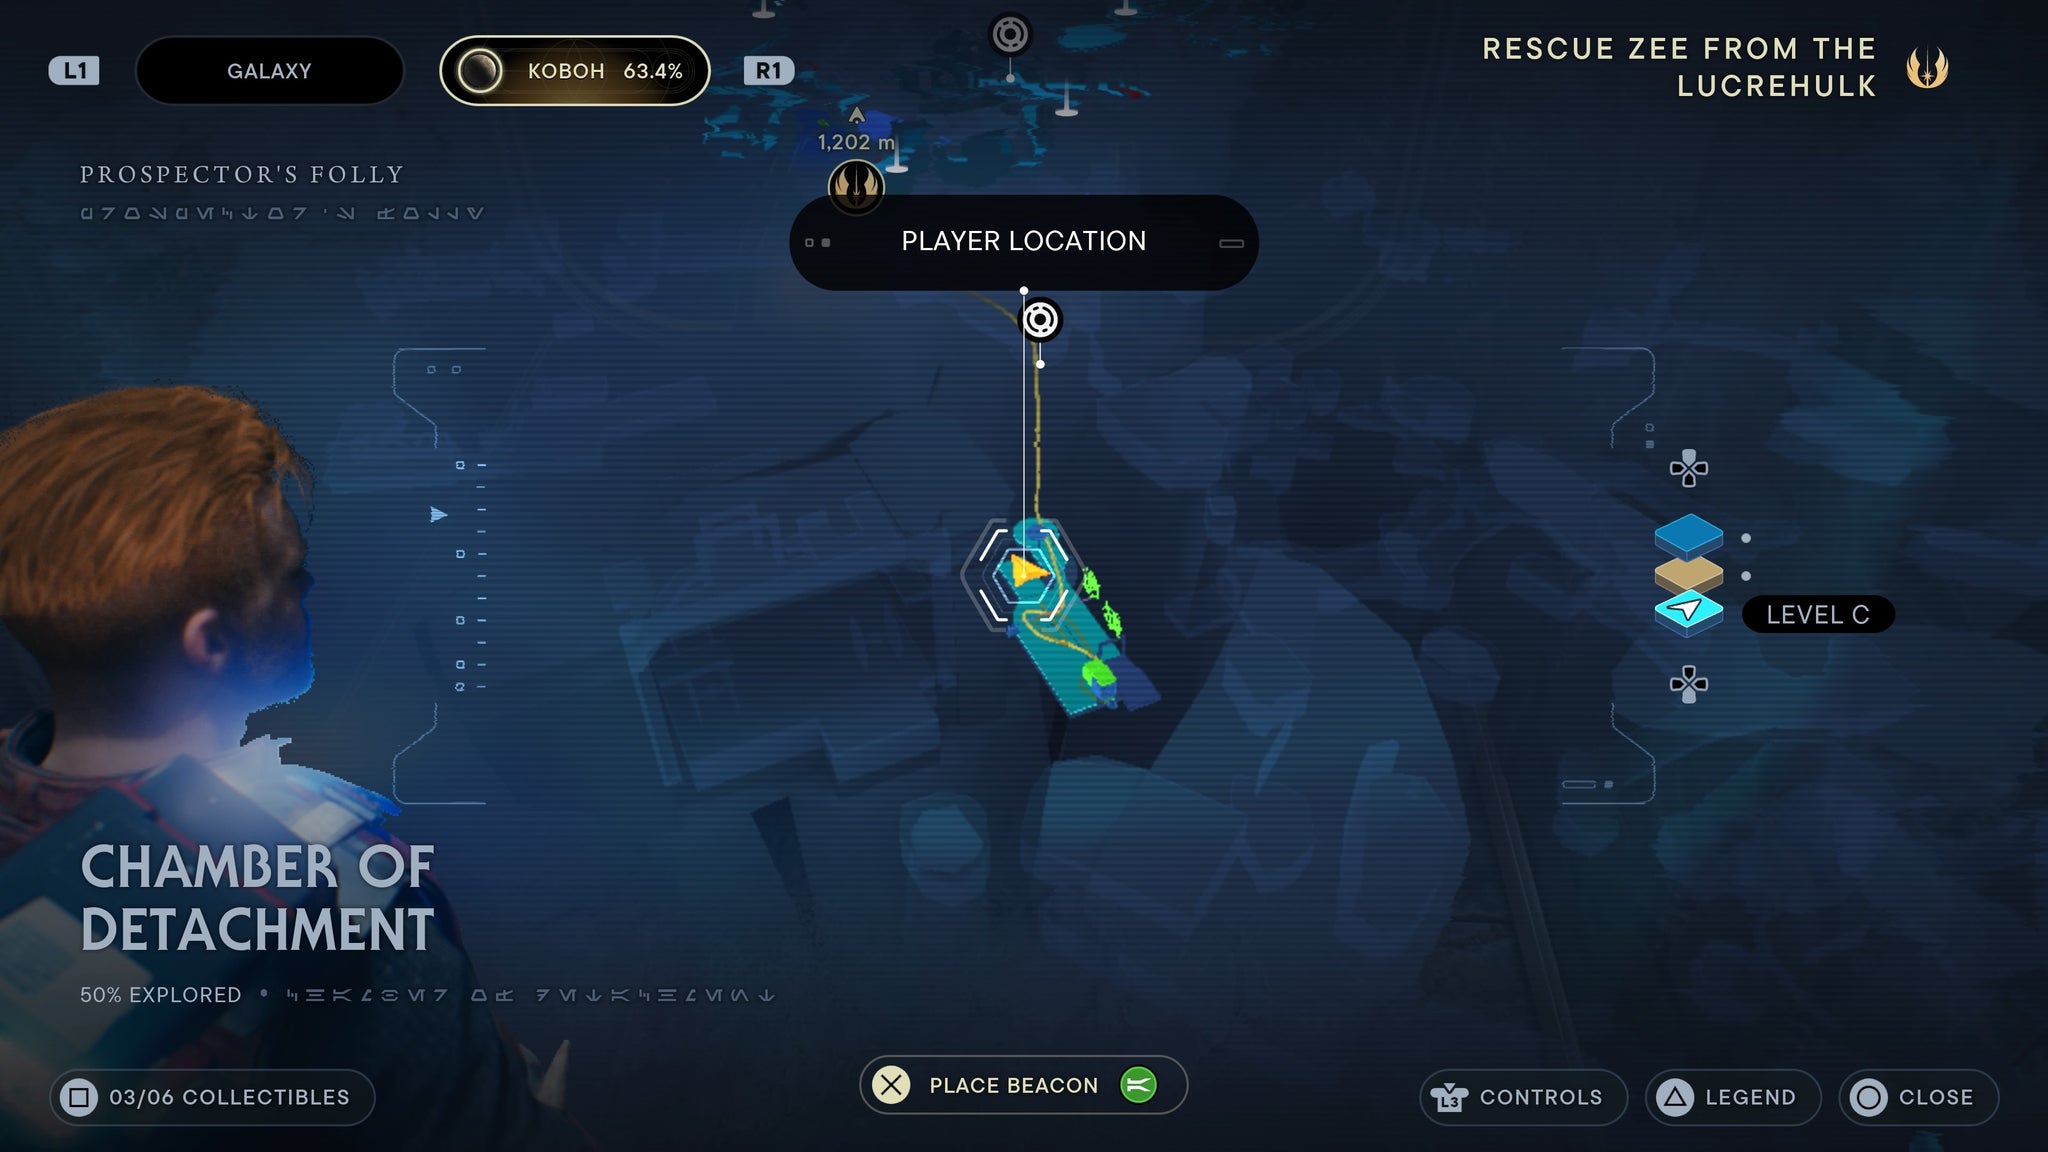
Behind the box!
Swooper legs
Requires electro dart. Found in the Untamed Downs. Walk up to the locked door at the centre of Untamed Downs. Walk to the right of the door and you’ll see a window you can shoot a dart through, Unlock the door, then walk inside for a chest.

Through the locked door!
Geonosian Body
Found in the Yurt Barracks. As you’re about to jump down to the lower part of the Yurt Barracks, turn right and you’ll see another path. Jump and dash through it, and you’ll find a chest.
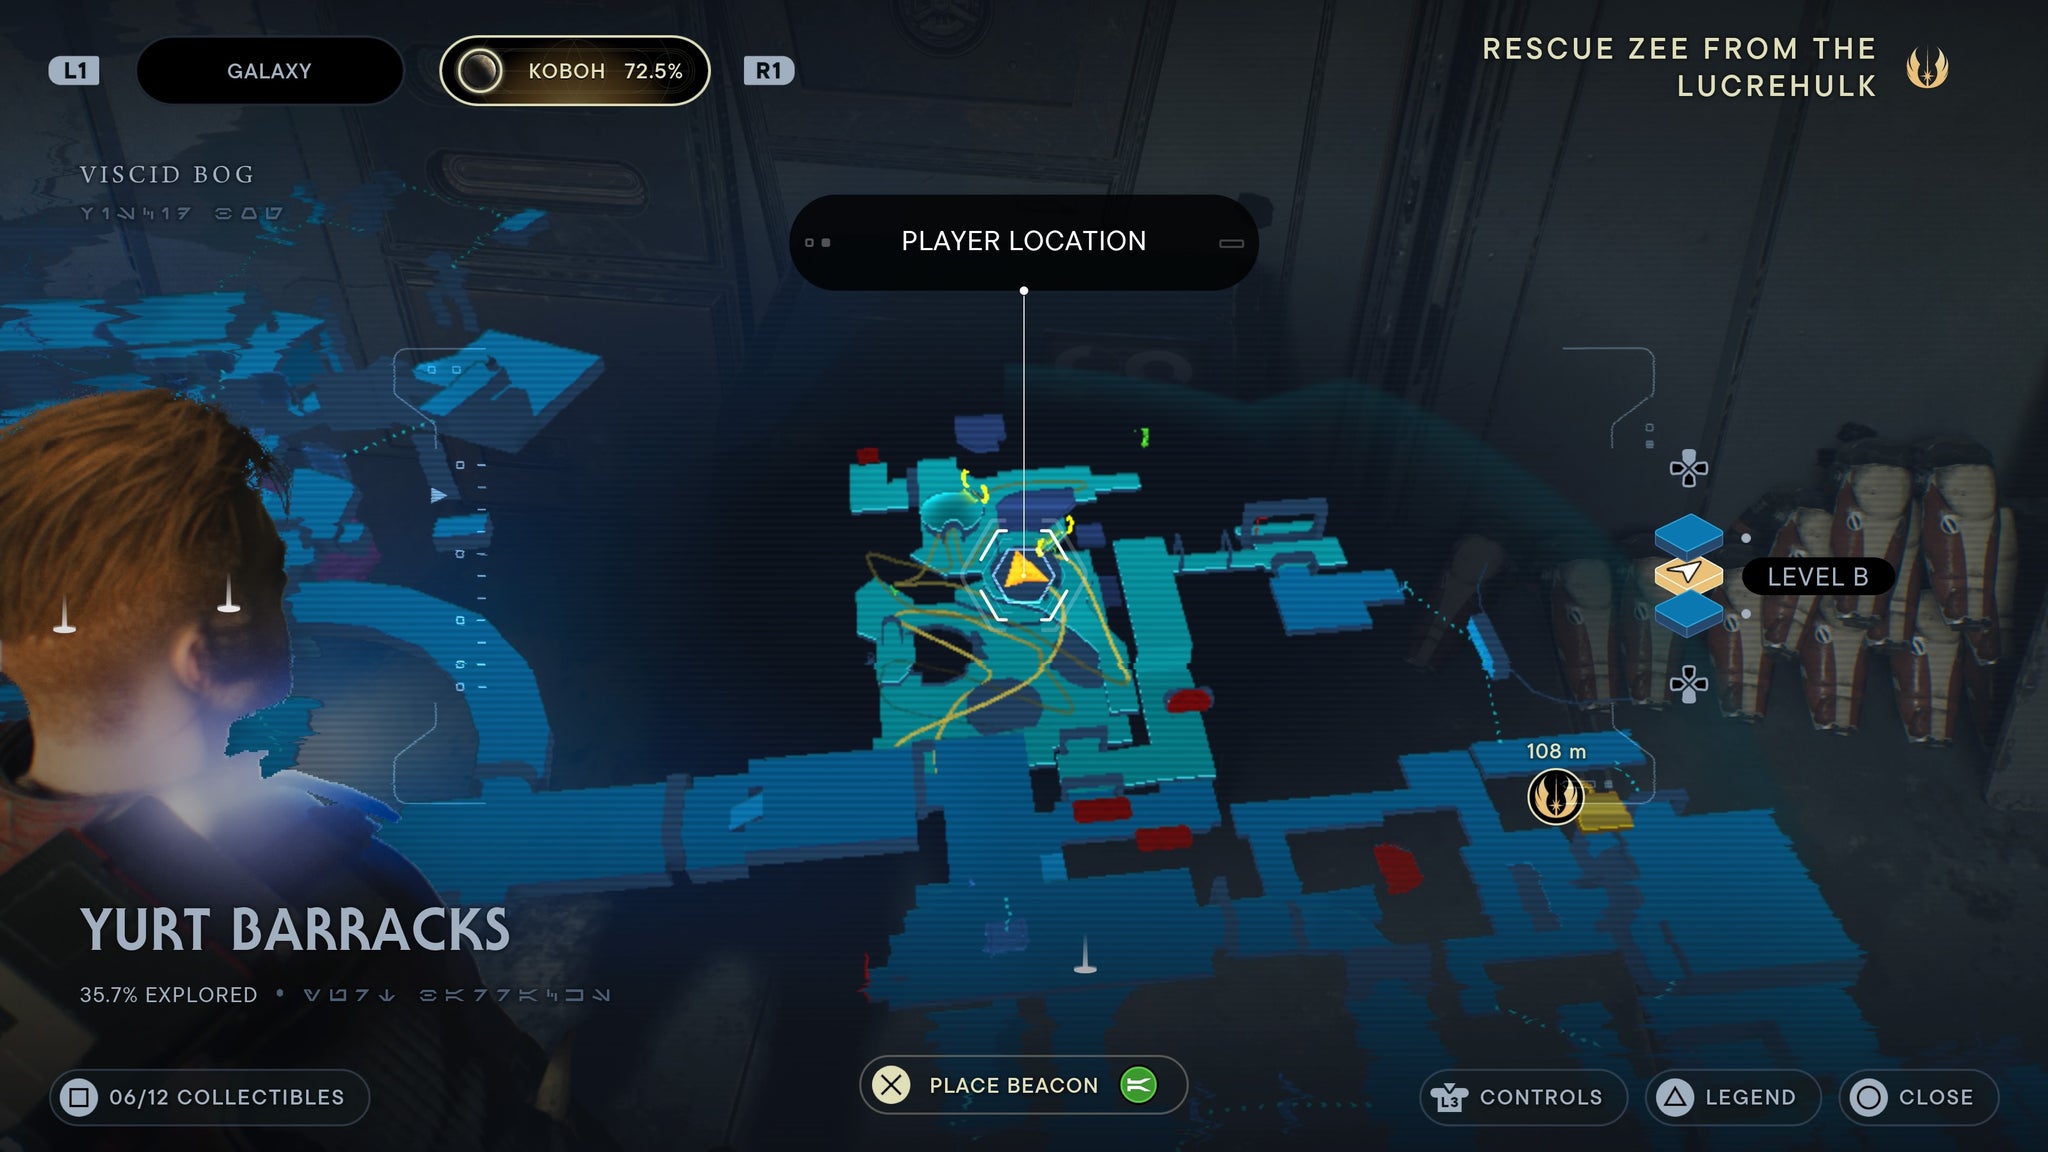
Rush forward and you’ll miss it!
Coated Metal BD-1 Material
Requires for lift and slam. Located in the Flooded Bunker. Enter the warehouse in Southern Reaches, take out the turret, then drop down. Swim into the next room, then climb up the vines. Turn around, raise the platform, then jump across. Here you’ll find a chest.

Next to another chest!
Two-Tone Metal BD-1 Material
Located in the Chamber of Fortitude. Once you kill the boss, look right of the entrance for a locked chest.
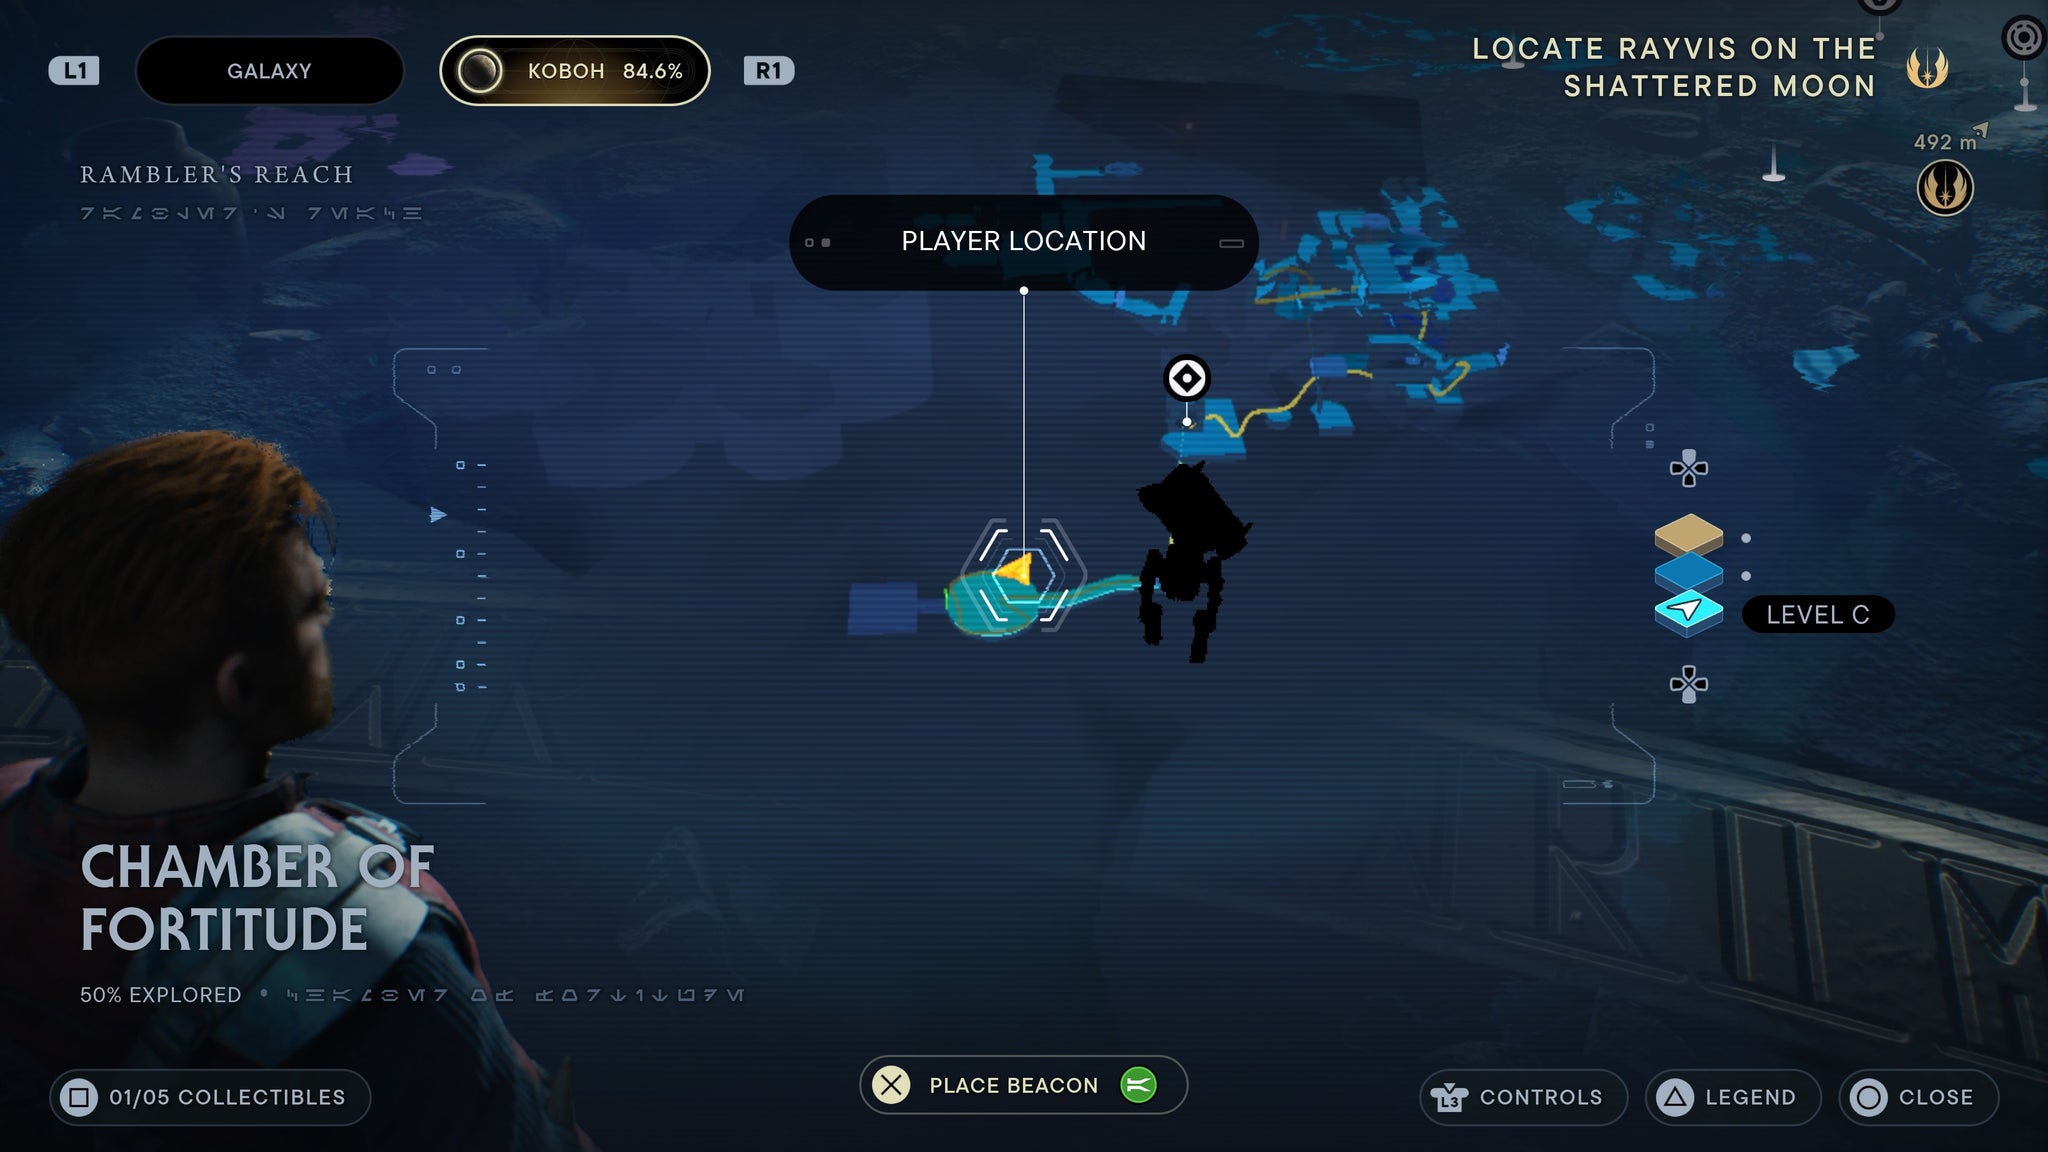
One of two main rewards for clearing the area.
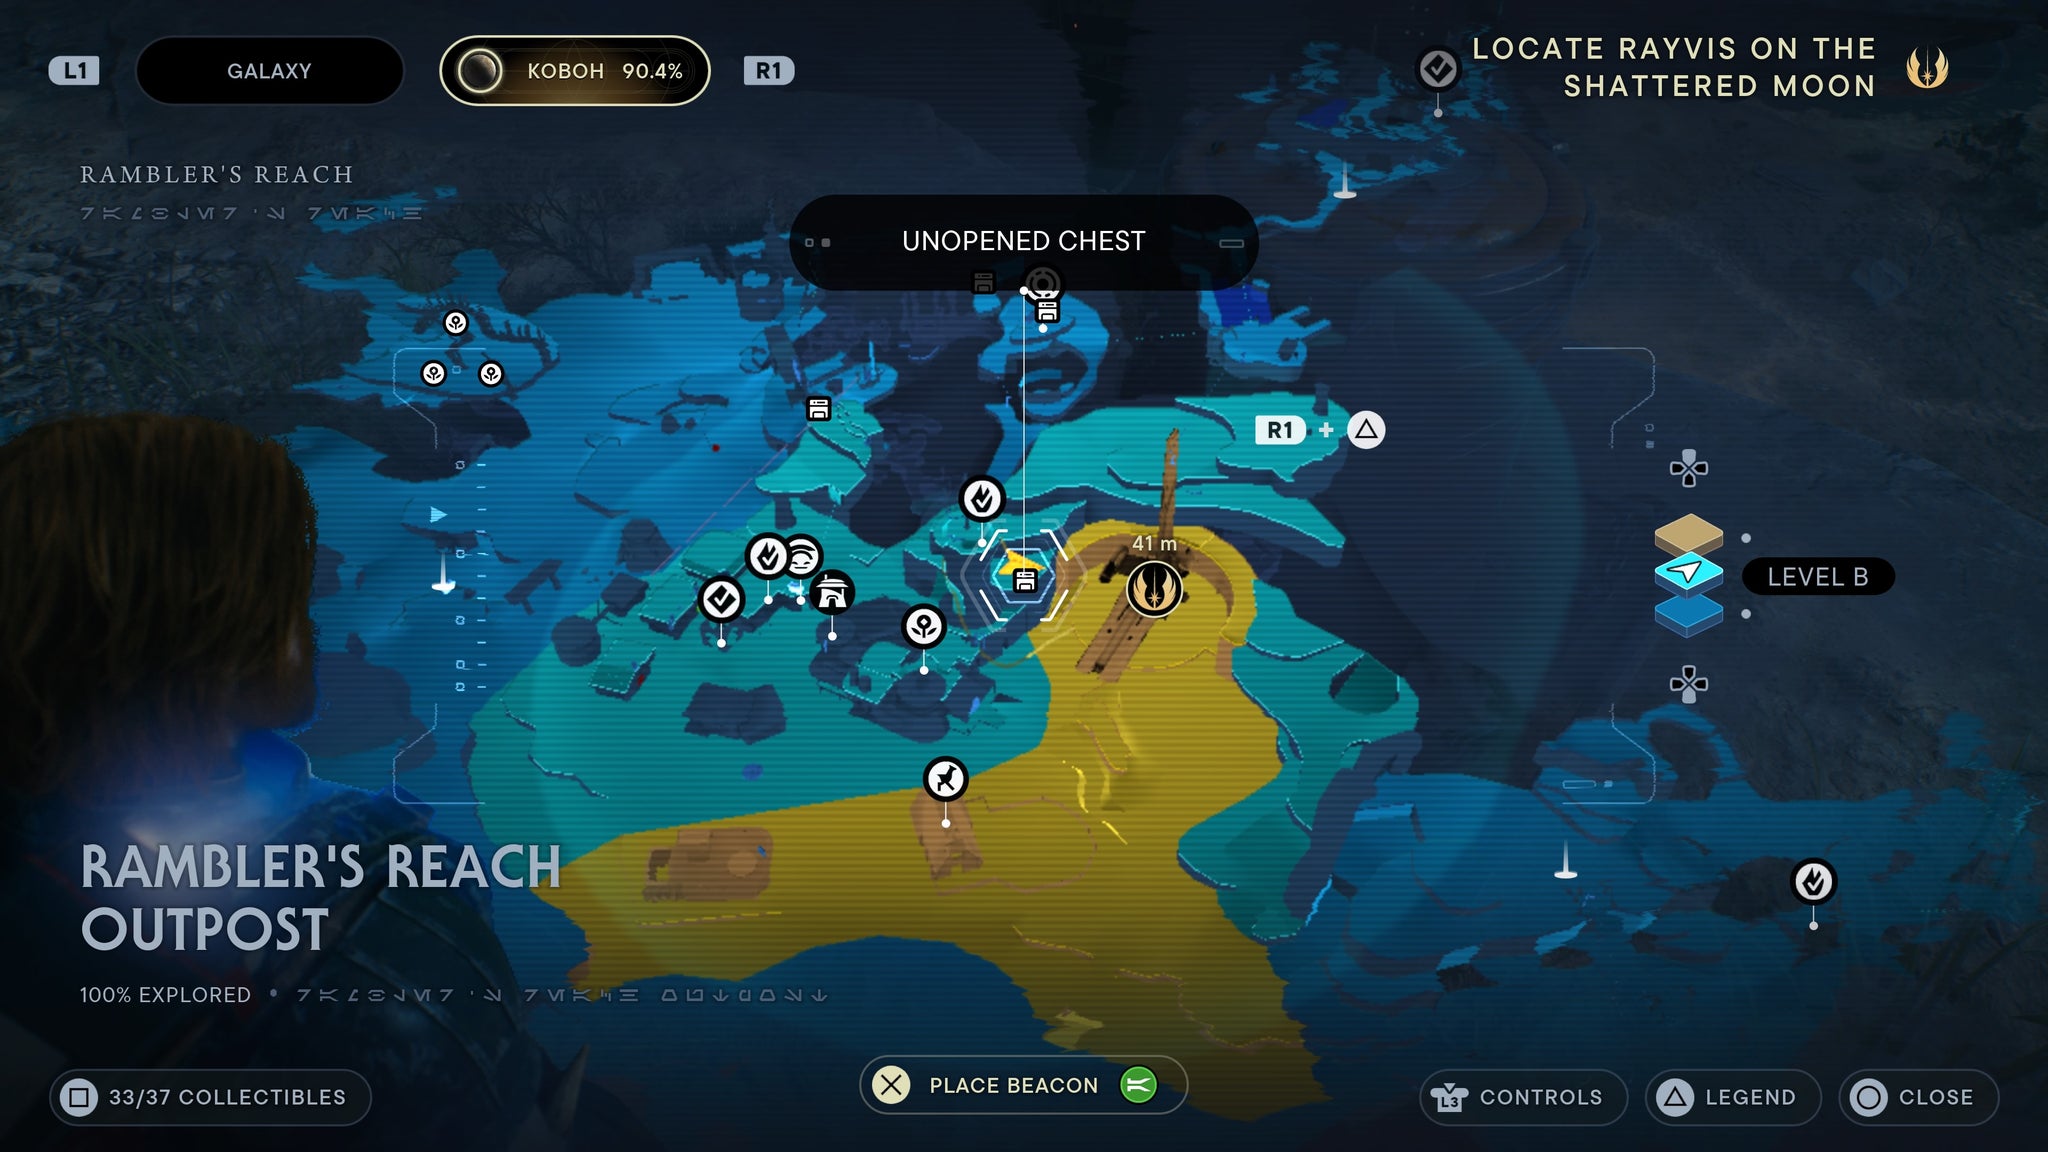
Unique Metal BD-1 material
Requires force lift and slam. Found in the Rambler’s Reach Outpost. Make your way to the stables and climb up the higher window. Use force lift to open up a hatch, then drop down for a chest.

Nekko jump up into the upper floor, then drop down.
Scrapyard Audio Sensors
Requires force lift and slam. Found in the Mountain Ascent. Make your way to the upper platform where multiple storm troopers can be found. Look right and wall run across towards a set of walls you can jump up. At the top, you’ll find a chest you can slam open.

Wall run up and slam it open!
Rebel Paint BD-1 material
Requires force lift and slam. Found in the Rambler’s Reach Outpost. You can find a slammable chest on a cliff overlooking The Mantis.
Use the tower to make our way up.
Kashyyyk Paint BD-1 Material
Requires electro dart. Found in the Rift Passage. Make your way across the zipline and dash to the platform at the top. Use the dart to activate the machine to your left, then open the chest below.
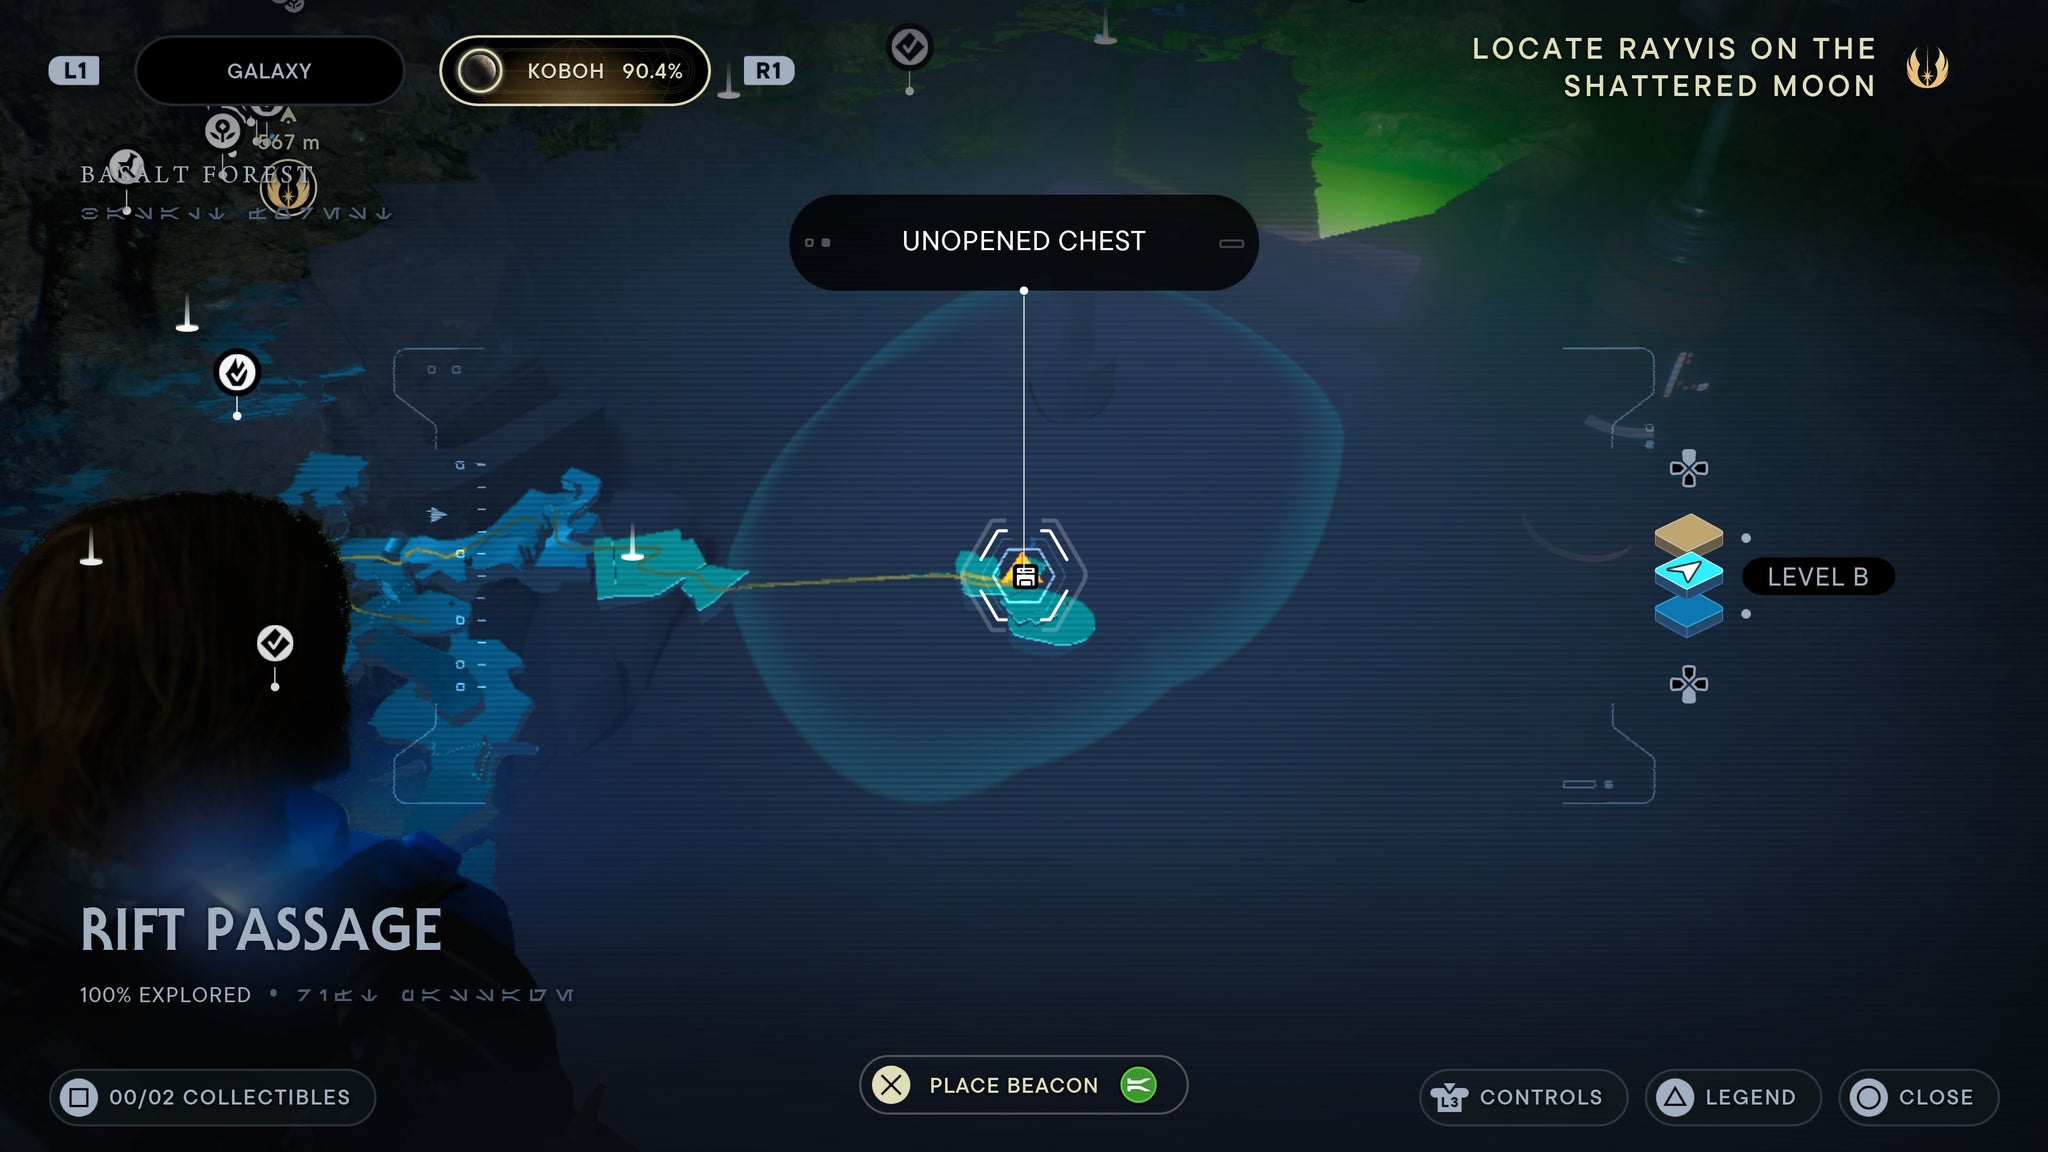
Shoot the dart and the chest will open.
Geonosian Photoreceptors
Requires force lift and slam. Found in the Lucrehulk Core. Look left of the meditation point and you’ll find a platform you can lift up. Do so, then jump on it. Then, pull down the following platform and jump on that. Ride this back up and you’ll find a chest in a room at the top.
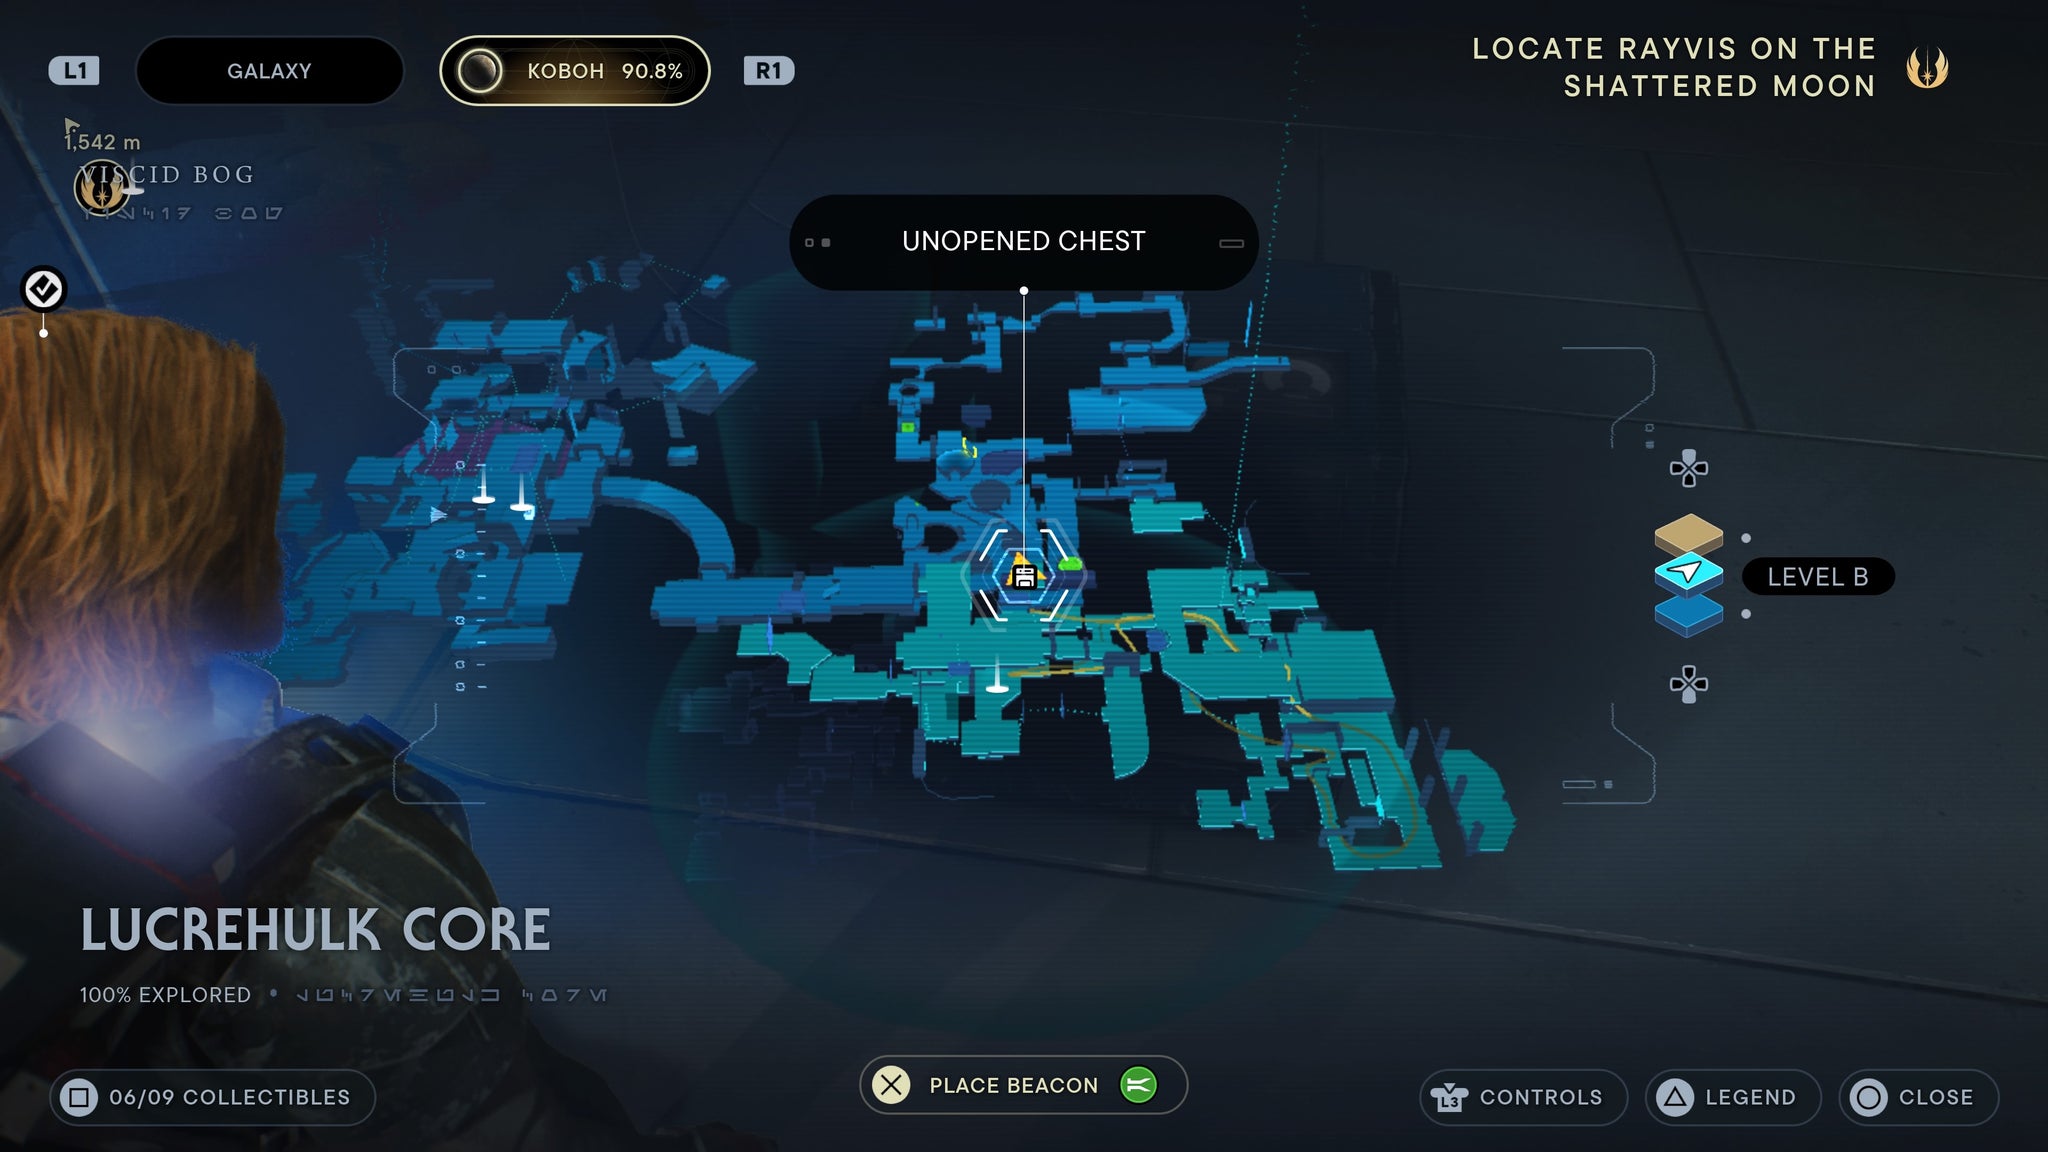
Be sure to pop back and get this once you can lift and slam.
Jedha BD-1 Parts
Nocular head
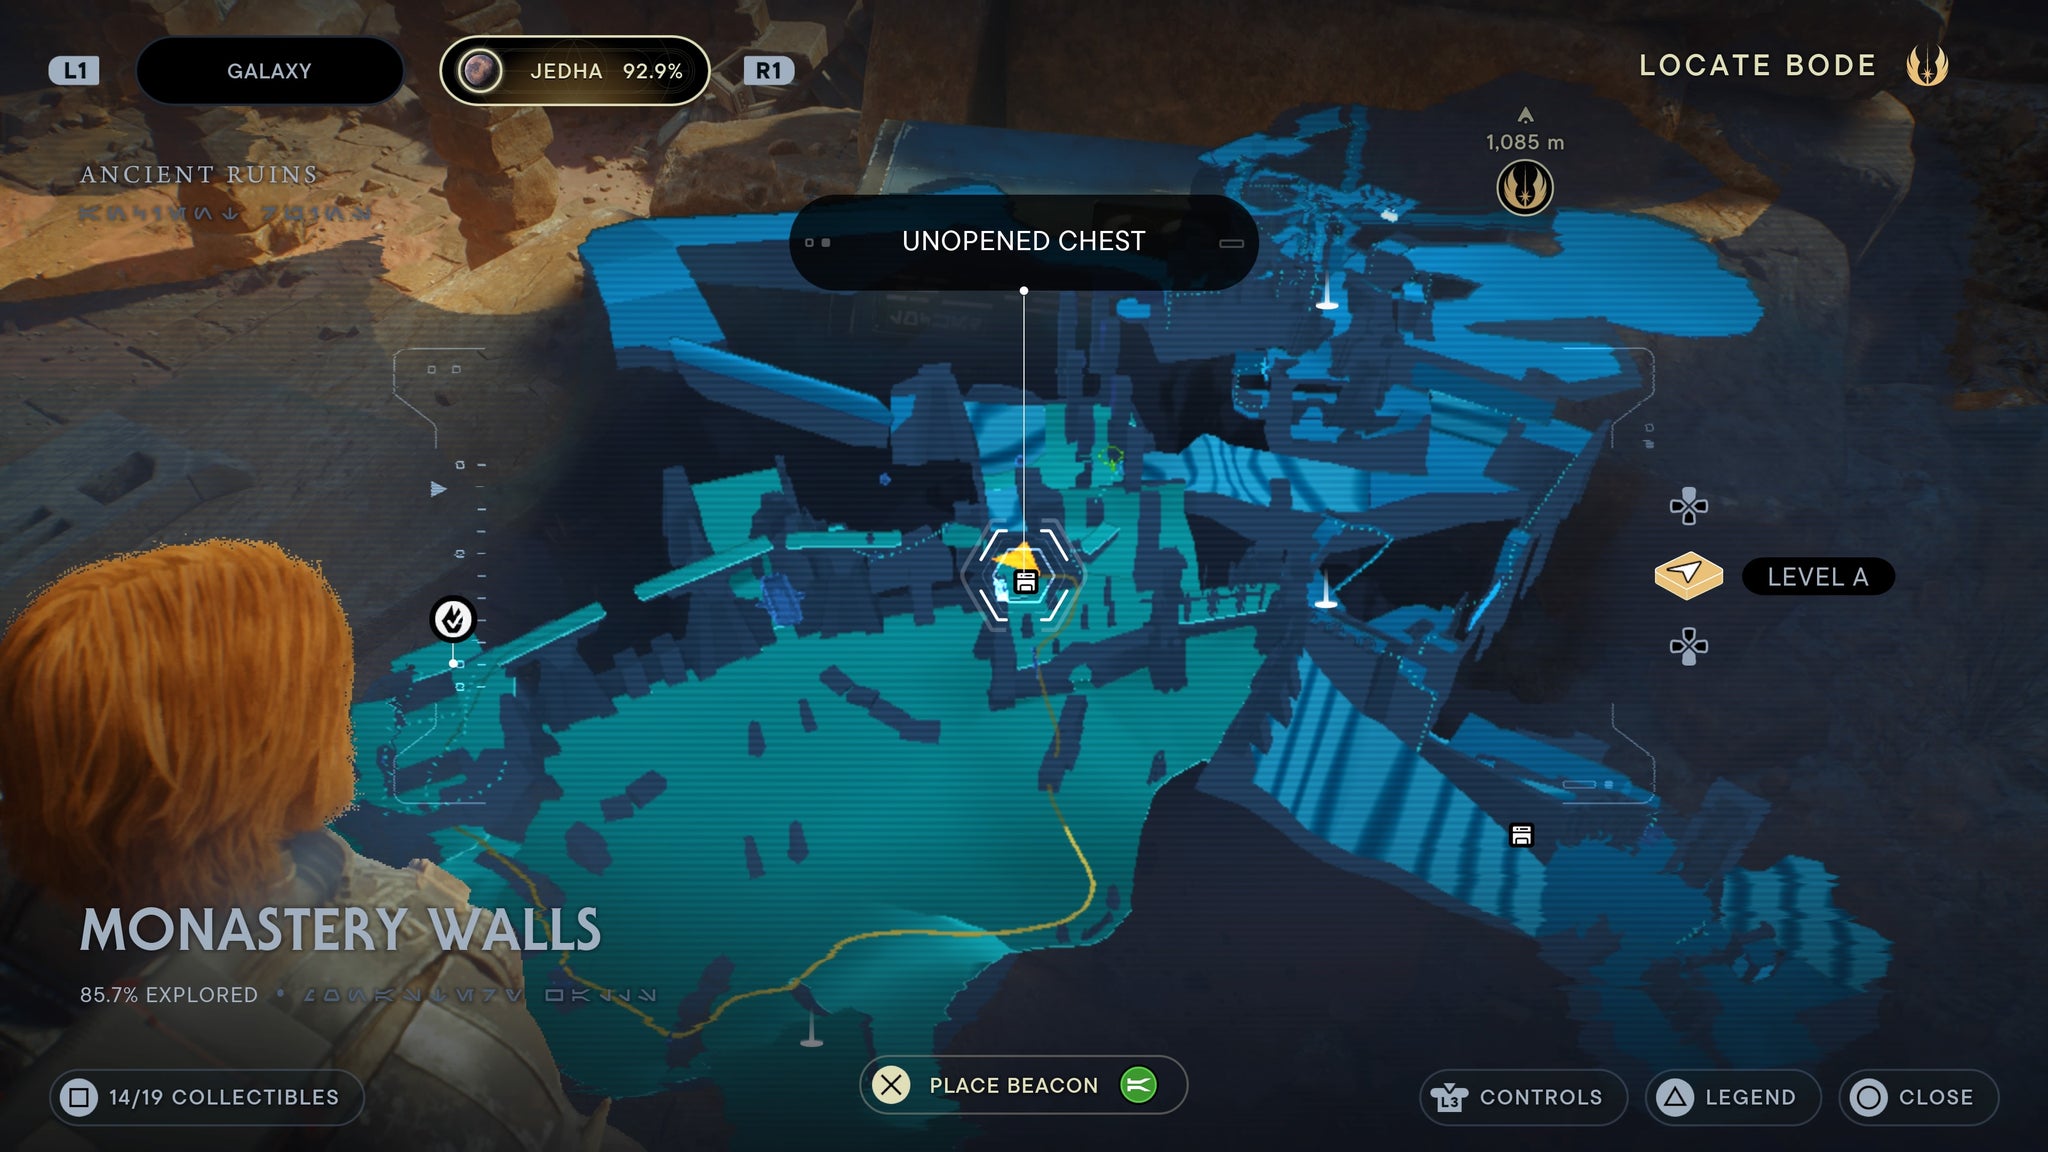
Found in the Monastery Walls. Enter the building to the left of the meditation point, and climb up to the second floor via the grapple point. Walk across a beam, then wall run into a hidden room with a chest.
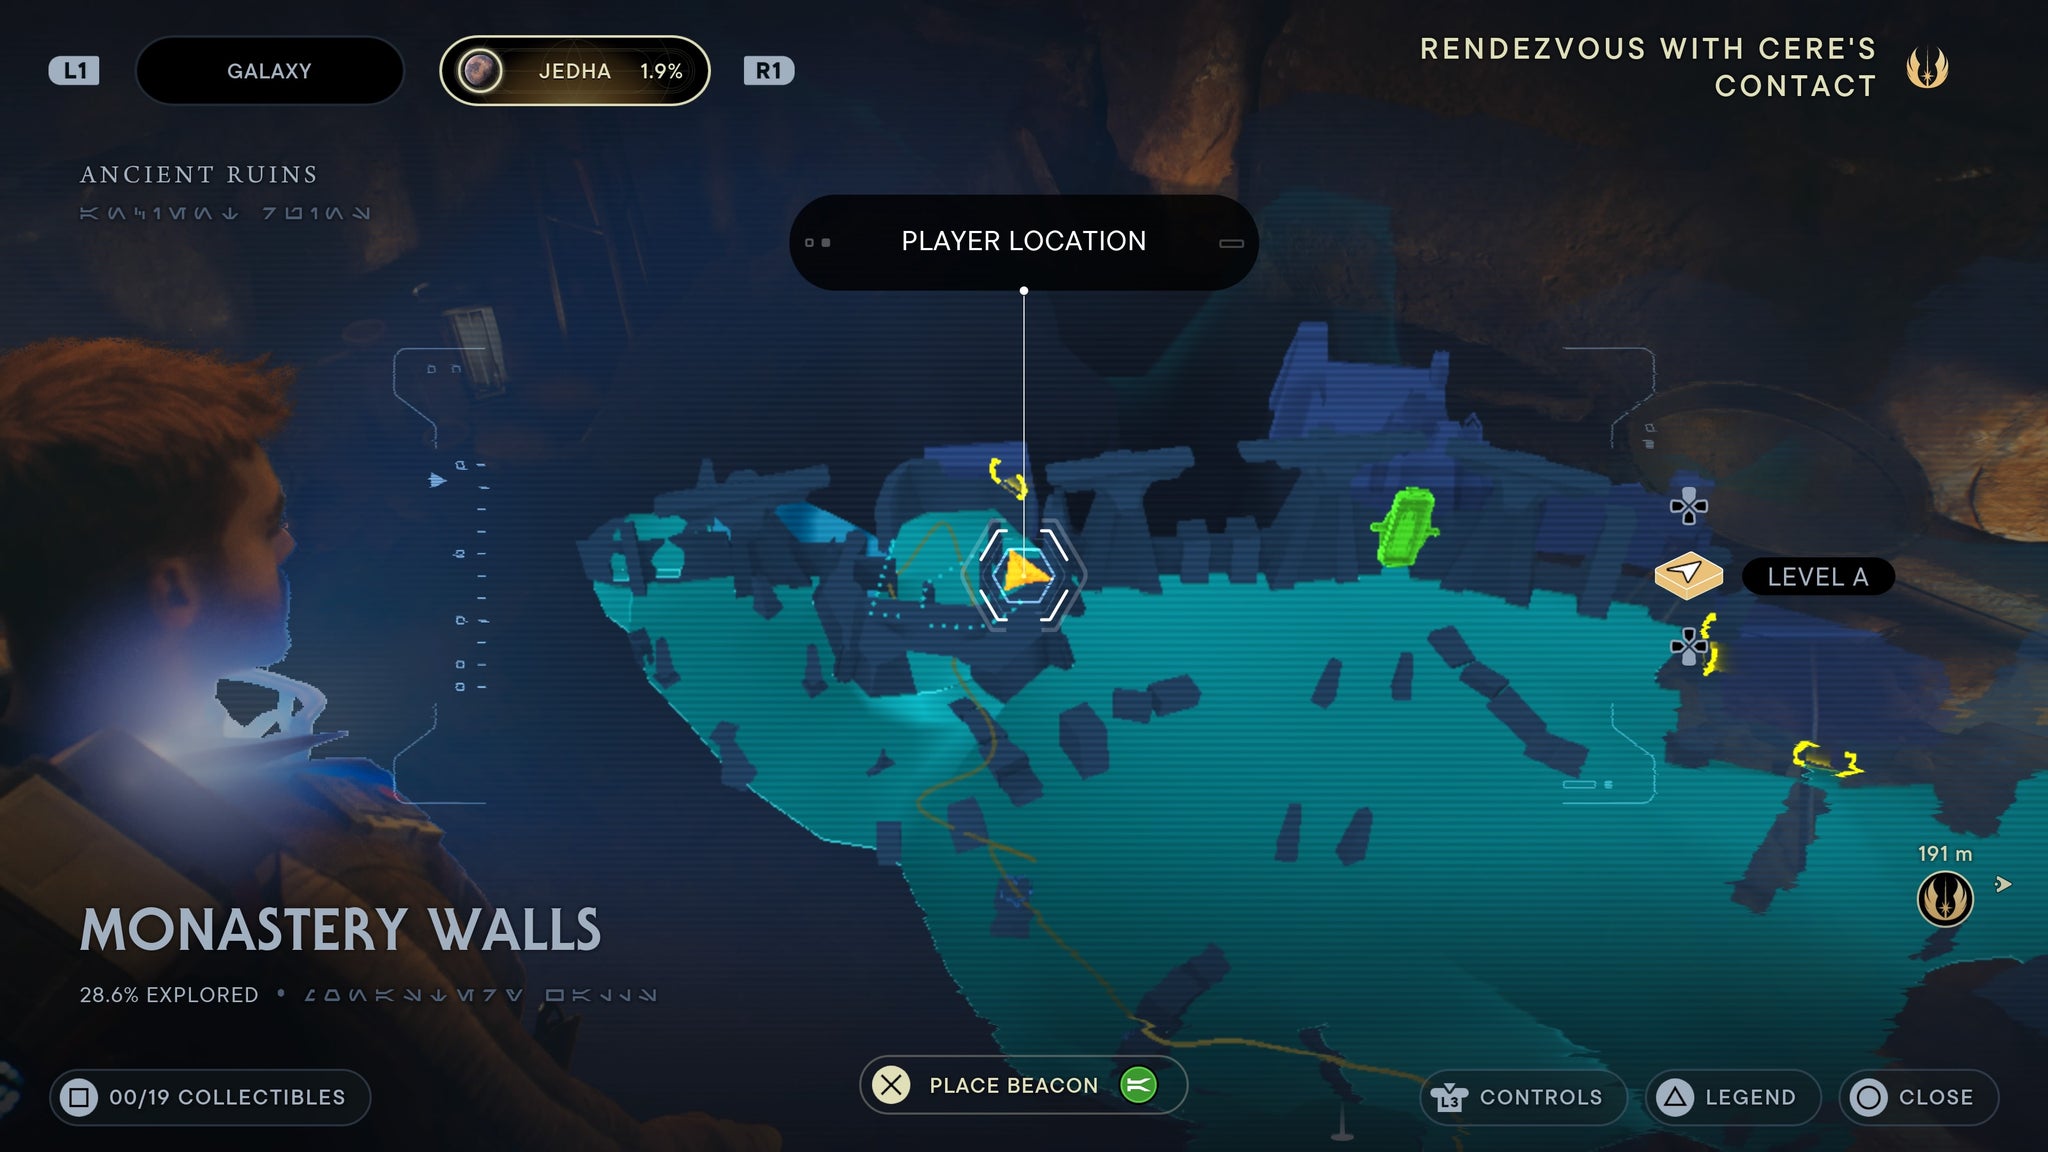
In a dark room.
Nocular Audio Sensors
Found in the Monastery Walls. Walk right from the meditation point and enter the building filled with storm troopers. Inside is a chest.
Inside the building filled with troopers.
Common Plastoid materal
Found in the Halls of Ranvell. In the room with the workbench and several storm troopers, There’s a chest right of the workbench.
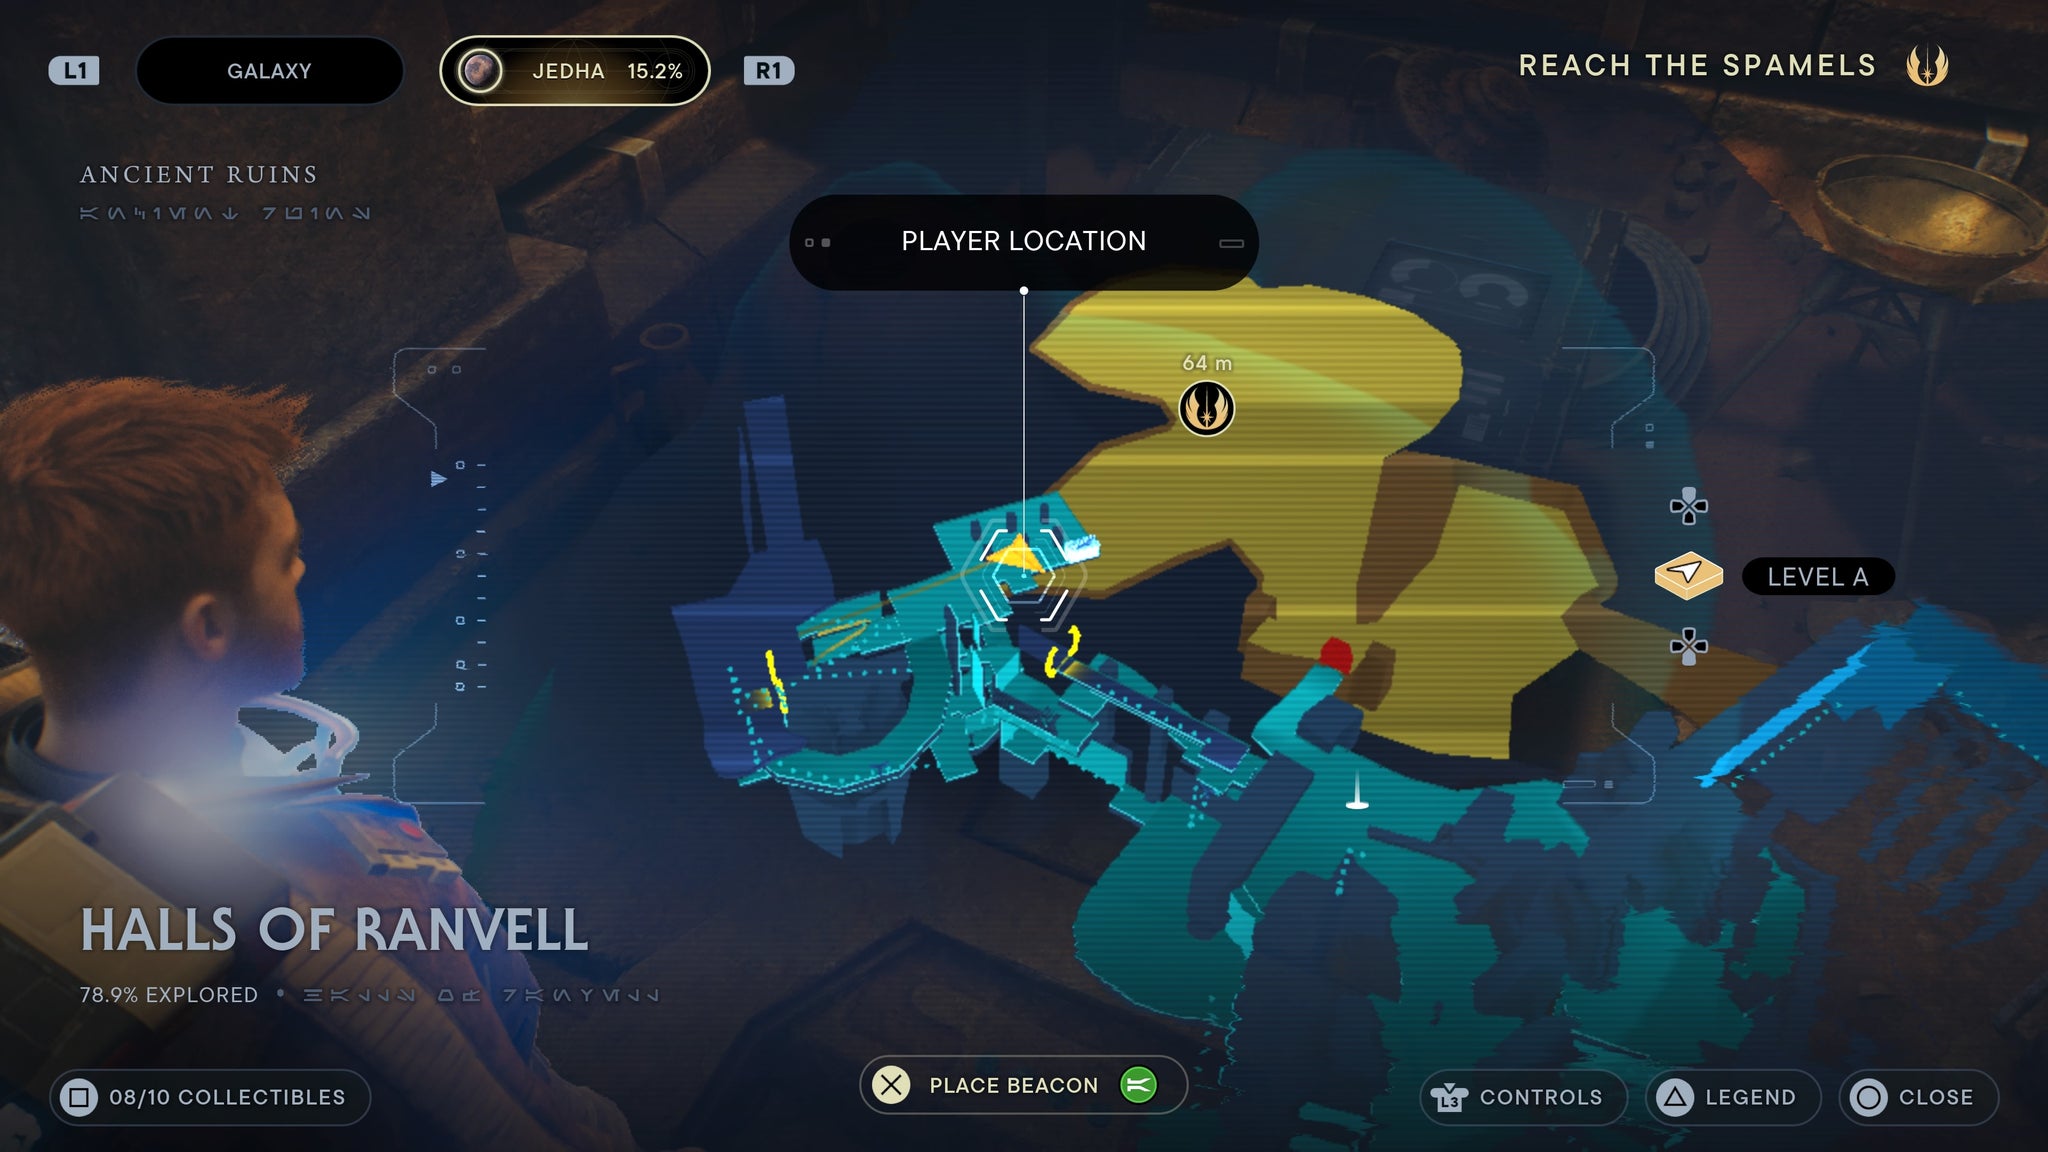
Next to the workbench.
Solar BD-1 (all parts)
Found in the archives. From the workbench, take the elevator up, then descend to the bottom floor of the room it takes you to. Walk into the speeder garage, and you’ll find a chest to your right.
to the right of the speeder garage.
Kaminoan legs
Found in the Desert Ridge. Right next to the Desert Ridge meditation point.
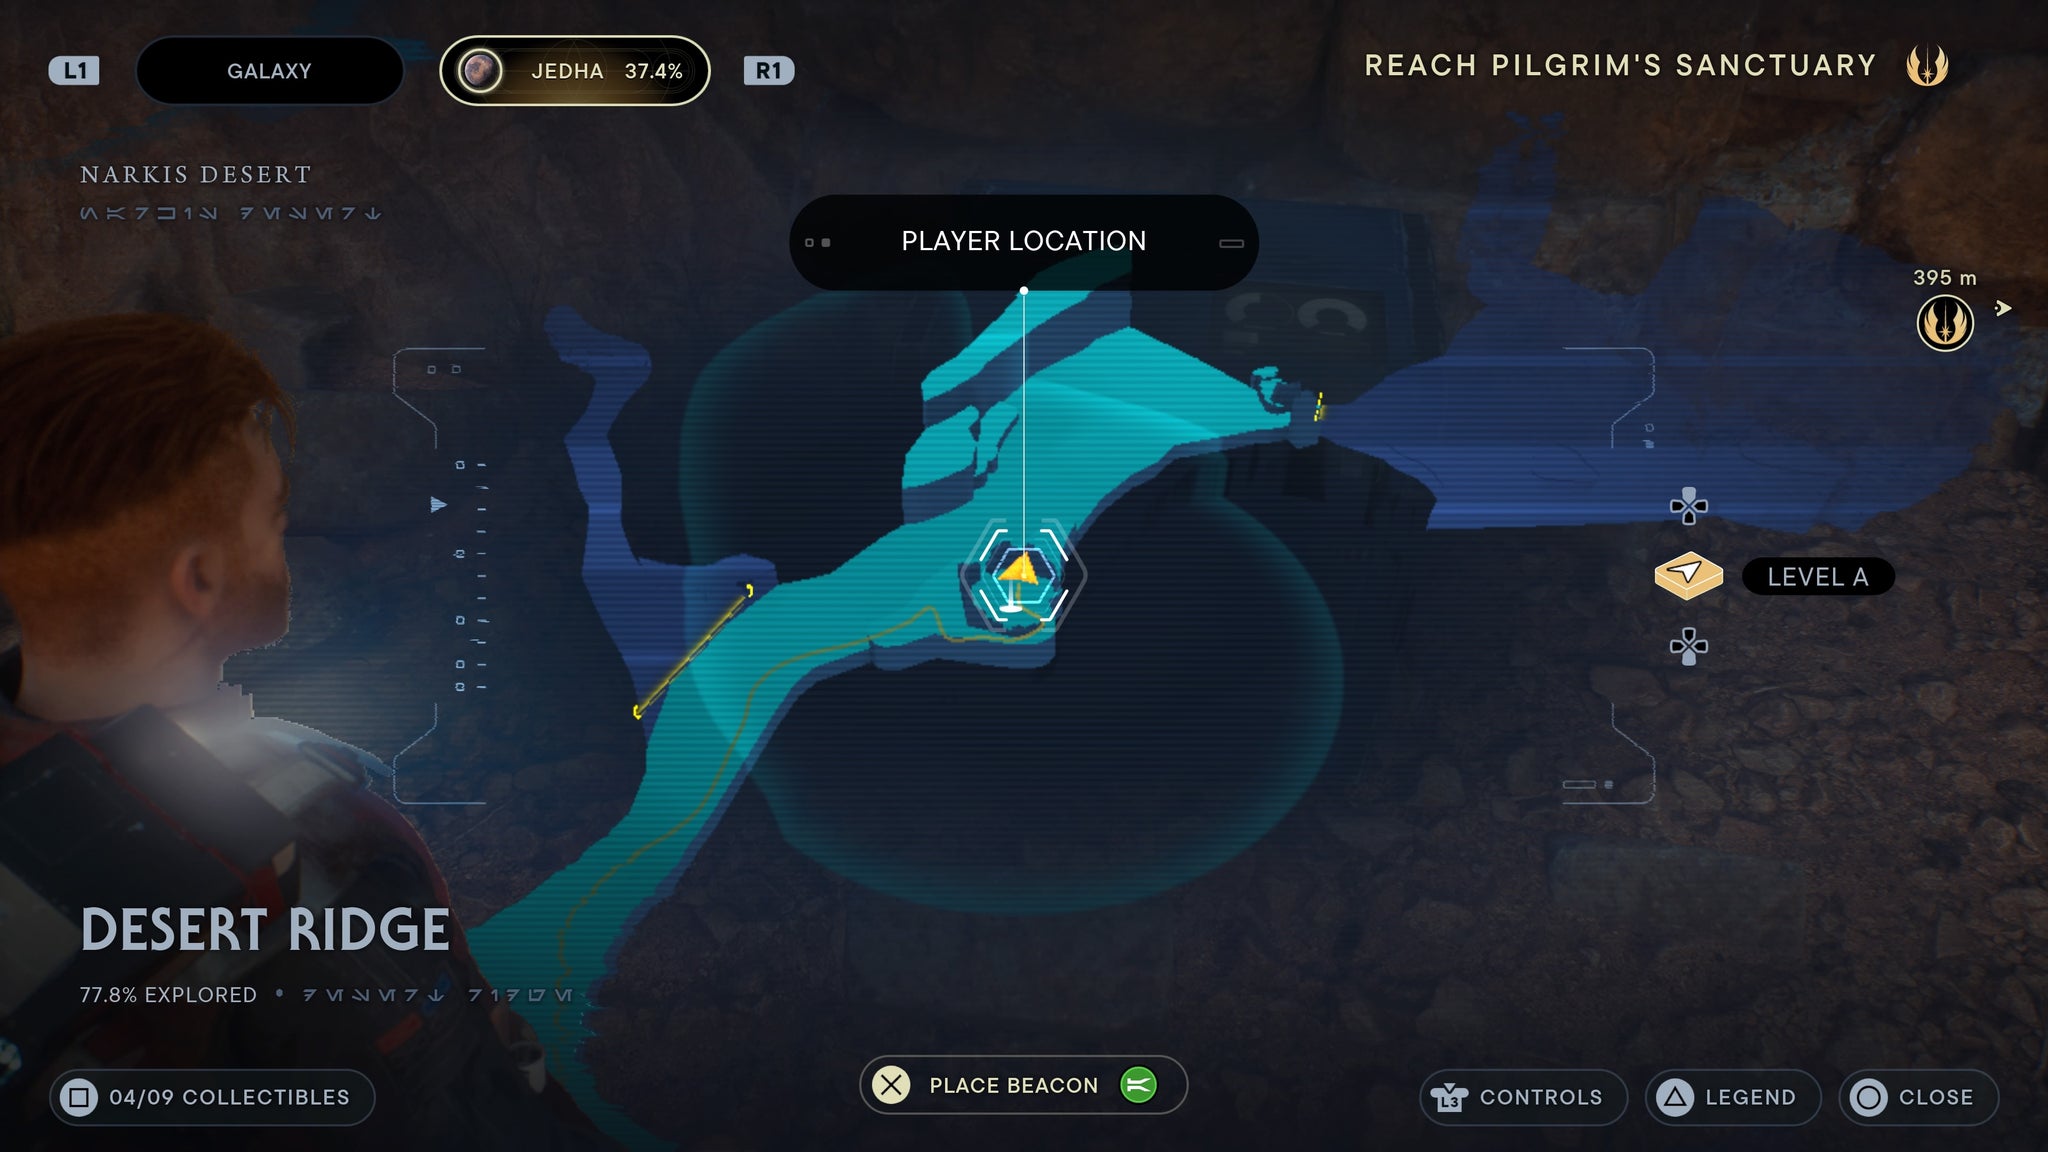
Right next to the meditation point.
Kaminoan Audio Sensors
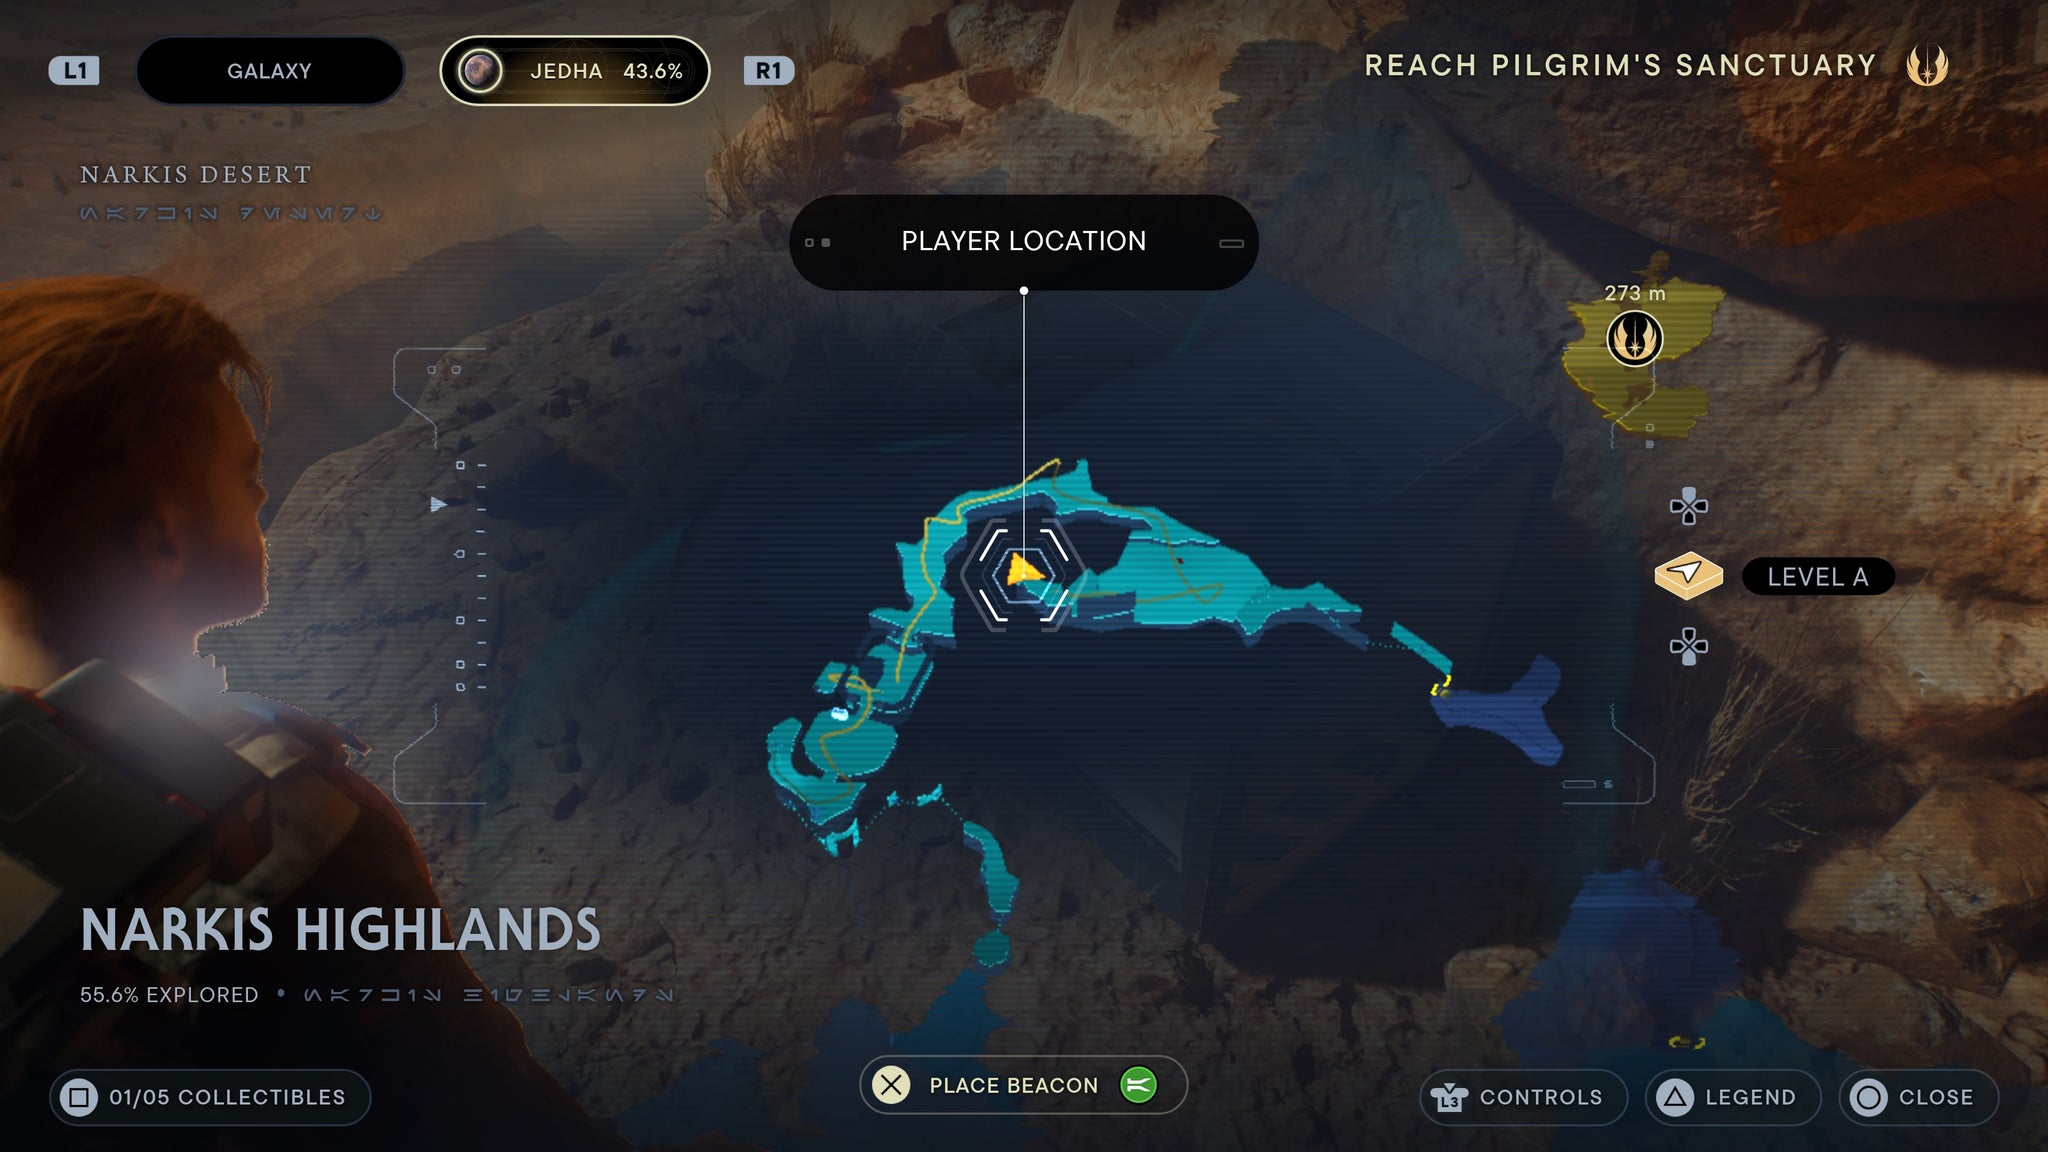
Found in the Narkis Highlands. As you enter the ruin, you’ll see a large block pulled away from the wall. Walk behind it, and you’ll find the chest.

In a hidden green room!
Jedha Paint Material
Found in the Narkis Highlands. From the arena where you fight the scorpion, turn right and jump up to a higher platform. There you’ll find a chest.
Overlooking a cliff.
Kaminoan Photoreceptors
Found in the Buried Refuge. Swim to the bottom of the large pool at the entrance of the Buried Refuge.
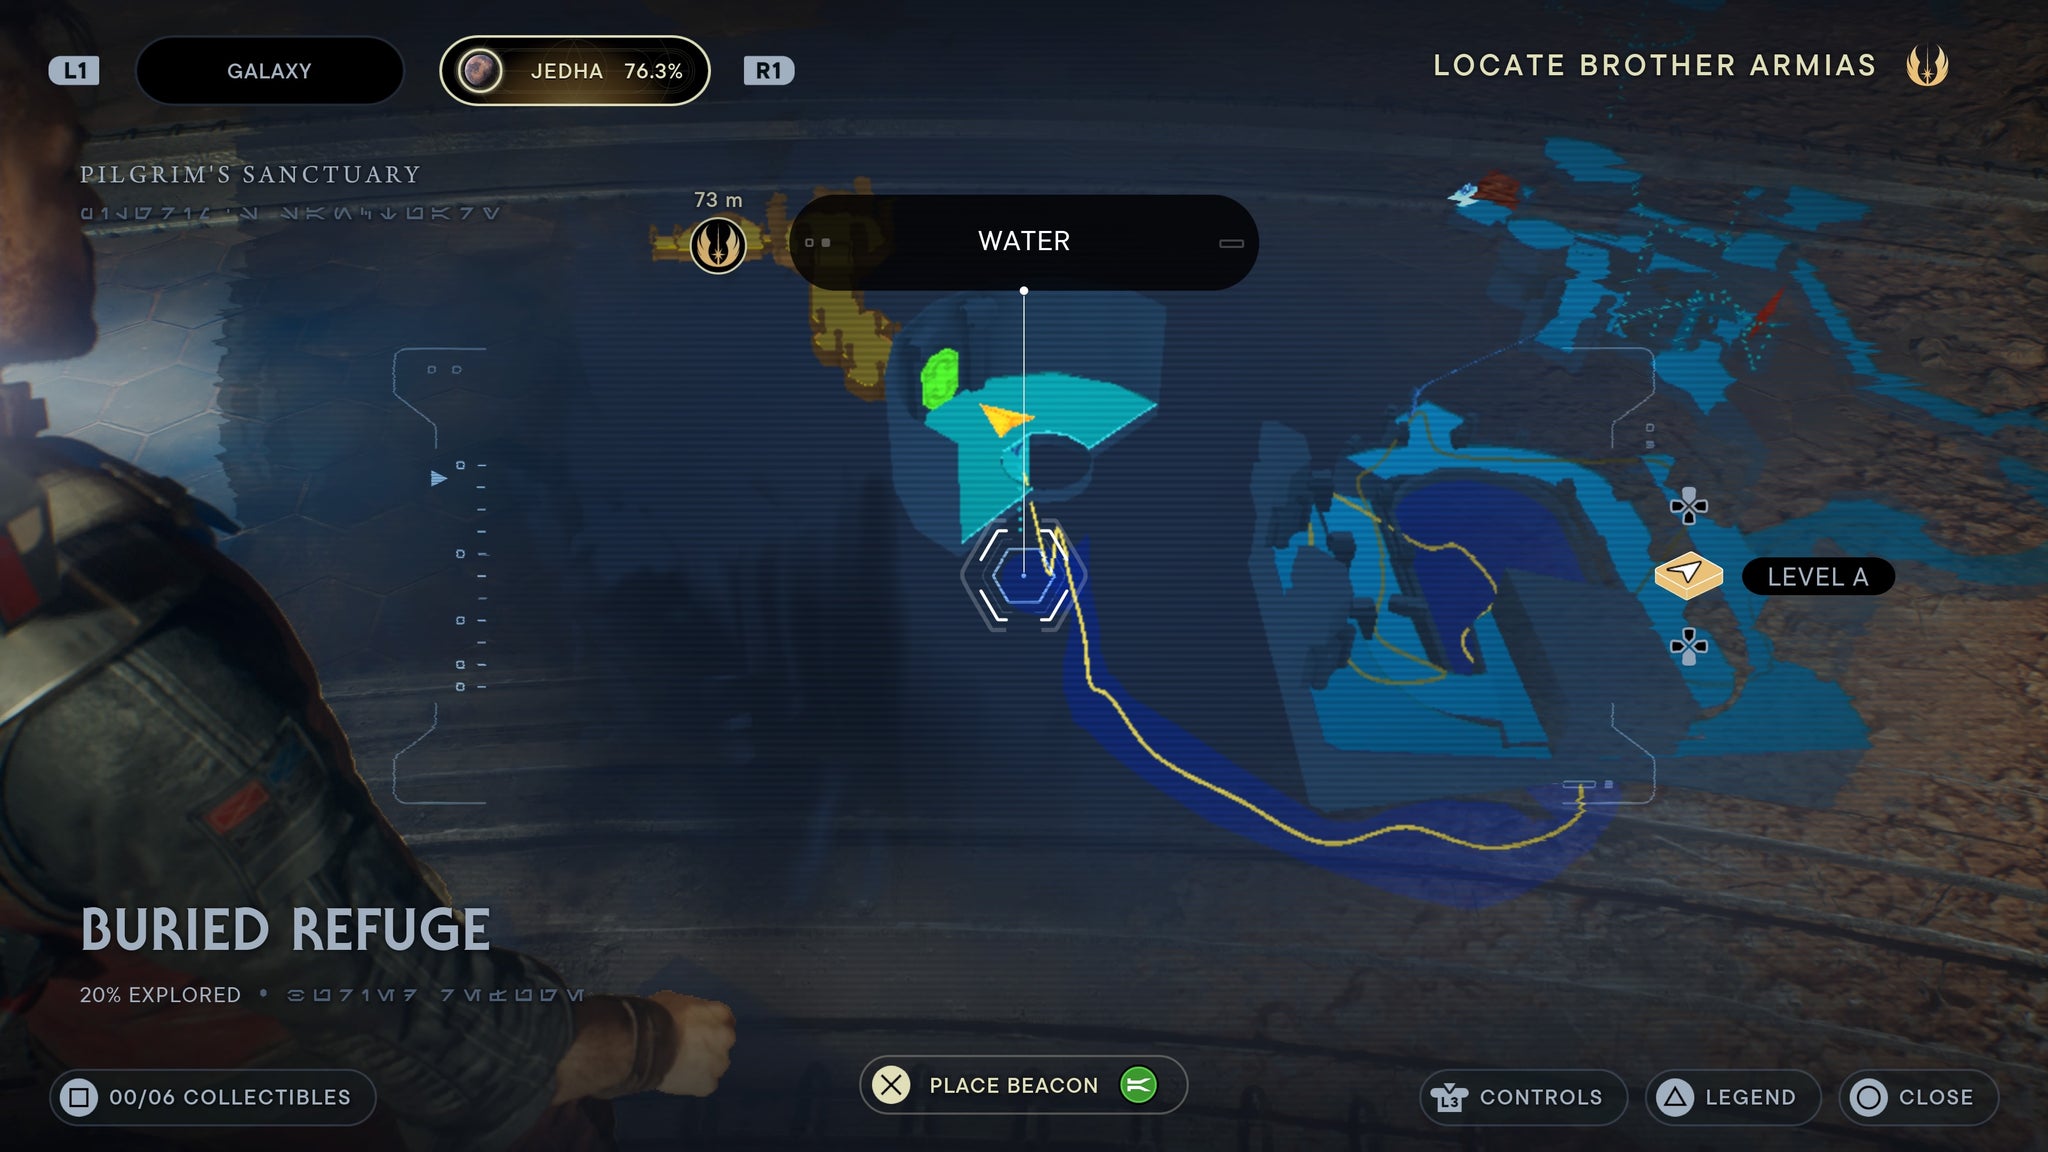
Under the water!
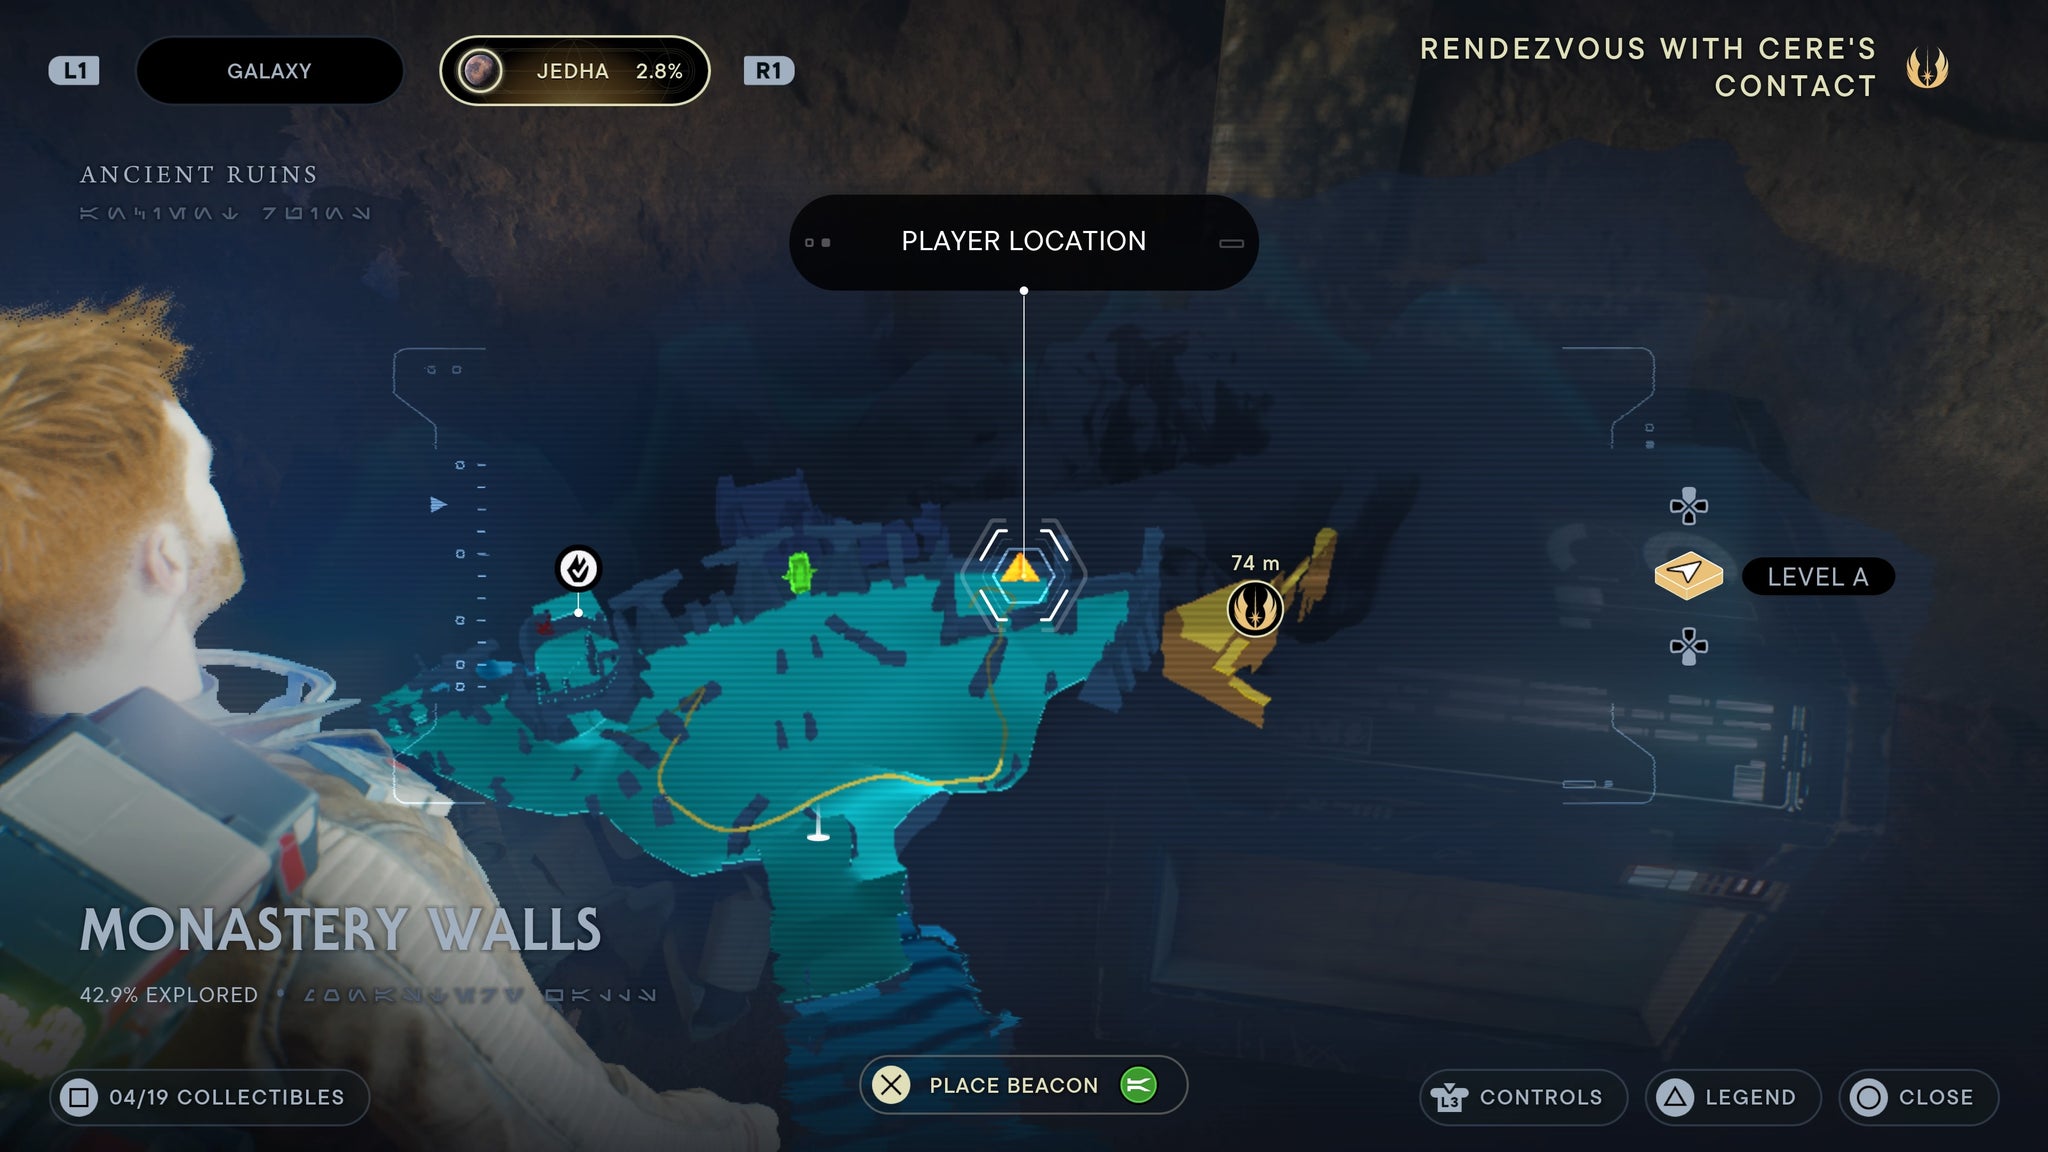
Nocular BD-1 Photoreceptors
Found in the Monastery Walls. Make your way to the workbench, then jump up to the floor above it. There you’ll find a chest.
Above the workbench!
Nocular Body
Found in the Penitent Chambers. From the walls you can run across, turn around and run back towards the start of the zone from the left side of the walls. Climb up into the corridor above, then take a right. You’ll find a chest overlooking the slide below.

Takes a bit of parkour, but not too tricky to find!
Industrial BD-1 (all parts)
Requires Balloon grapple. Found in the Path of Persistence. Use the grapple to make your way around the right of the path. Use the balloon to reach a small gap in the cliff wall where a chest can be found.
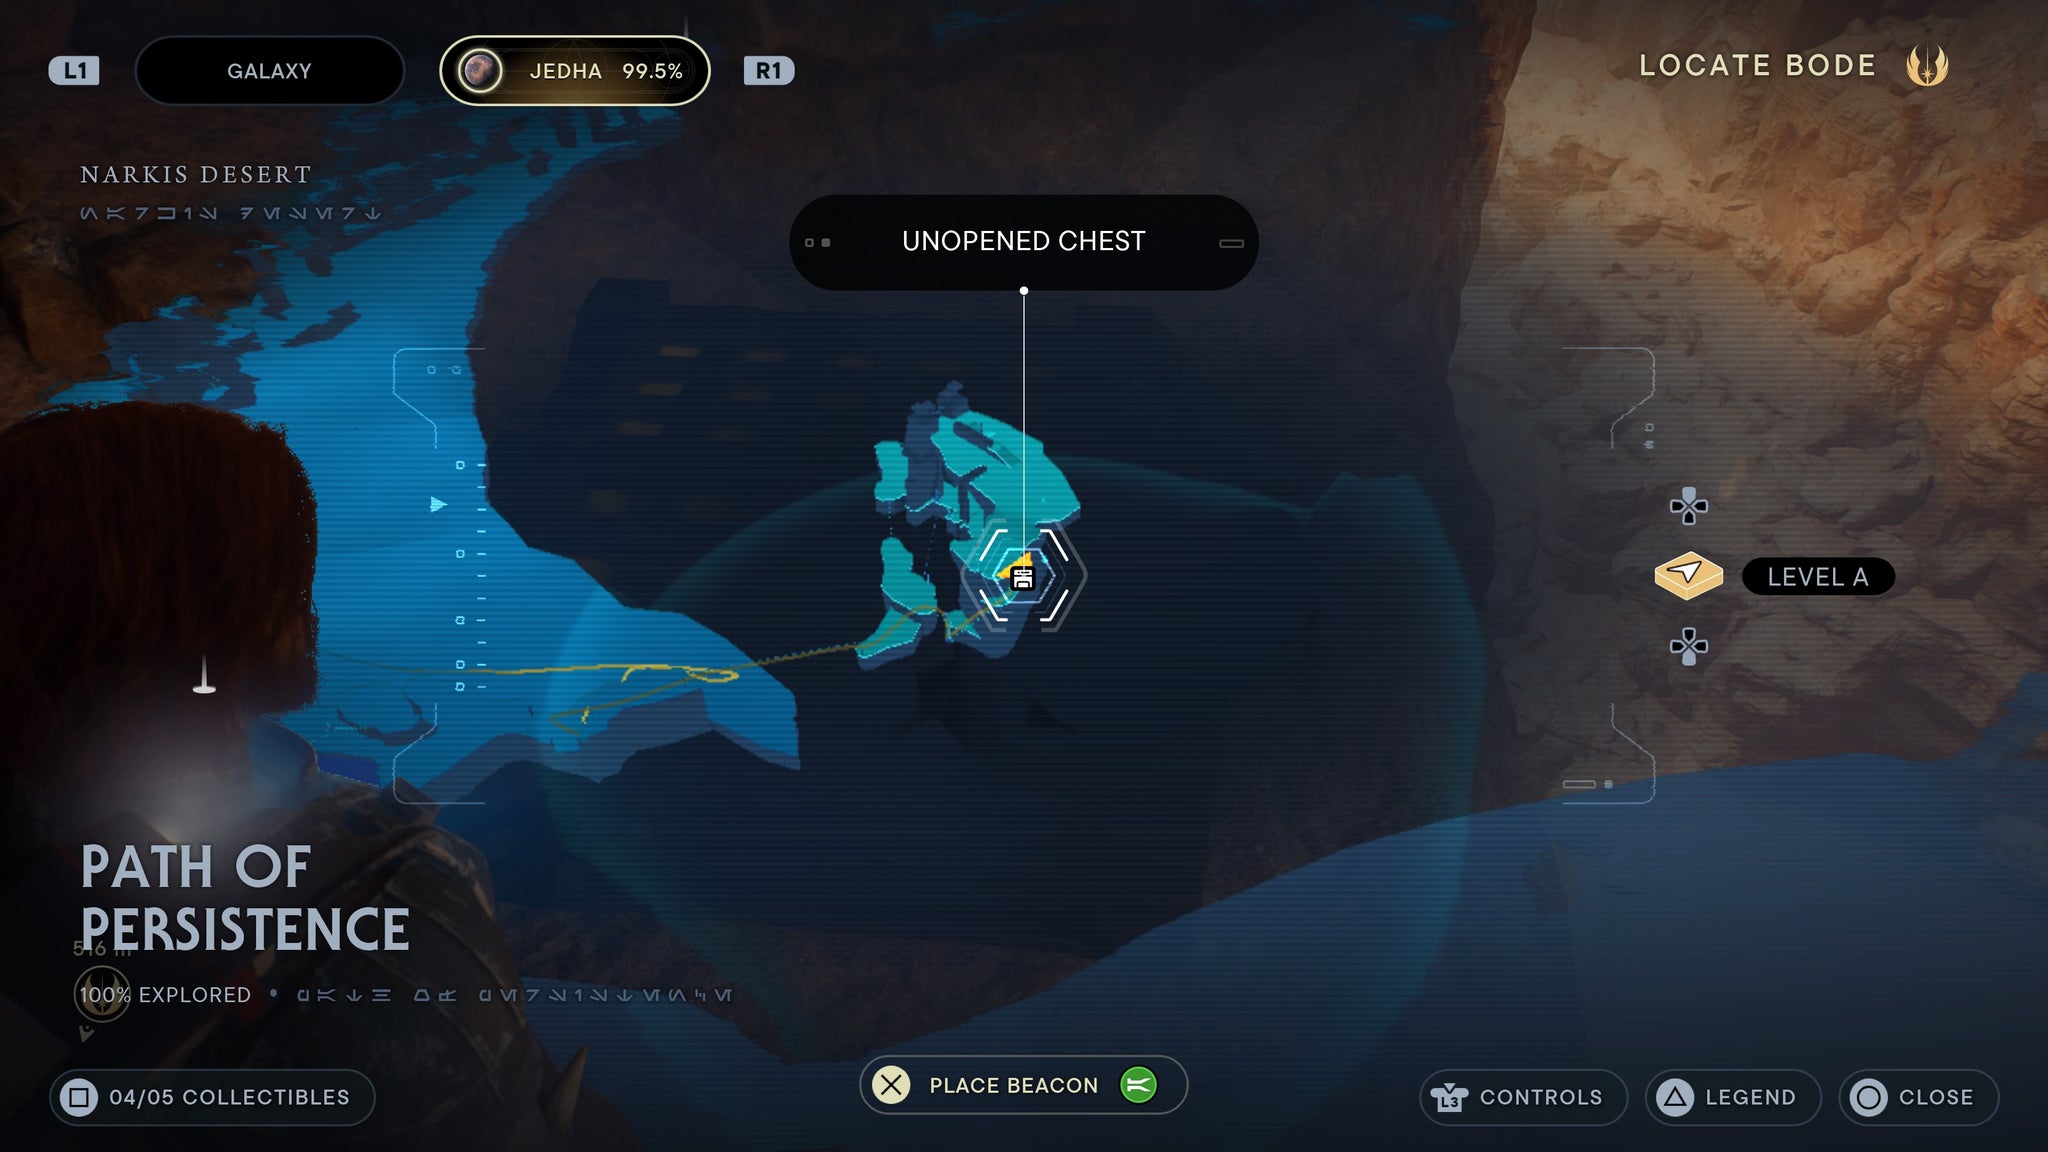
A full new look for BD-1!
Nova Garon BD-1 parts
Inquisitor Paint material
Found in the Hangar Bay Exterior. Enter the building then take a right. Climb up a wall down this path, and you’ll find a priorite shard. Turn around again and you’ll be able to jump up to a chest.
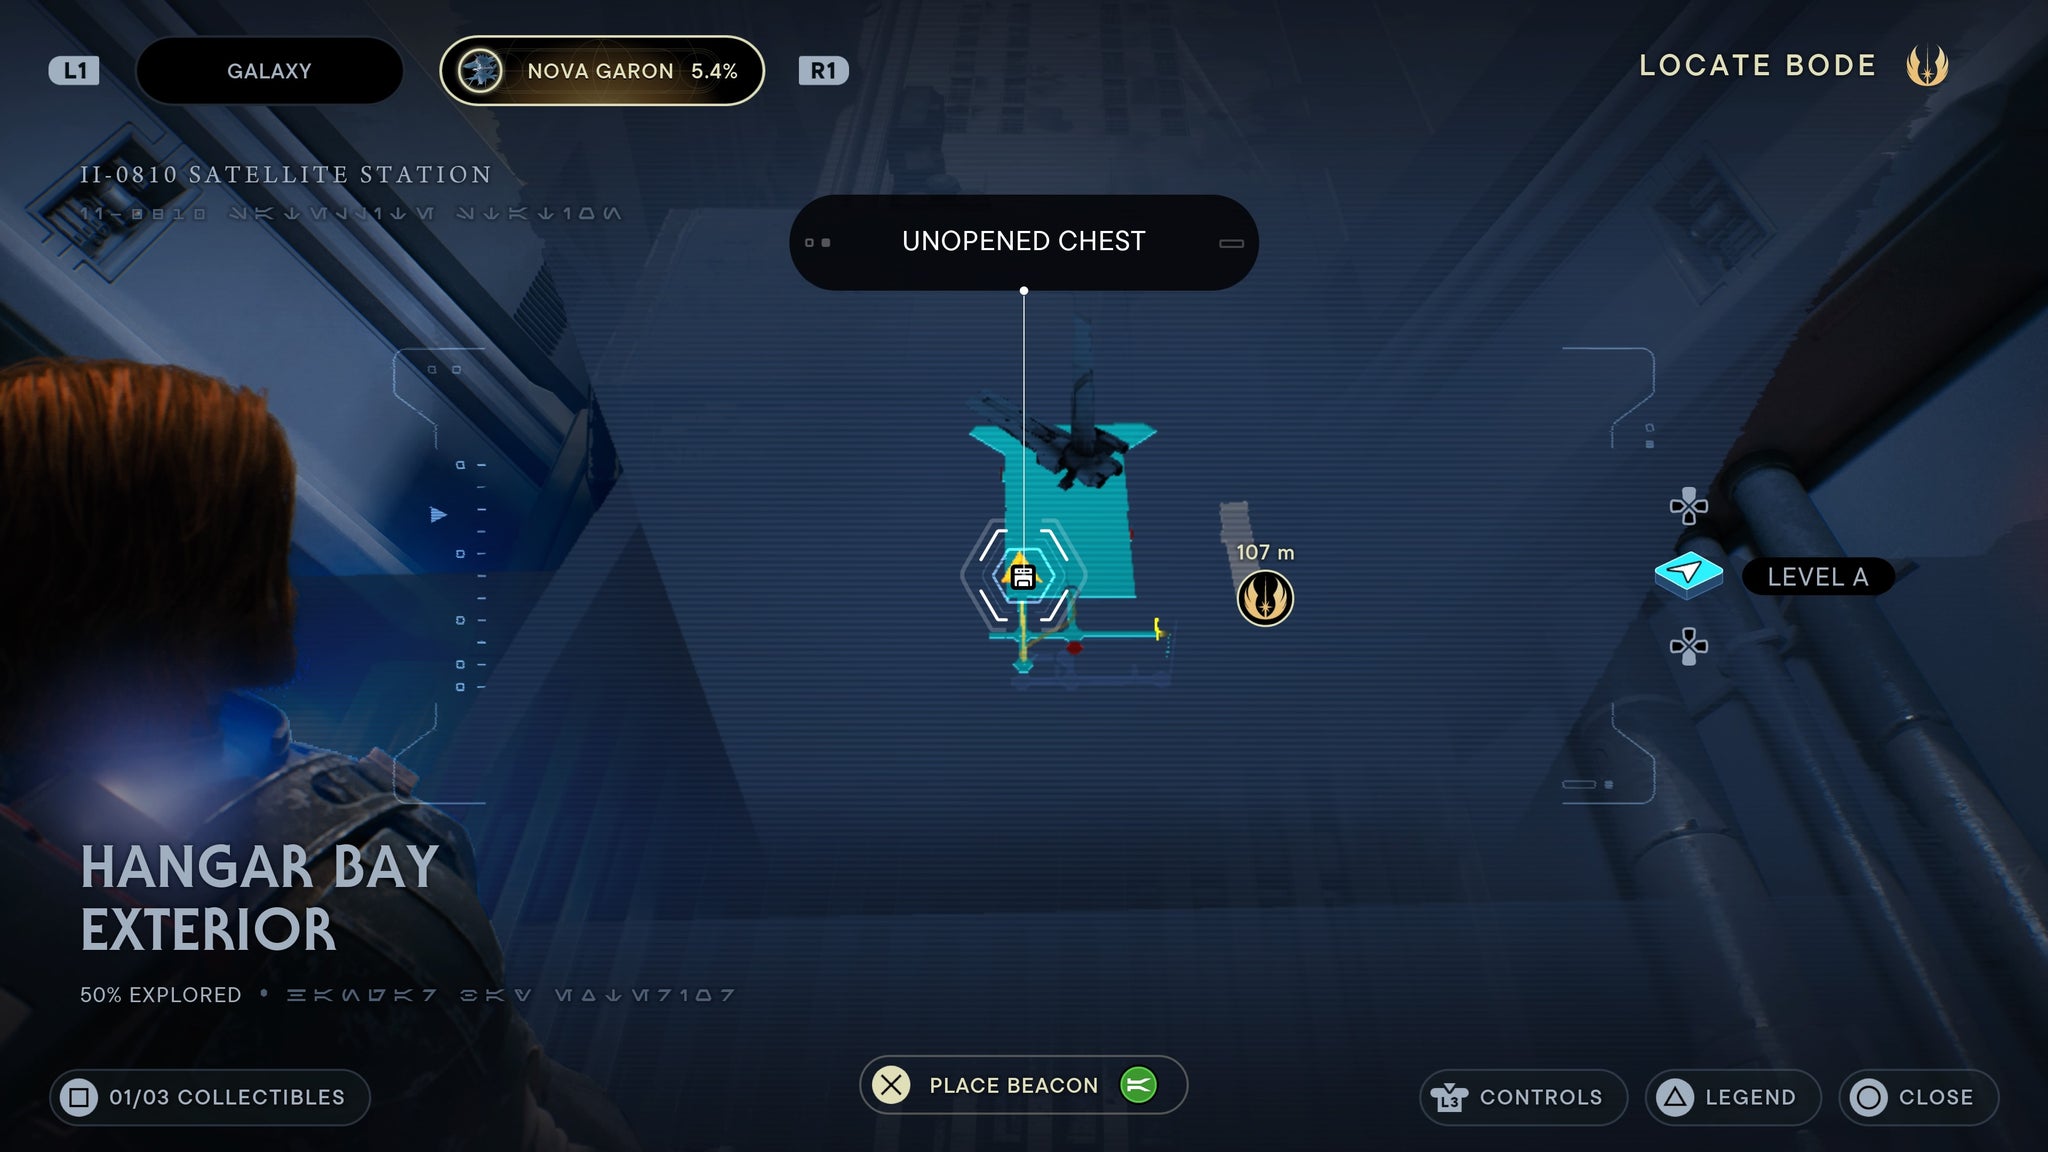
BD-1 is now fulled dripped out.
Star Wars Jedi: Survivor
Video Game
Sign in and unlock a world of features

