All Lightsaber parts in Star Wars Jedi: Survivor
All lightsaber part locations, including weapon materials, all in one guide with maps.


Star Wars Jedi: Survivor has been out for some time, and is packed full of lightsaber and blaster parts hidden across the game. Hidden in caves, buildings, and all manner of secret places. Once you track down these lightsaber parts, you’ll be able to customize your jedi weapon to your hearts content.
This guide will take you through all the lightsaber and blaster parts , their locations, as well as how to reach them. With each part, we’ve included a screenshot of the map so you can cross reference it with your own game.
Watch the launch gameplay trailer for Star Wars Jedi: Survivor here!
Star Wars: Jedi: Survivor all lightsaber part locations
The kind of lightsaber parts you can find are emitters, switches, pommels, grip and weapon material. You can, on occasion, find a whole new lightsaber hidden away. In this case, you’ll get a matching emmiter, switch, grip, and pommel at the same time.
Once you have a lightsaber part, you can equip it at any workbench in the game. These lightsaber parts have no influence on damage or player power. However, it’s my duty to inform you that if you use the white lightsaber crystal, you are a loser.
You can find lightsaber parts on each of the planets in Star Wars Jedi: Survivor . We’ve broken them down by planet below!
- Coruscant lightsaber parts
- Jedha lightsaber parts
- Shattered Moon lightsaber parts
- Nova Garon lightsaber parts
Coruscant lightsaber parts
Patience Emitter
Found on the Rooftops. As soon as you drop down and gain control of your character for the first time, walk forward and open the blue chest next to the scannable door.
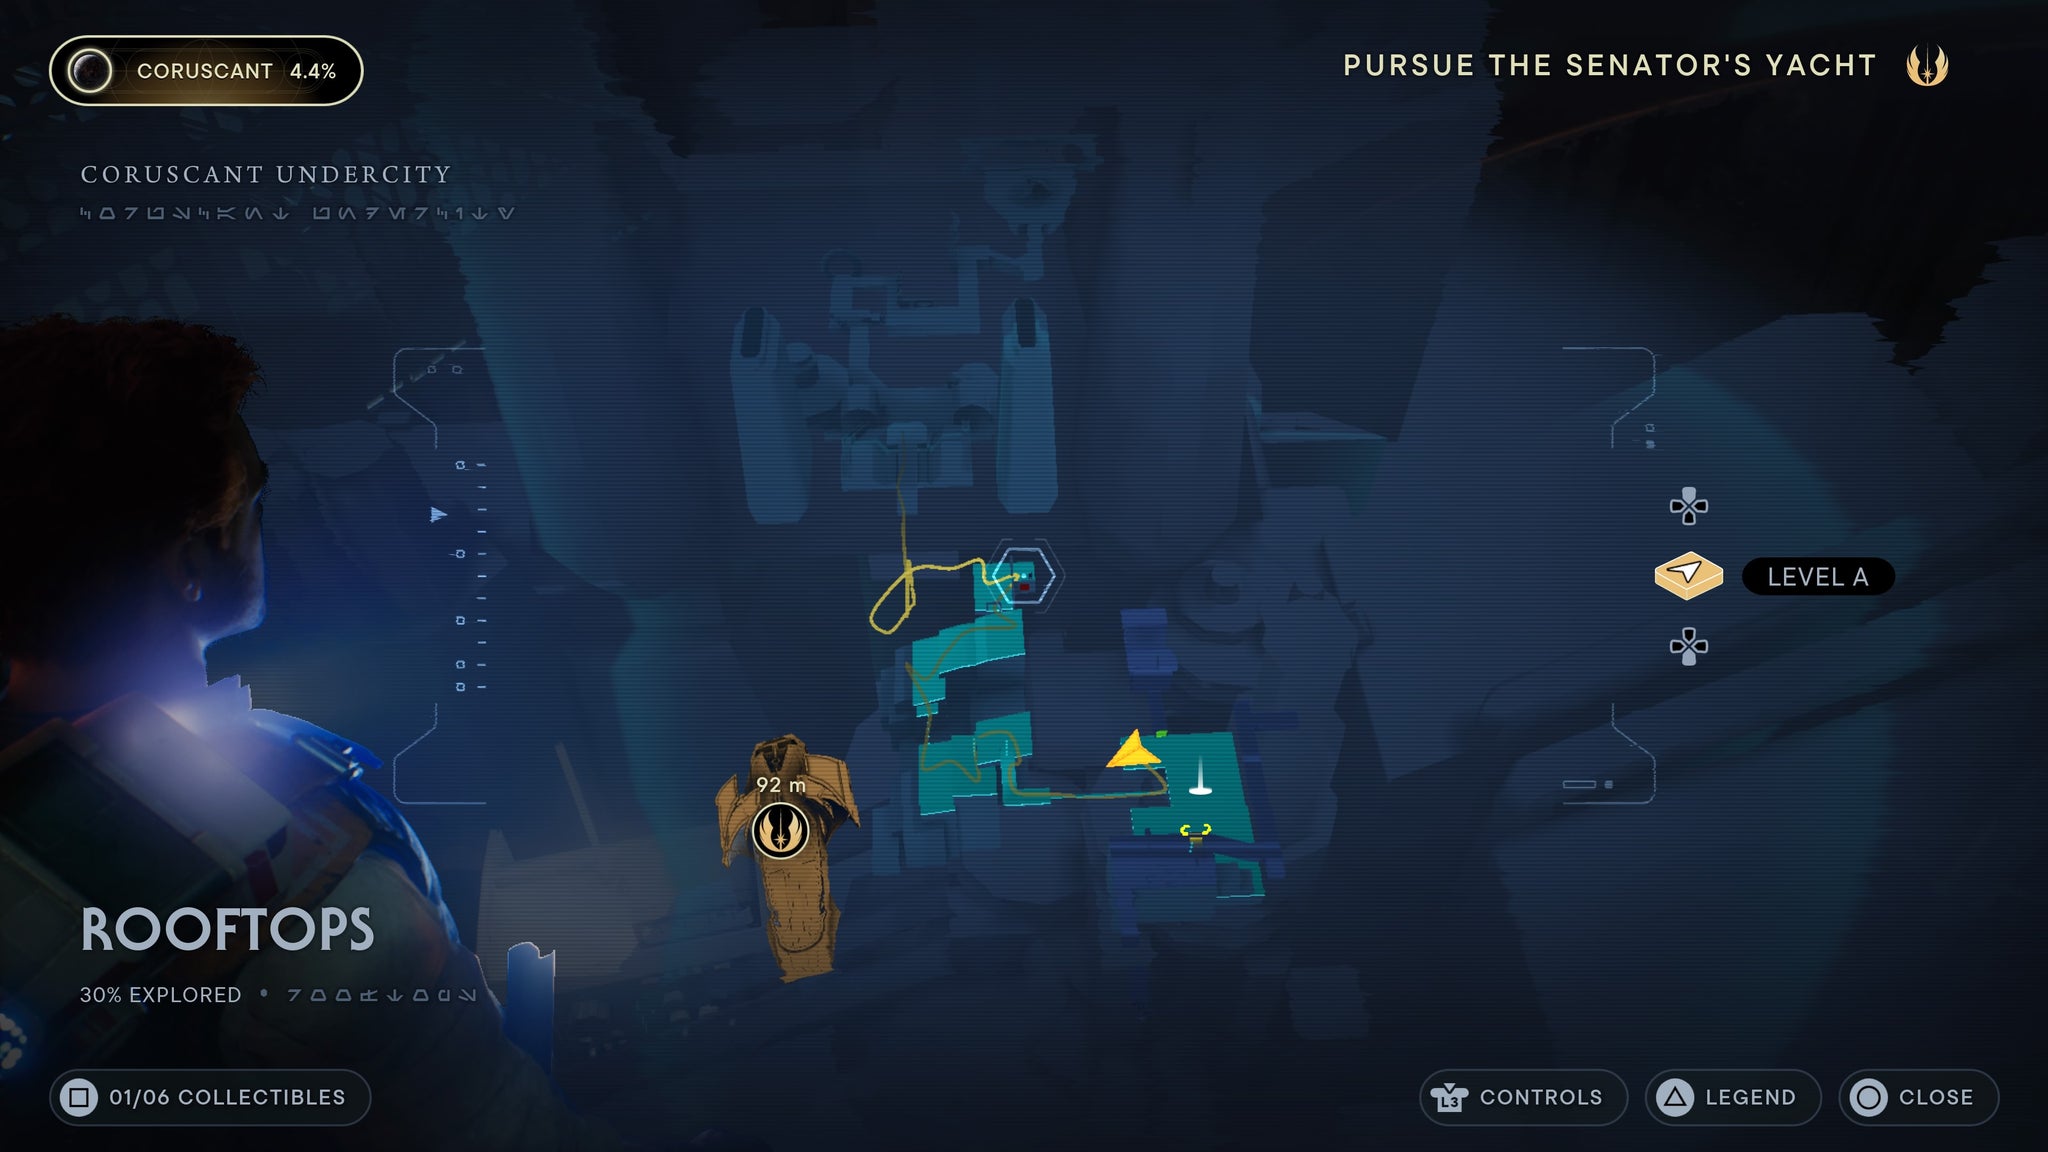
Right as you drop down for the first time, by the locked door.
Patience Switch
Found on the Rooftops. From the first meditation point, use BD to slice open the nearby flashing red door. Walk through, force push the water pipe, then leap across to the furthest platform. The lightsaber part can be found in a chest there.
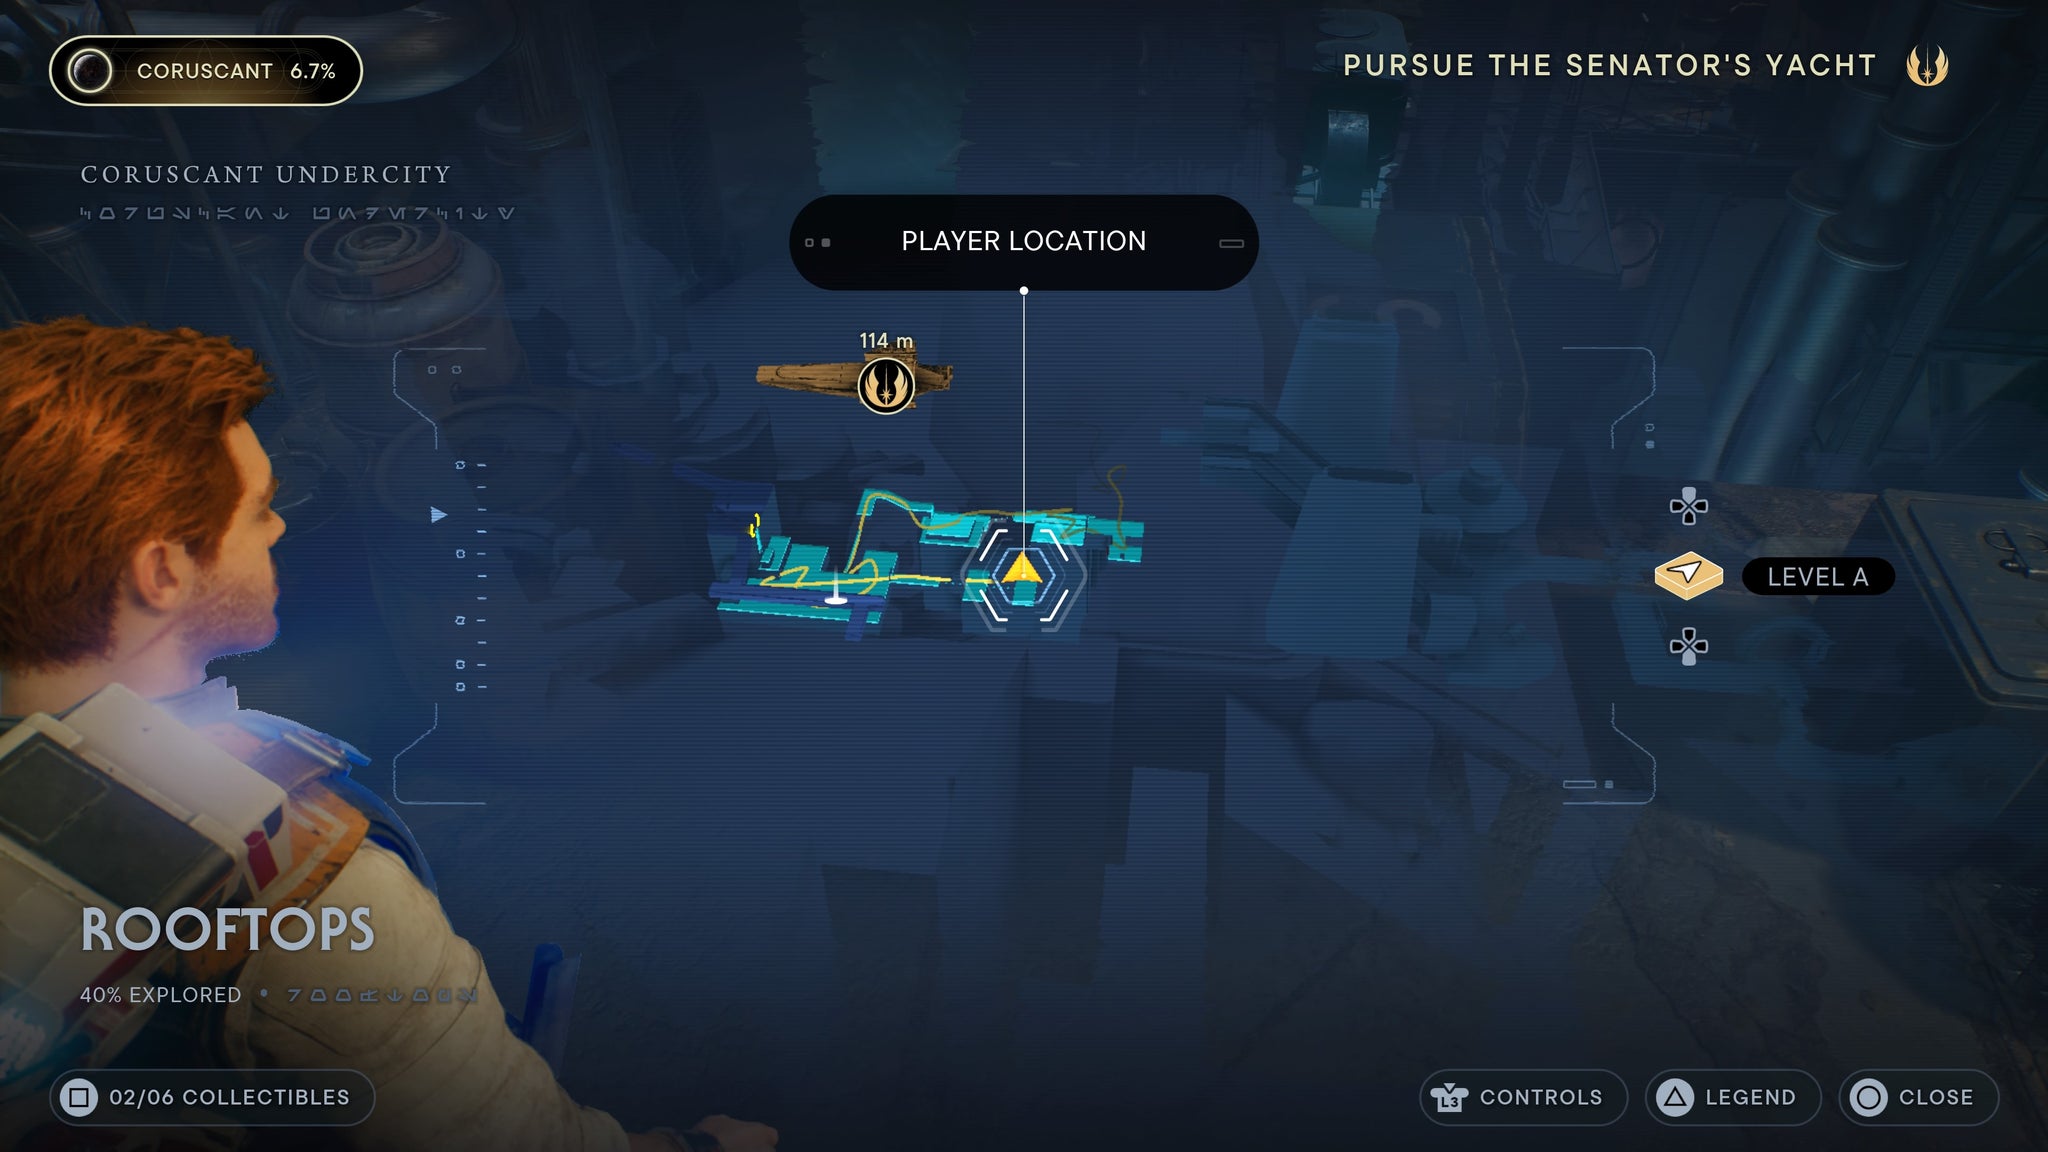
Right at the edge of the platform, behind the slicable door near the meditation point.
Coruscant Paint weapon material
Found in the Freight Handling Depot. As you swing up towards the freight ship dock, turn around and wall run towards a chest.
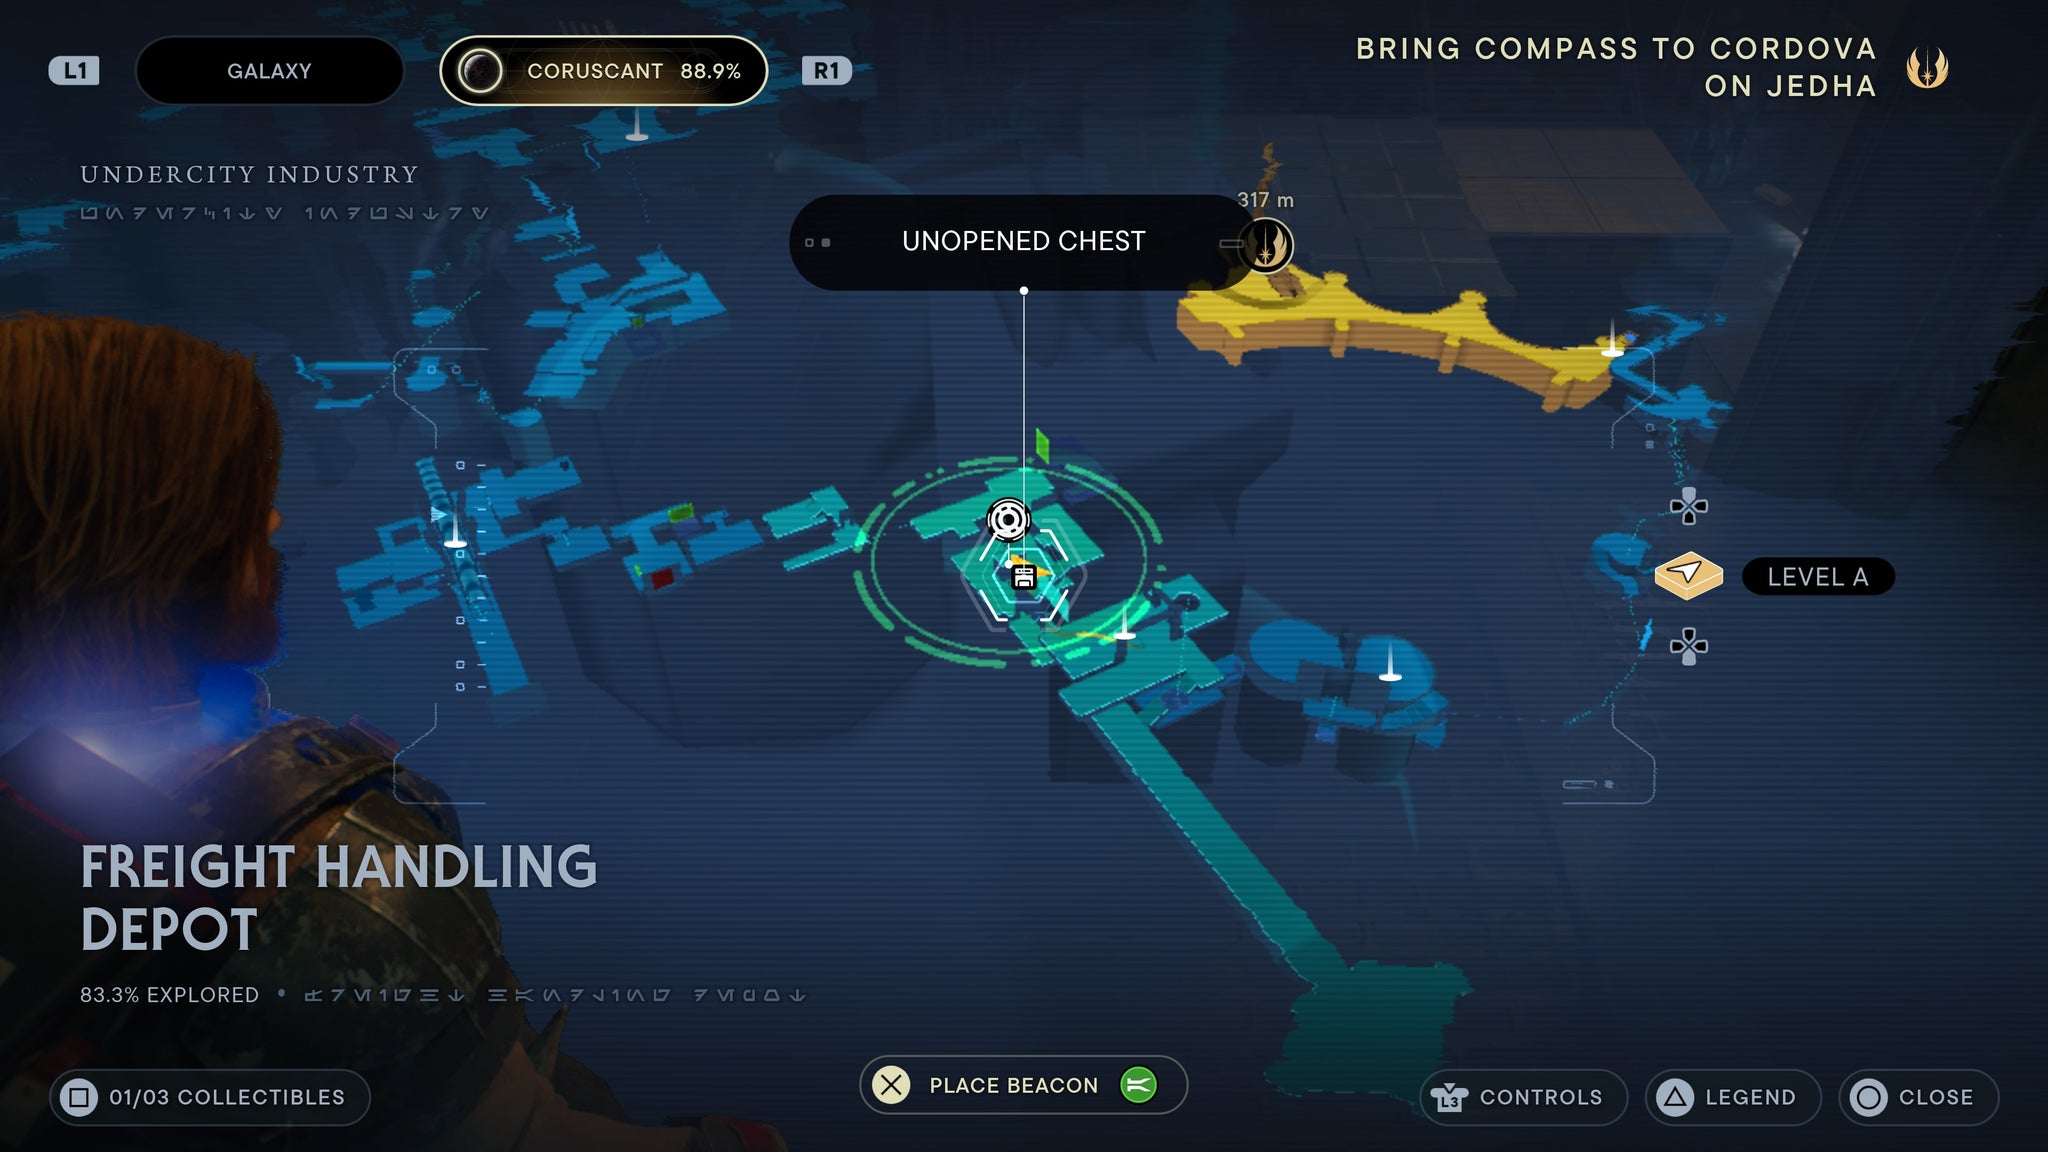
Easy to miss.
Patience Grip
Found in Renovation Site 4733. Once you run across the giant screens to a grate you can climb up, turn around and run abc to reach a higher platform. There, you can find a chest.
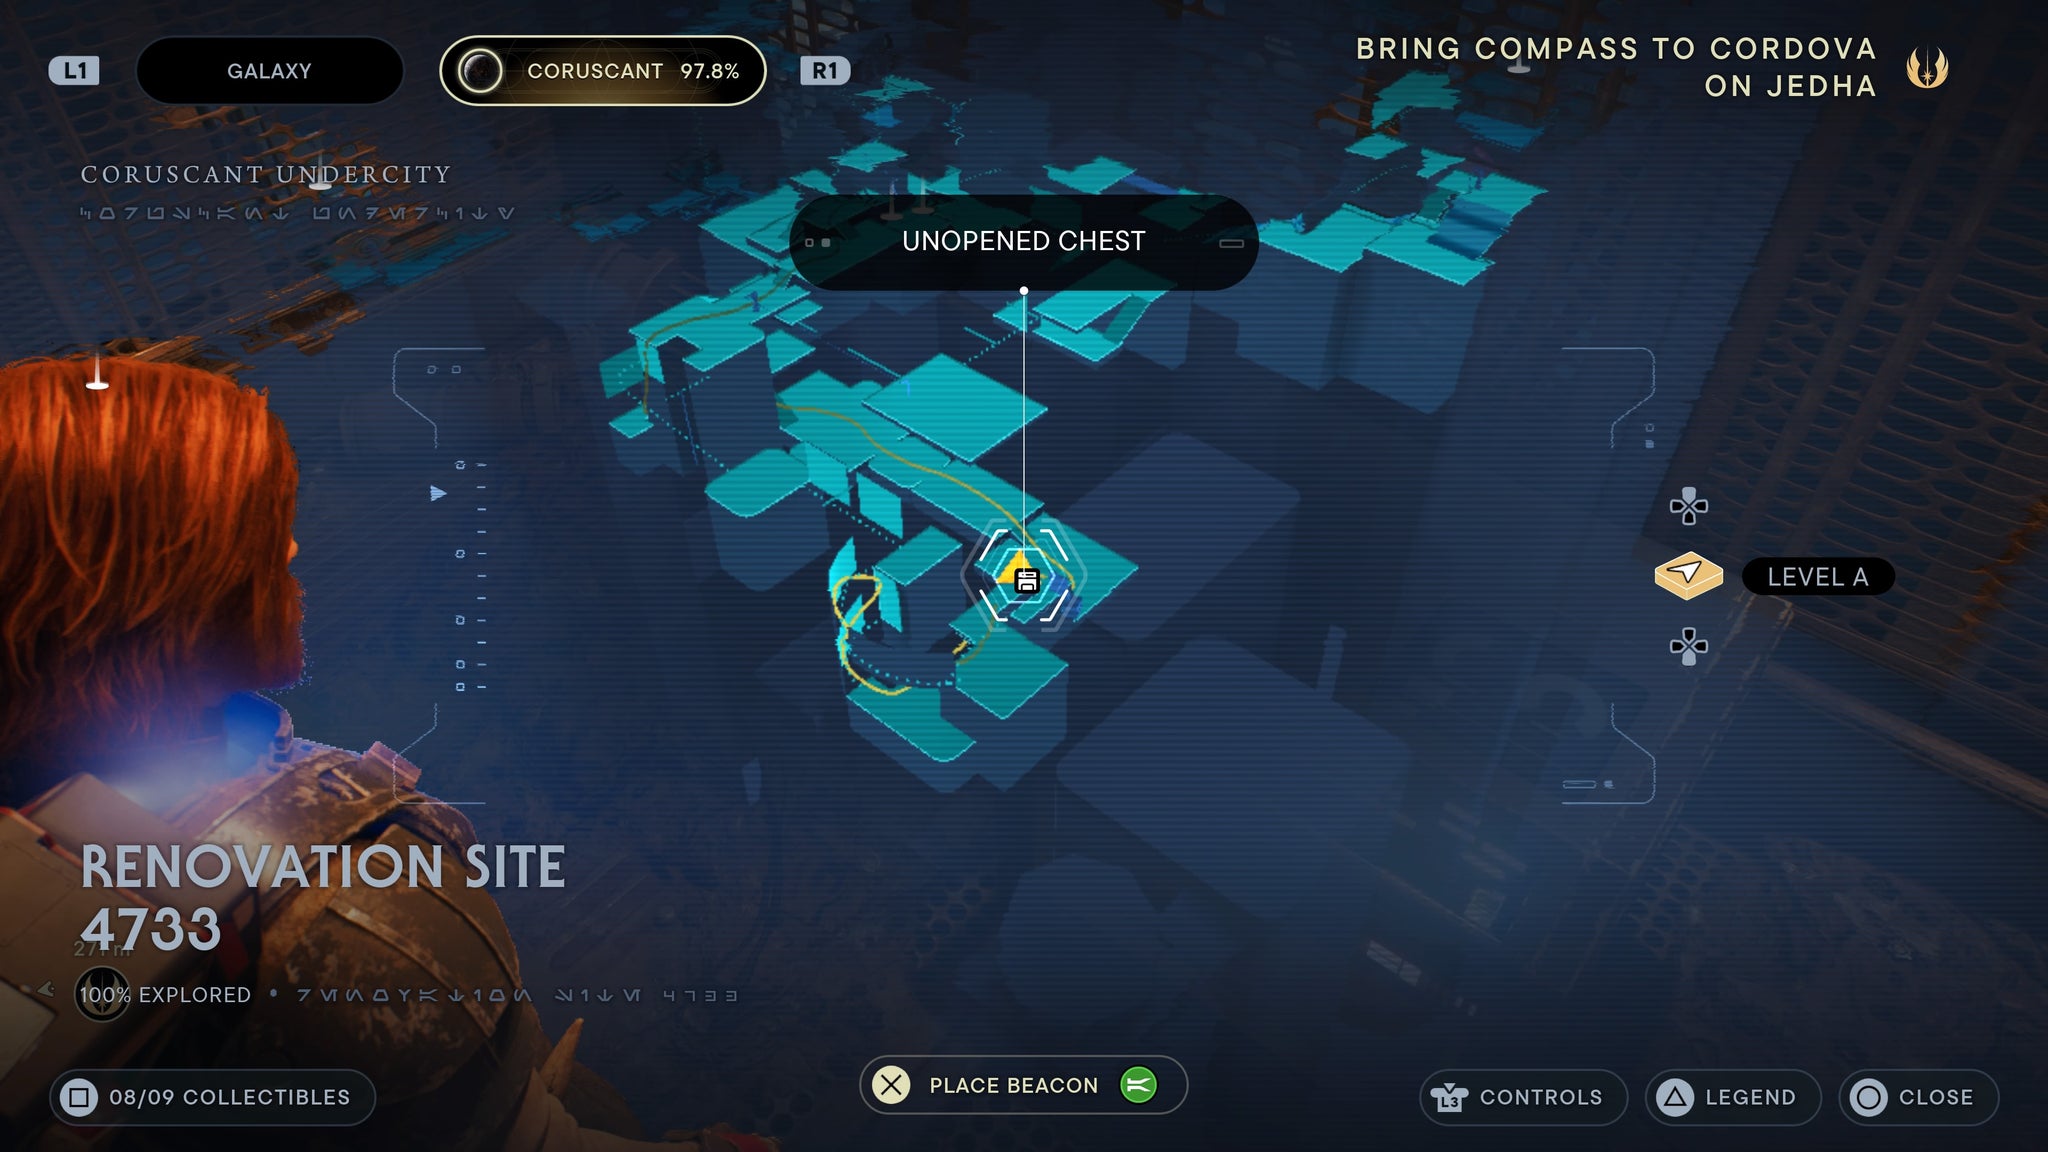
Turn around and run back across!
Koboh lightsaber parts
Light metal weapon material
Found in the Derelict Dam. From the meditation point, walk towards the giant create and stick left. You’ll be able to walk down a slope towards a hidden blue chest containing the light metal weapon material.
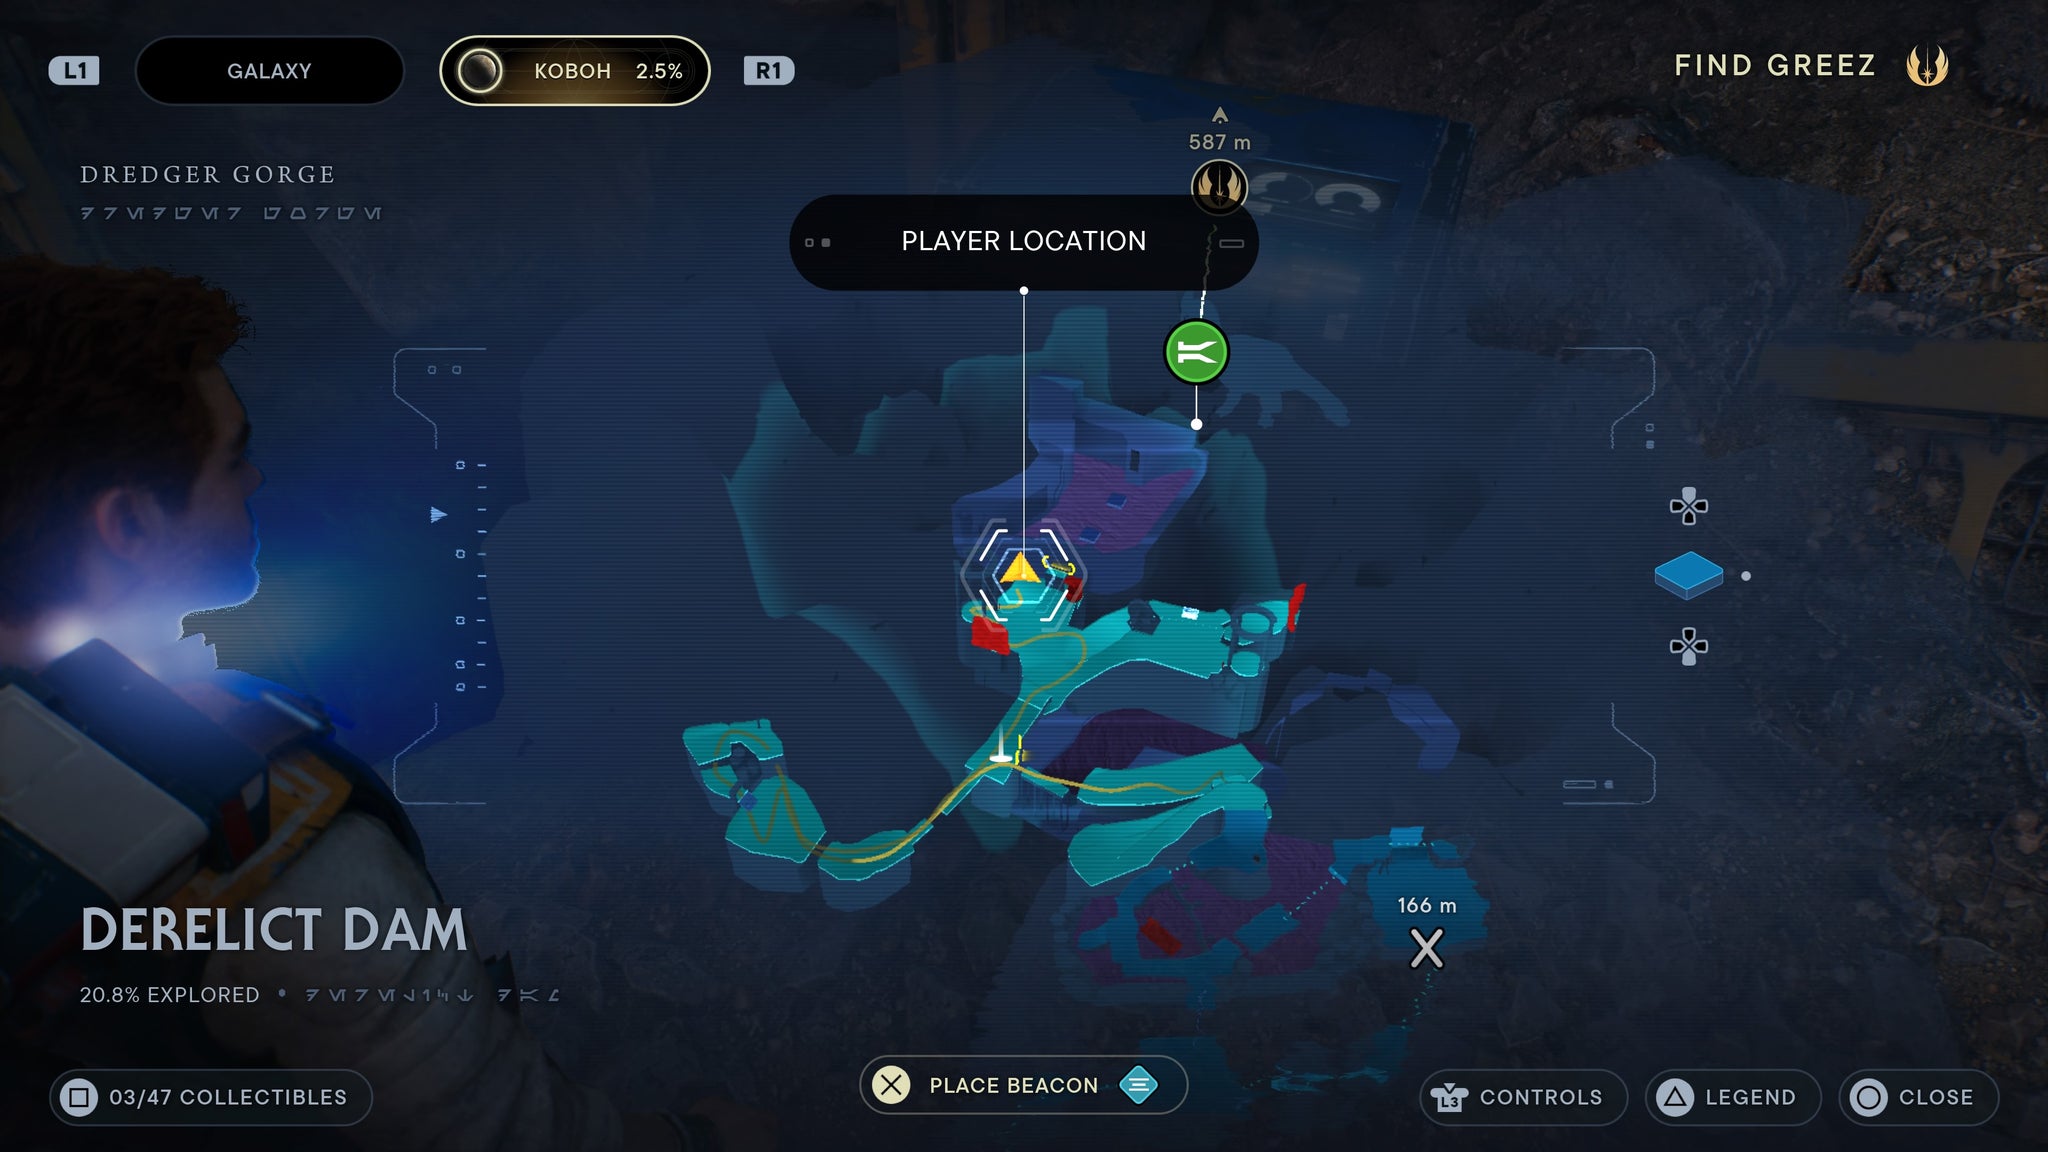
Right in the corner!
Kashyyyk Paint weapon material
Found in the Southern Reaches. From the meditation point, head downhill to Mosey’s hut then take a right past some gorgers. You’ll find a rock wall you can climb up, marked by some white symbols painted on the wall. When you climb up, swing across the chasm using the nearby pole, then cut the vines leading into the cave. Past two enemies, you’ll find a blue chest behind a waterfall.

Hidden in the cave, behind a waterfall.
Jedi paint weapon material
Found in the Chamber of Duality. In the Chamber of Duality, cross the bridge that requires two orbs to activate. Once you do, run across the wall to your left. When you land, you’ll see a blue chest on the ground to your left. Inside is the Jedi Paint weapon material.
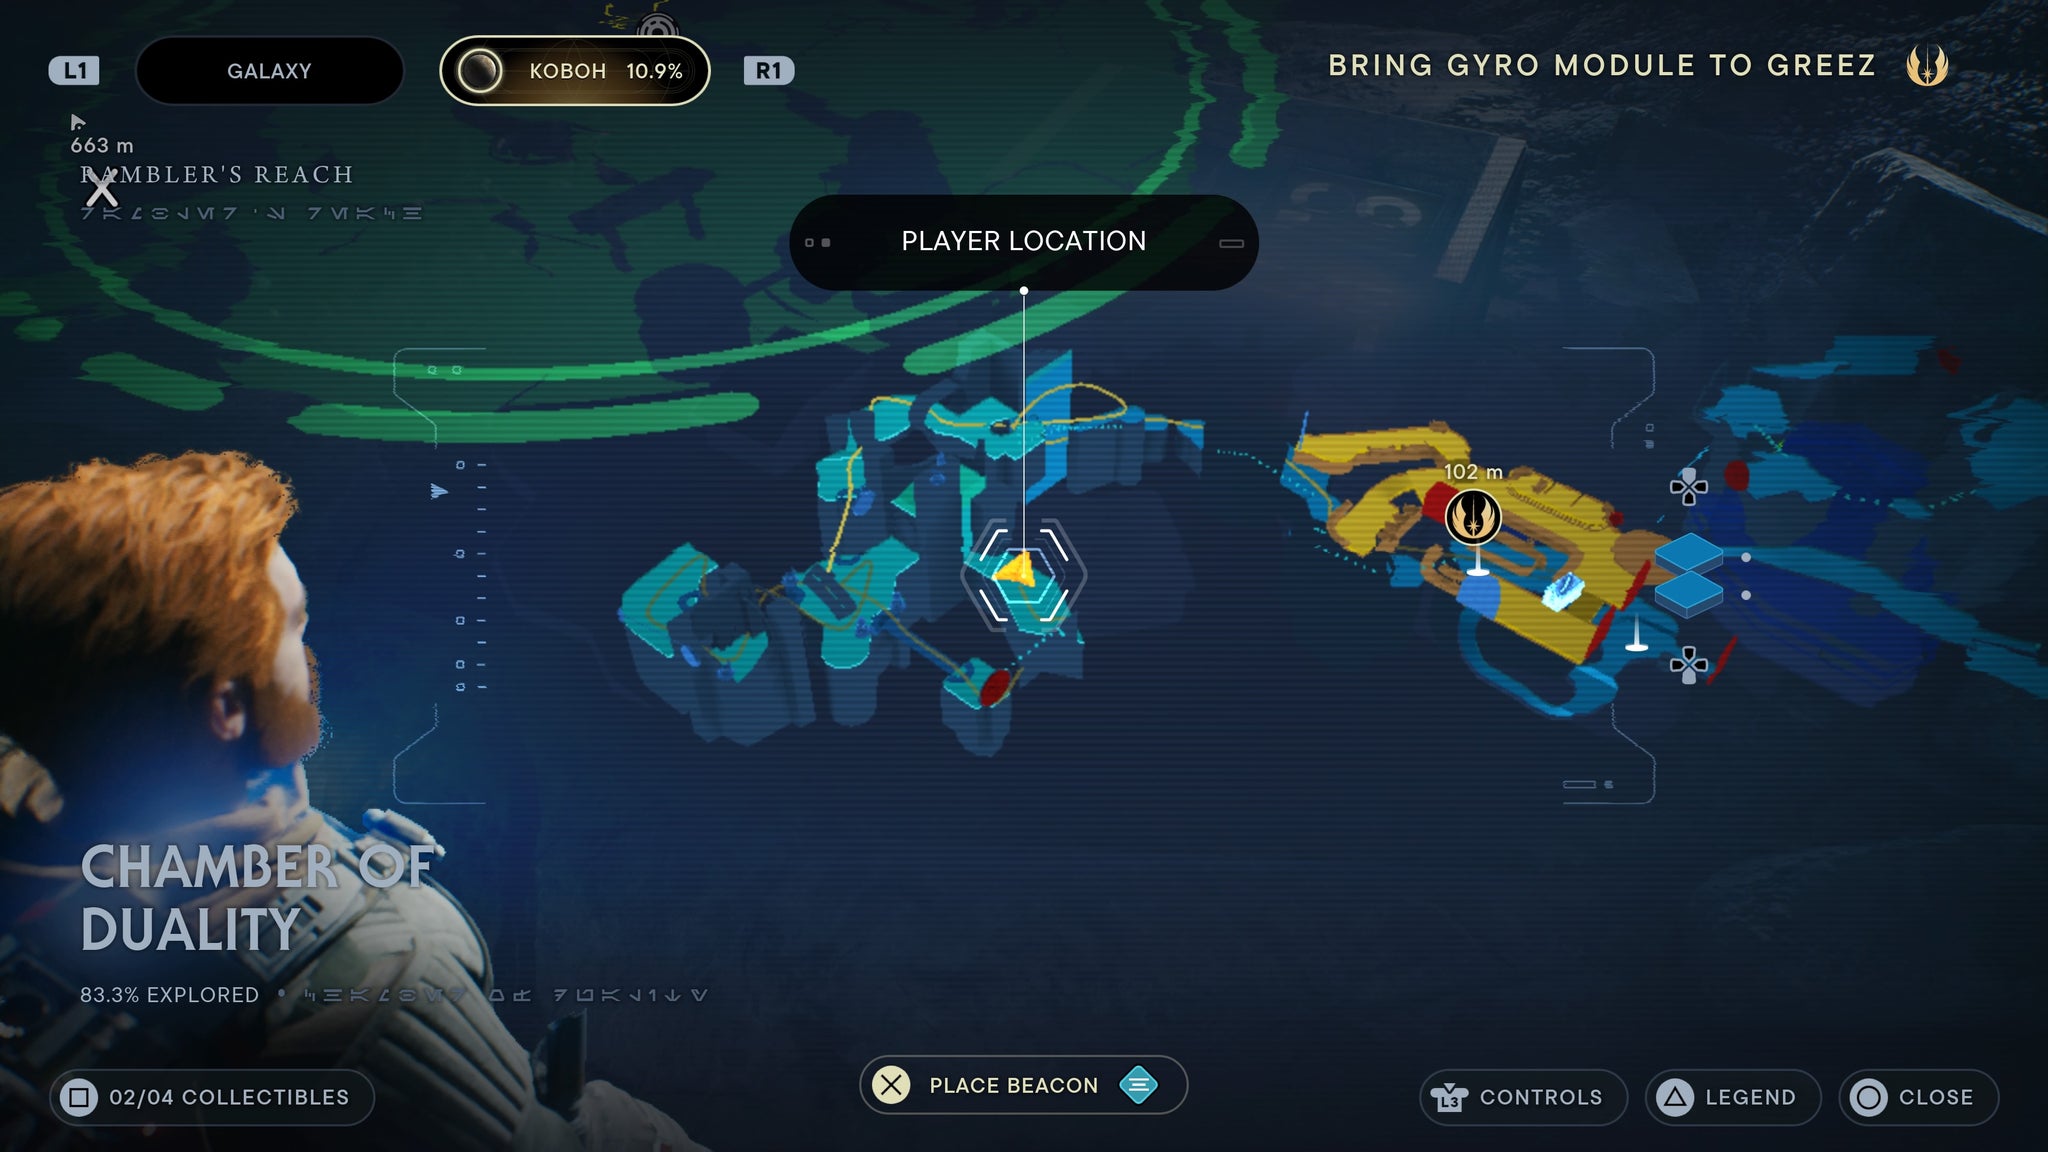
On the ground, before you free Zee.
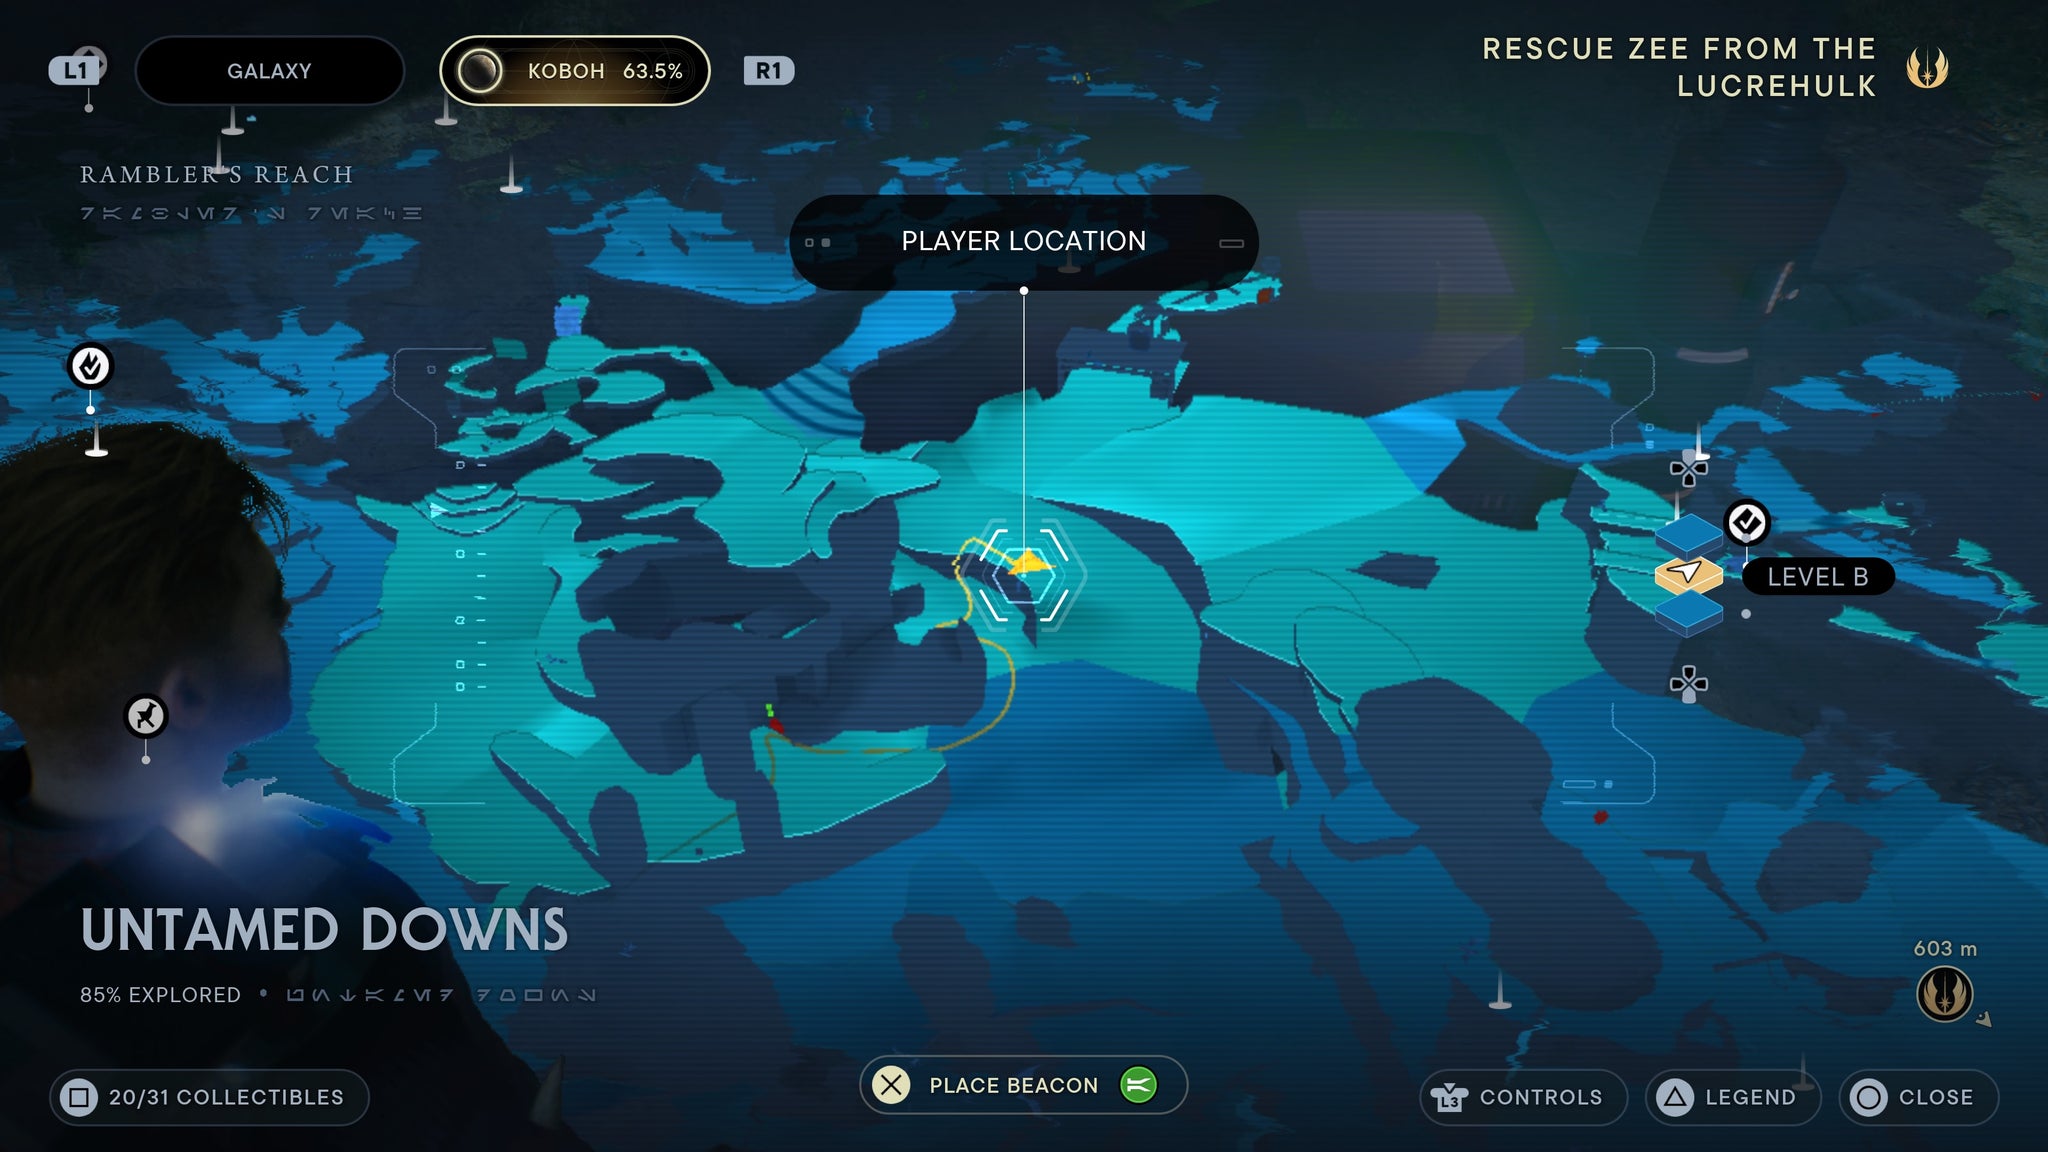
Santari Khri lightsaber Grip / Emitter / Pommel / Switch
Found in the Untamed Downs - Go to the cave to the right of the forest gate, then walk inside. Clear out all the enemies. You’ll find a door you can blow up using a roller mine. Drag a Roller Mine from a locked door nearby ( read a guide about it here ). Once you blow the door open, you’ll find a chest you can open for a Santari Khri lightsaber.
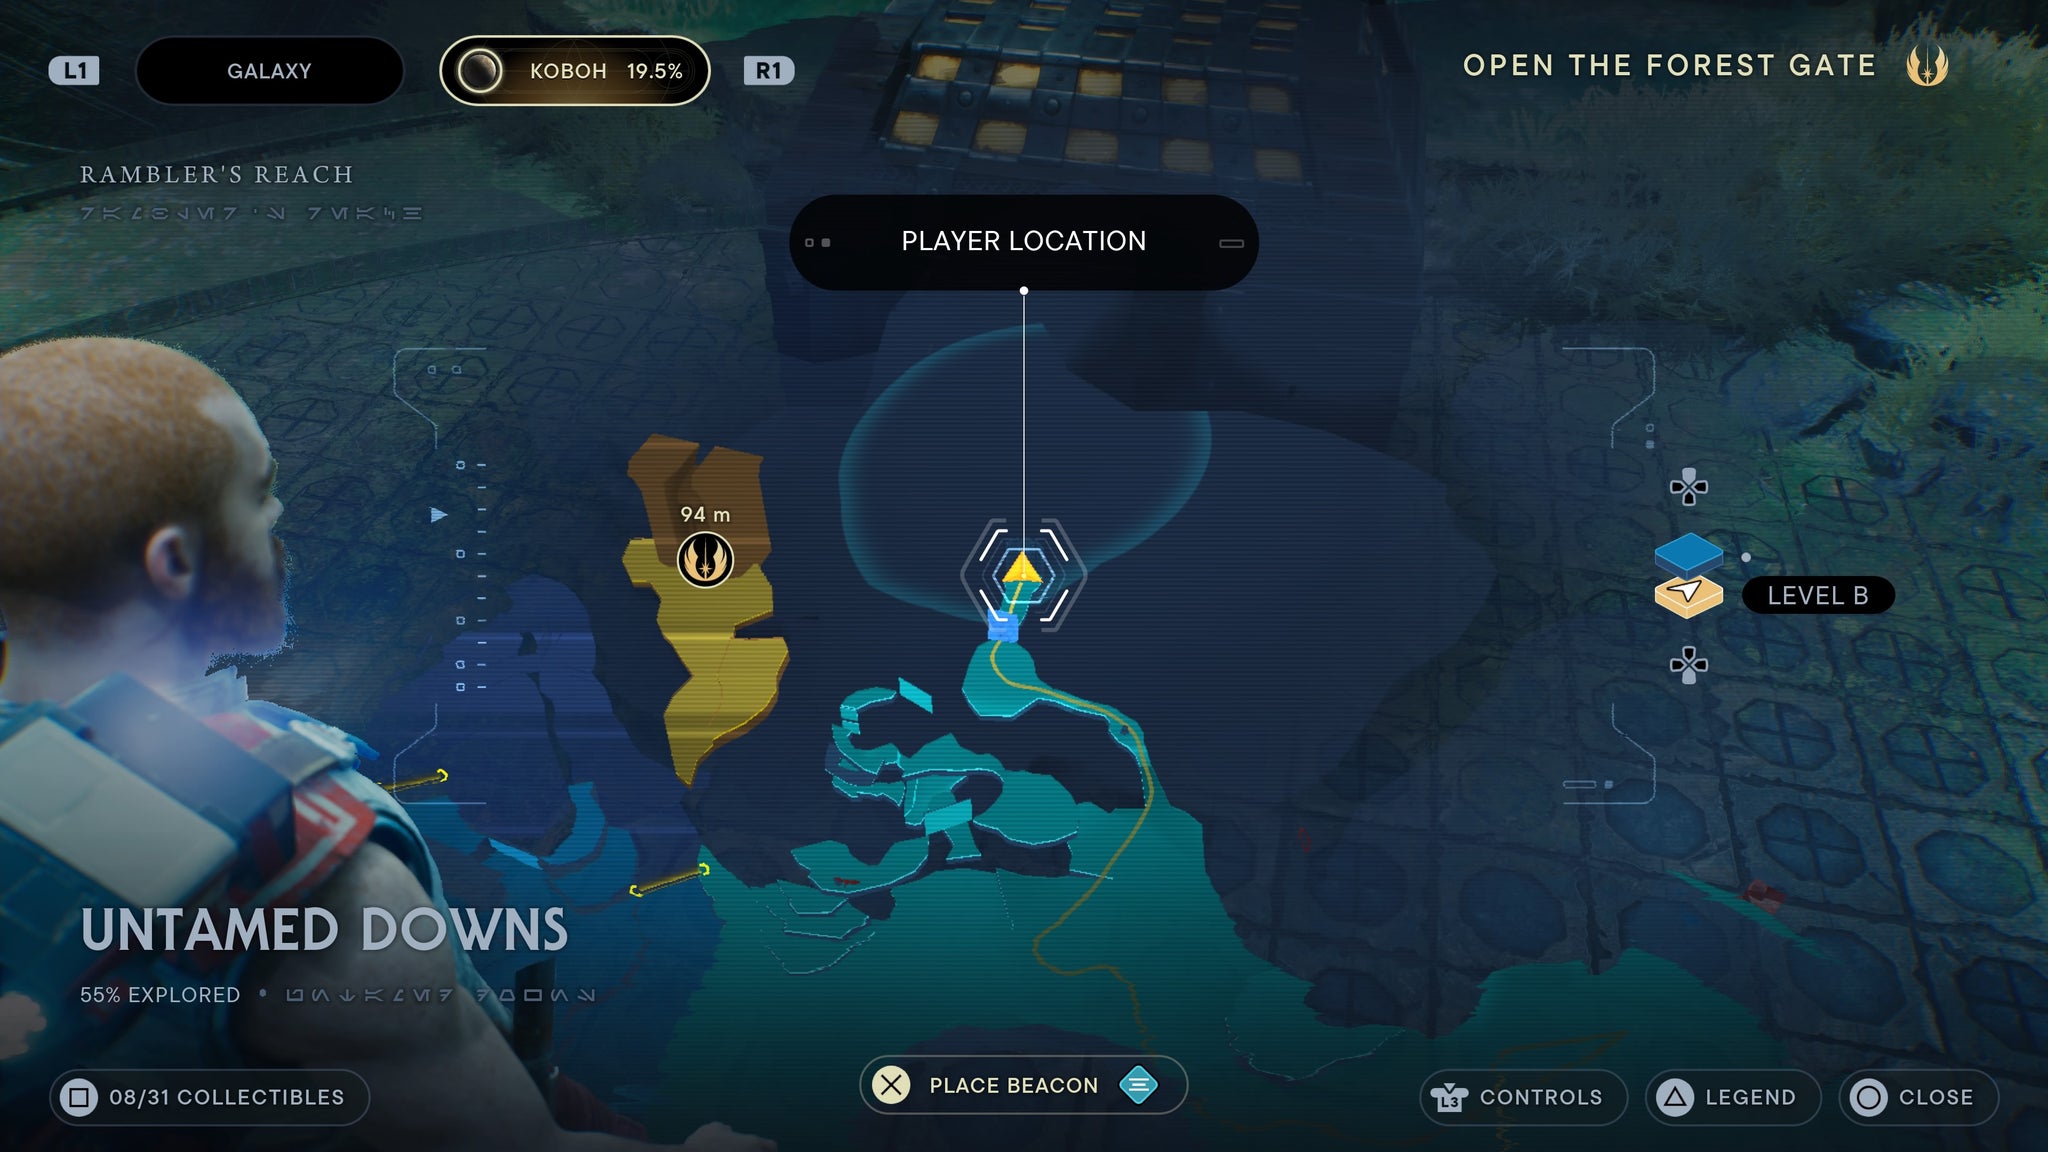
A whole lightsaber in this one chest.
Diligence Pommel
Found in the Basalt Rift. From the Basalt Rift meditation point, cross over the shortcut and down the hill towards the high republic ruins. Once you reach the giant monster at the bottom of the path, drop down to either side of the path and enter the tunnel going beneath it. There you’ll find a locked chest with the Diligence Pommel inside.

Under the path you walked down.
Diligence Switch
Found in the Forrest Array. Take the zipline shortcut and make your way down to the buildings below. From there, walk back towards the meditation point and climb up the nearby circular building. Walk around the right of the roof and a chest will be waiting.
before you slide down, look right!
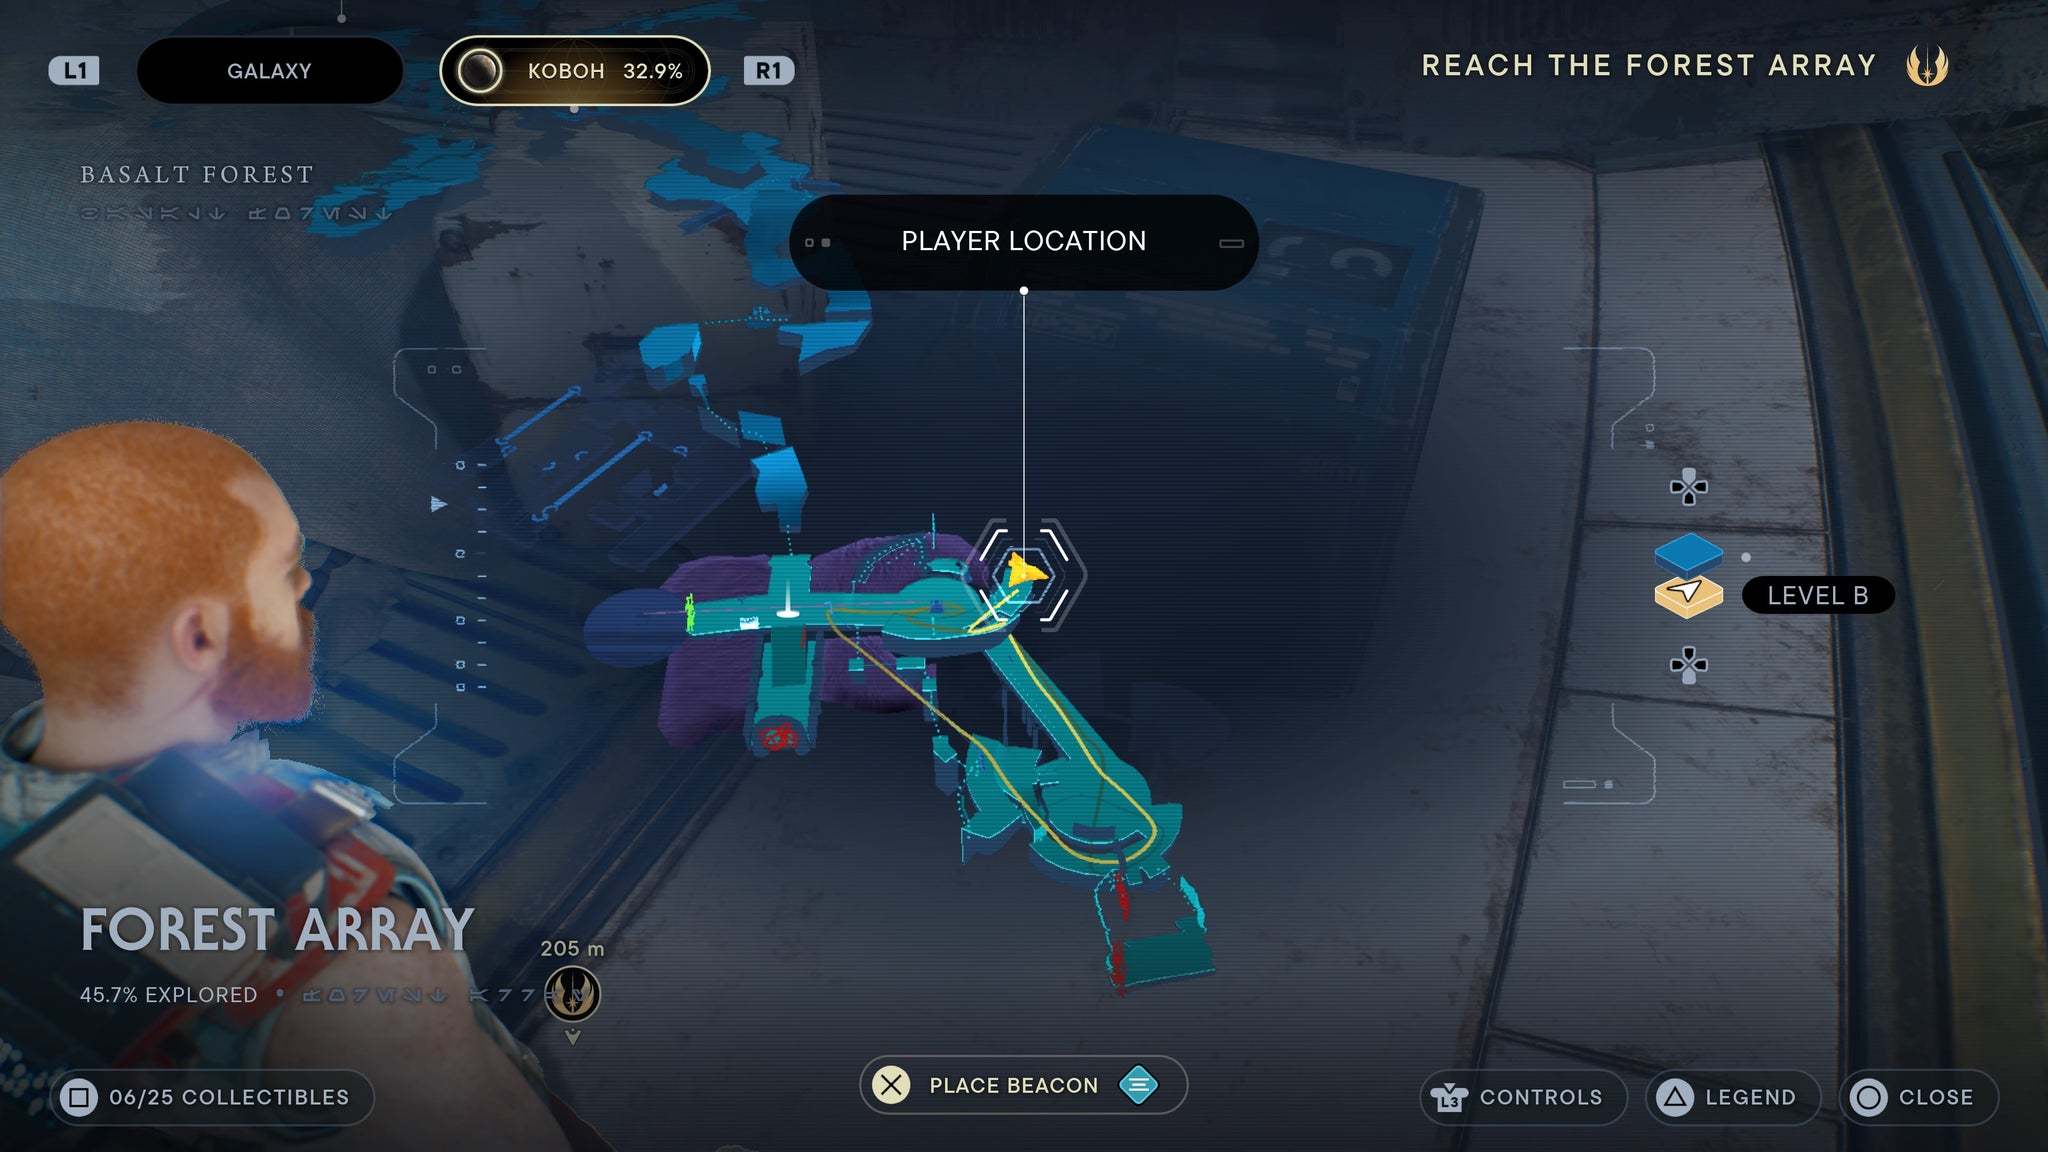
Diligence Grip
Found in the Forrest Array. Point the beam towards the Bilemaw Den, and you’ll find a chest at the end of the beam by a tree.
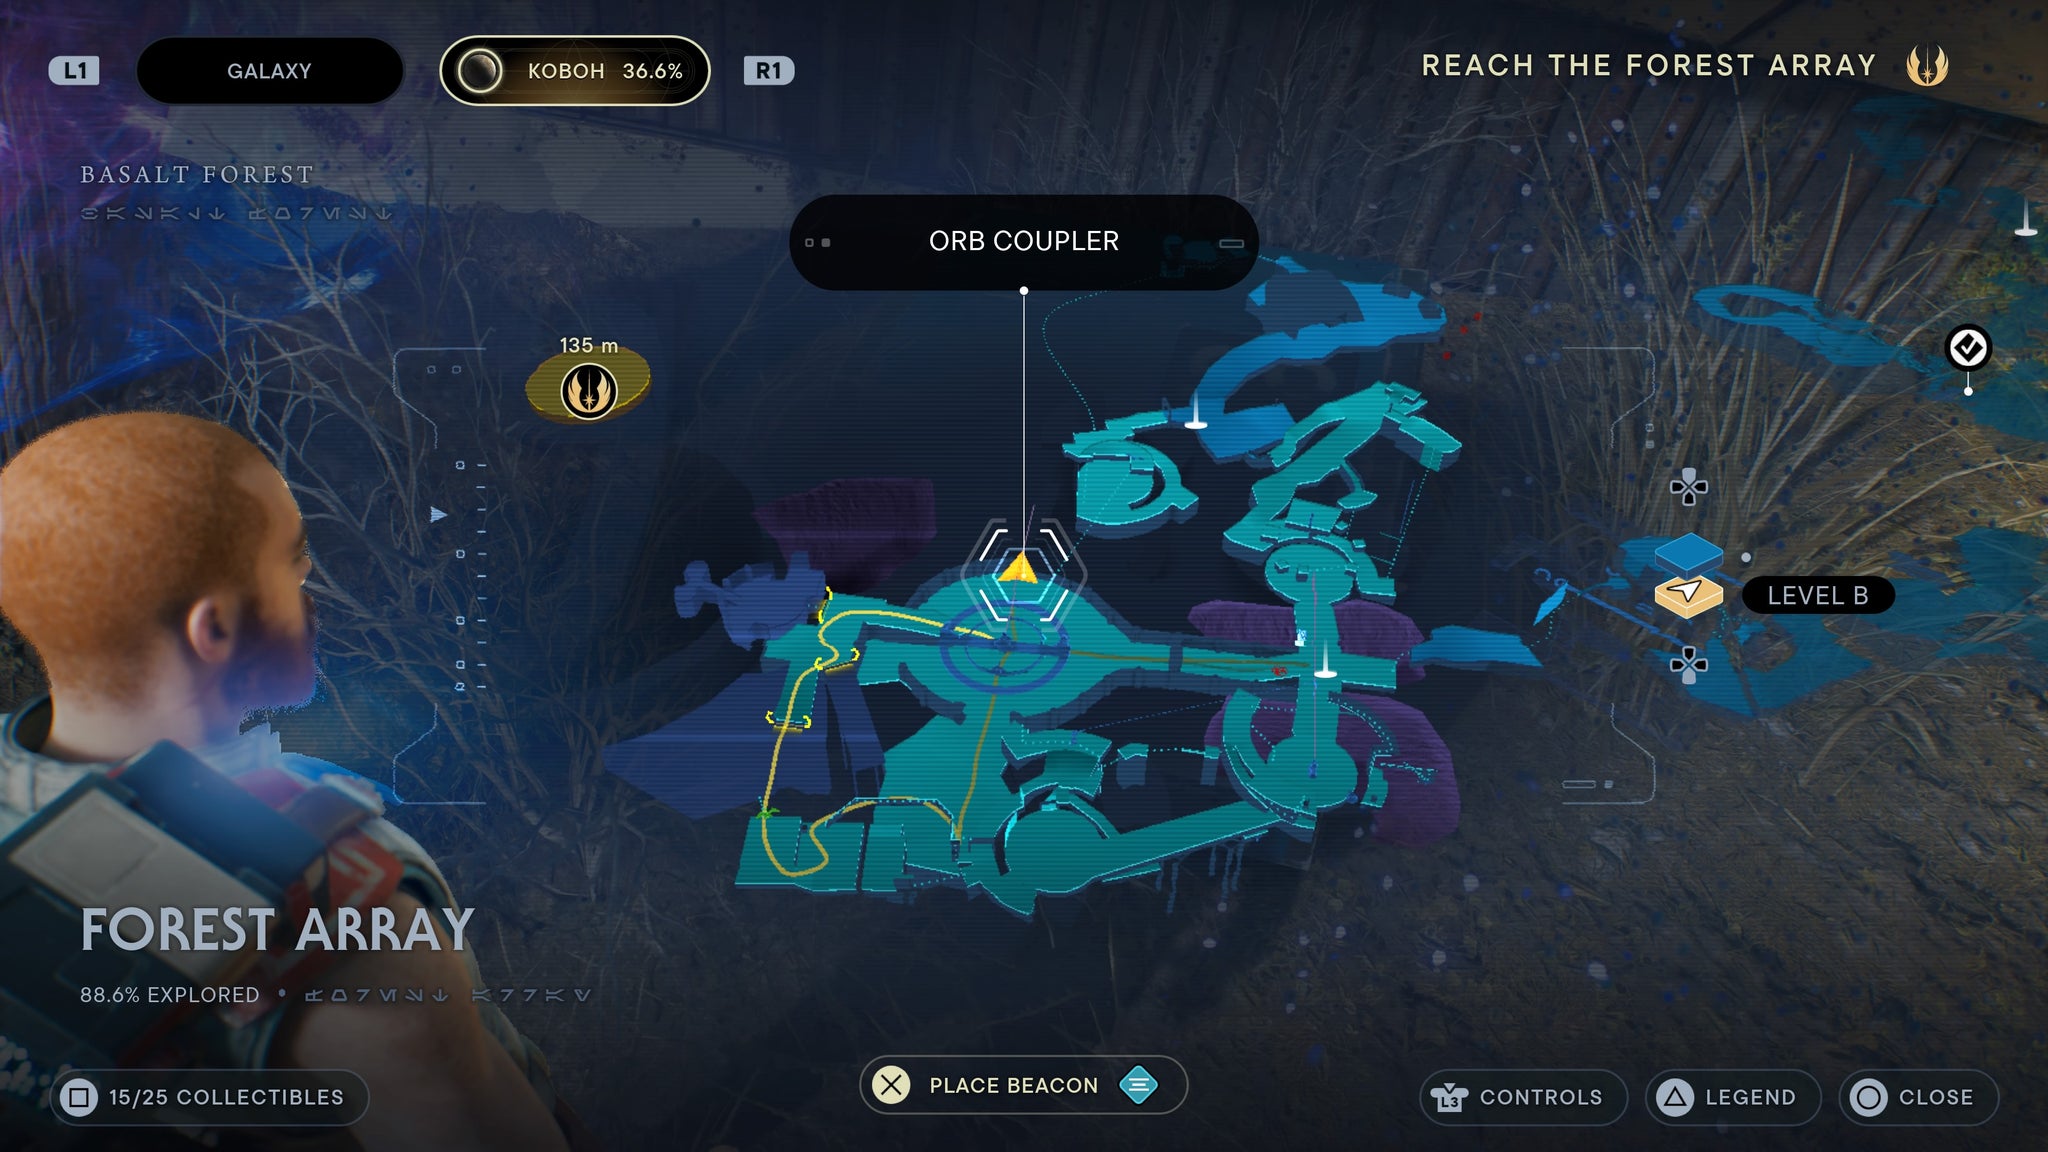
Follow the laser to the chest.
Warm Metal Weapon Material
Found in the Winding Ravine (requires access to Jedha) As you enter the Winding Ravine, turn left and push the yellow box against the wall to create a path upwards. As you wall run ahead, you’ll be able to jump below into a lower path on the left wall. Inside is a chest.

Look left as you wall run. In a lower path, there’s a box.
Hunter Lightsaber
Requires access to Jehda. Found in the Winding Ravine. Follow the Winding Ravine up until you reach a Relter, then fly it down to the rope shortcut. By this shortcut, is a chest.
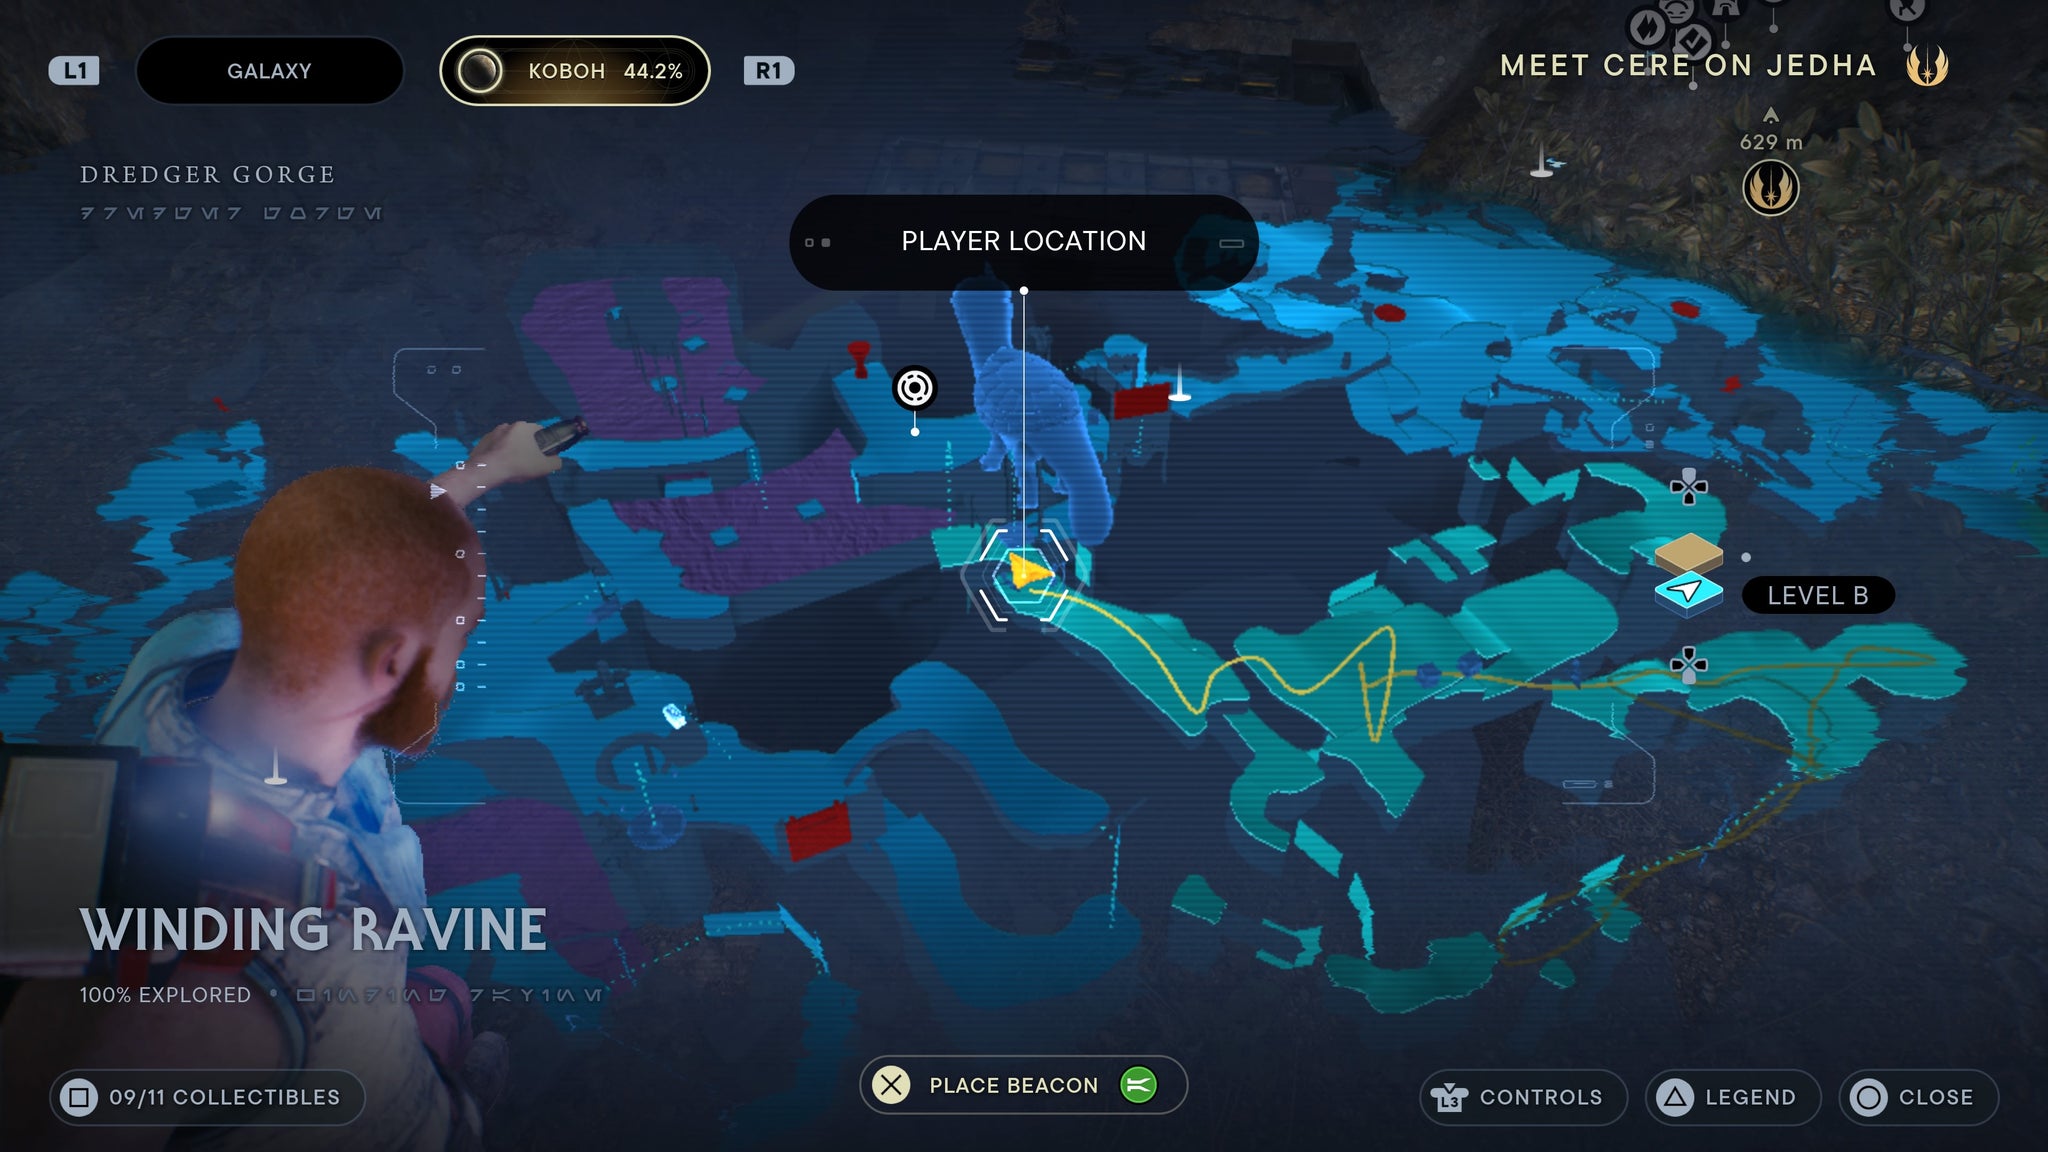
Your big reward for finishing the zone!
Patience Pommel
Found in the Mountain Ascent. Take the zipline up and jump into the pool in front of you. A chest can be found underwater, to the right of the grapple point.
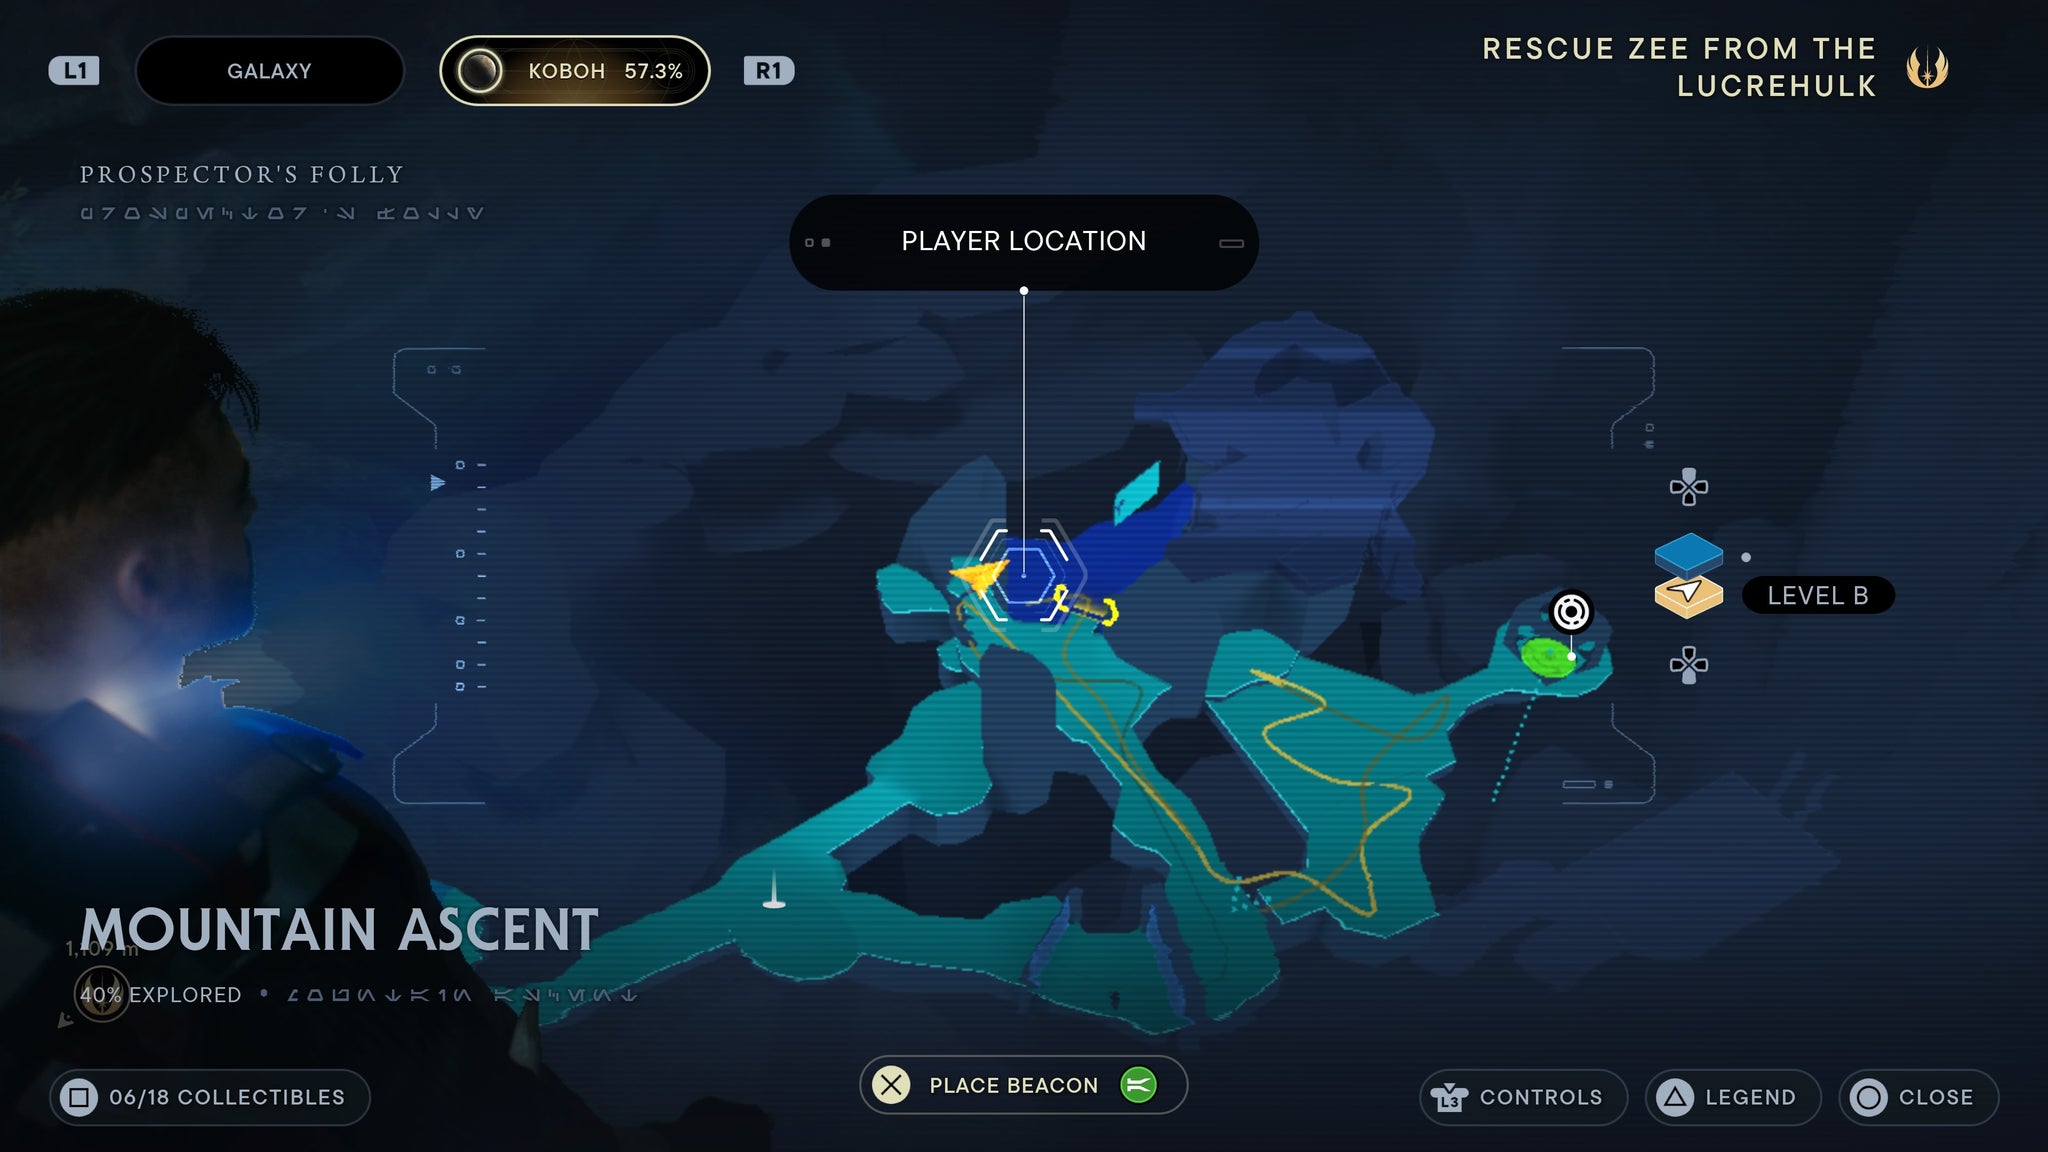
In the water!
Harmony Switch
Found in the Devastated Settlement. Once you’ve unlocked the Koboh Grinder and the 2nd central steam vent, glide down and to an isolated stone pillar back towards the meditation point. On there, alongside several enemies, is a locked chest.
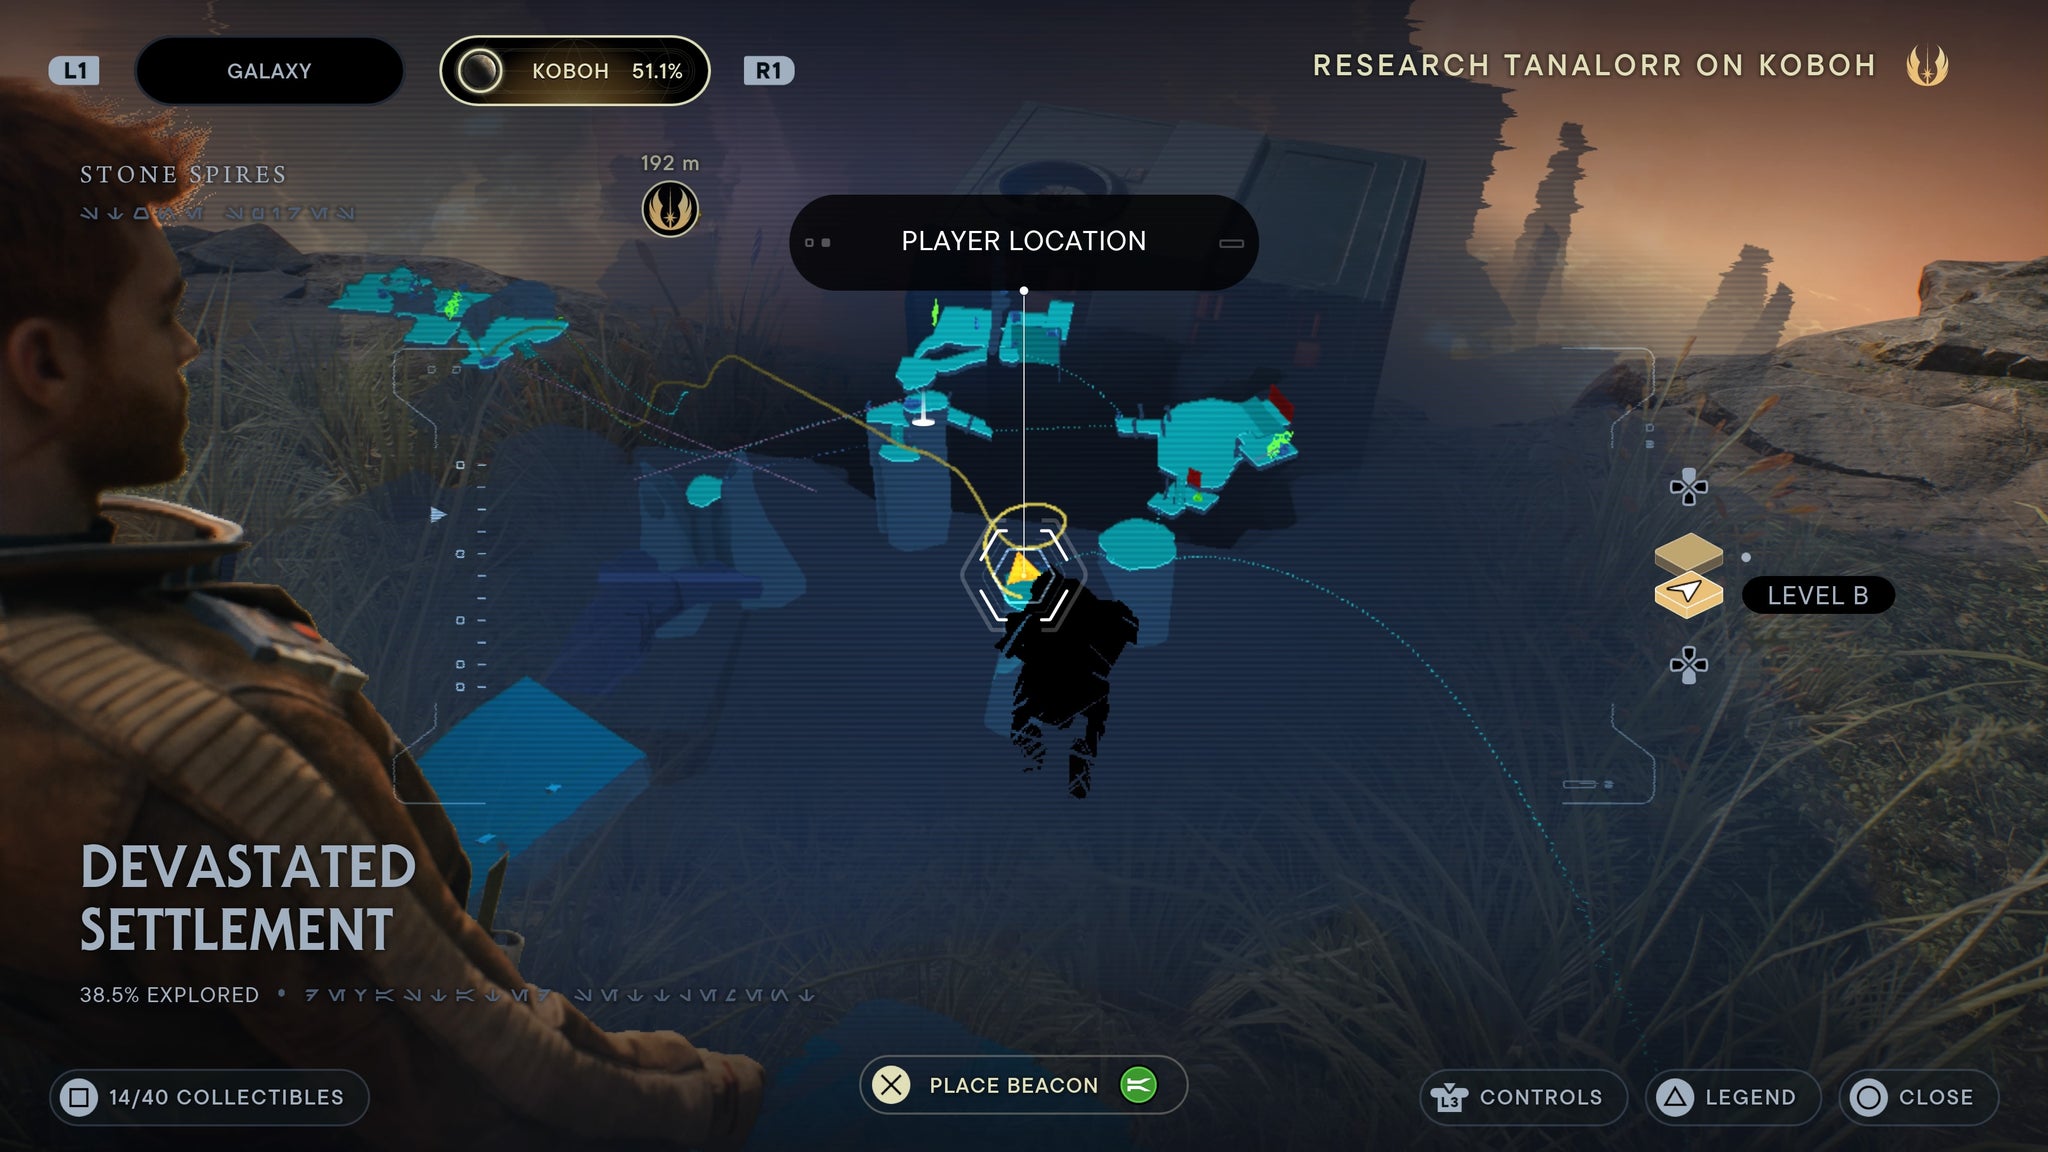
surrounded by bugs.
Hard Leather weapon material
Found in the Devastated Settlement.Once you’ve opened three steam vents at the centre of the zone, fly up to a rocky pillar with a pool at the top. Jump in the pool, and you’ll find a chest underwater.

Under the water!
Harmony Pommel
Found in the Alignment Control Centre. Climb down the vines from near the lift, then drop down into the room below. There will be a chest.
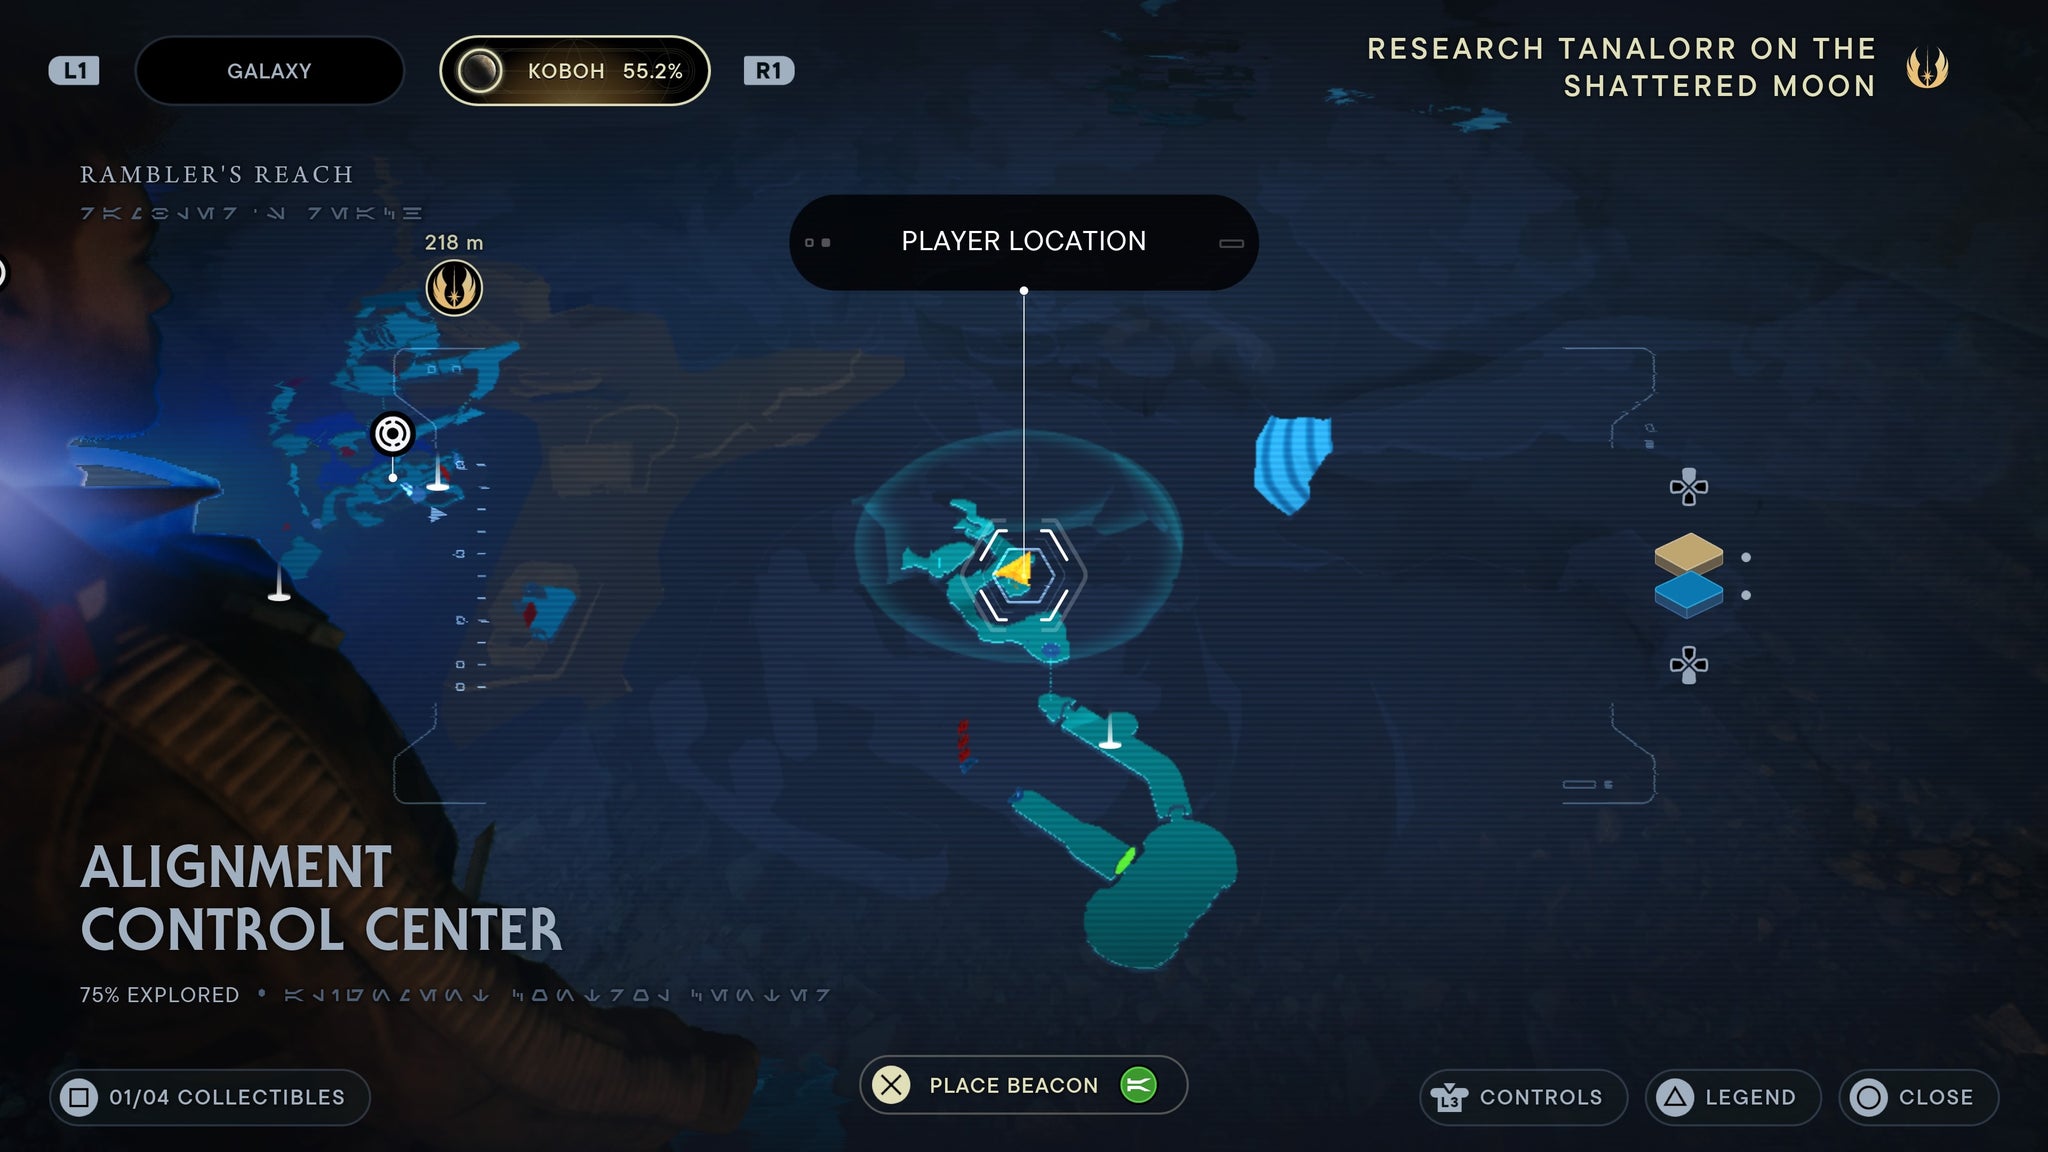
In a room hidden below.
Model 13 Barrel
Bought at Caij’s Bounty Board shop. It costs 1 bounty puck.
Showdown Barrel
Bought at Caij’s Bounty Board shop. It costs 1 bounty puck.
Showdown Body
Bought at Caij’s Bounty Board shop. It costs 1 bounty puck.
K3 Vindicator Body
Bought at Caij’s Bounty Board shop. It costs 1 bounty puck.
RSKF-44 Grip (gun)
Bought at Caij’s Bounty Board shop. It costs 1 bounty puck.
Textured Rubber weapon material
Found in Imperial Post 8L-055. From the meditation point, drop down and walk away from the hanger. You’ll see a small jump to a locked chest. After you shoot the electro dart at the nearby machine, the chest will unlock.
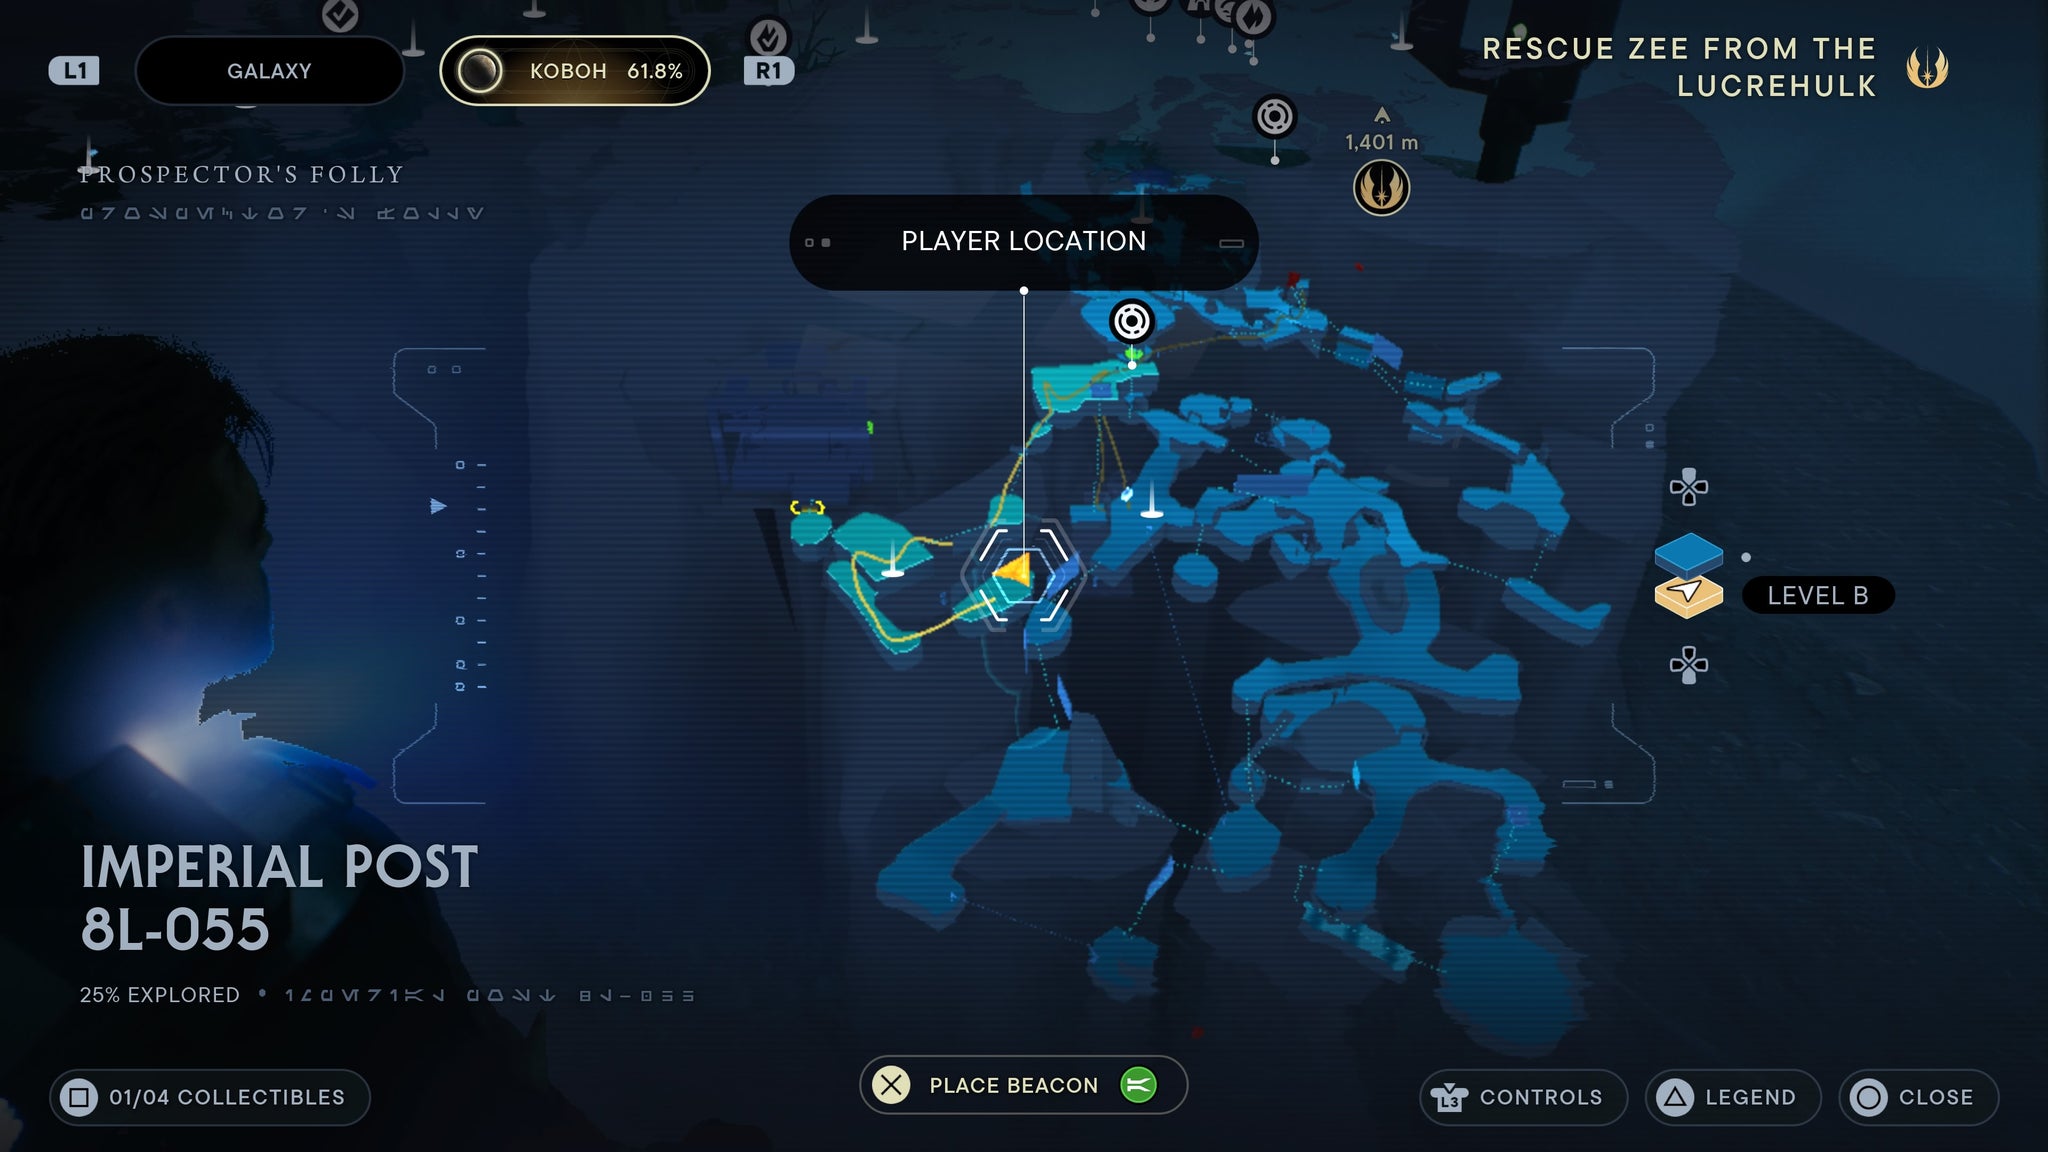
Round the corner from the meditaiton point.
RSKF-44 Barrel
Found in Imperial Post 8L-055. Once you enter the big red room, jump down to the platform to your right. Once there, make one more jump and you’ll find a chest.
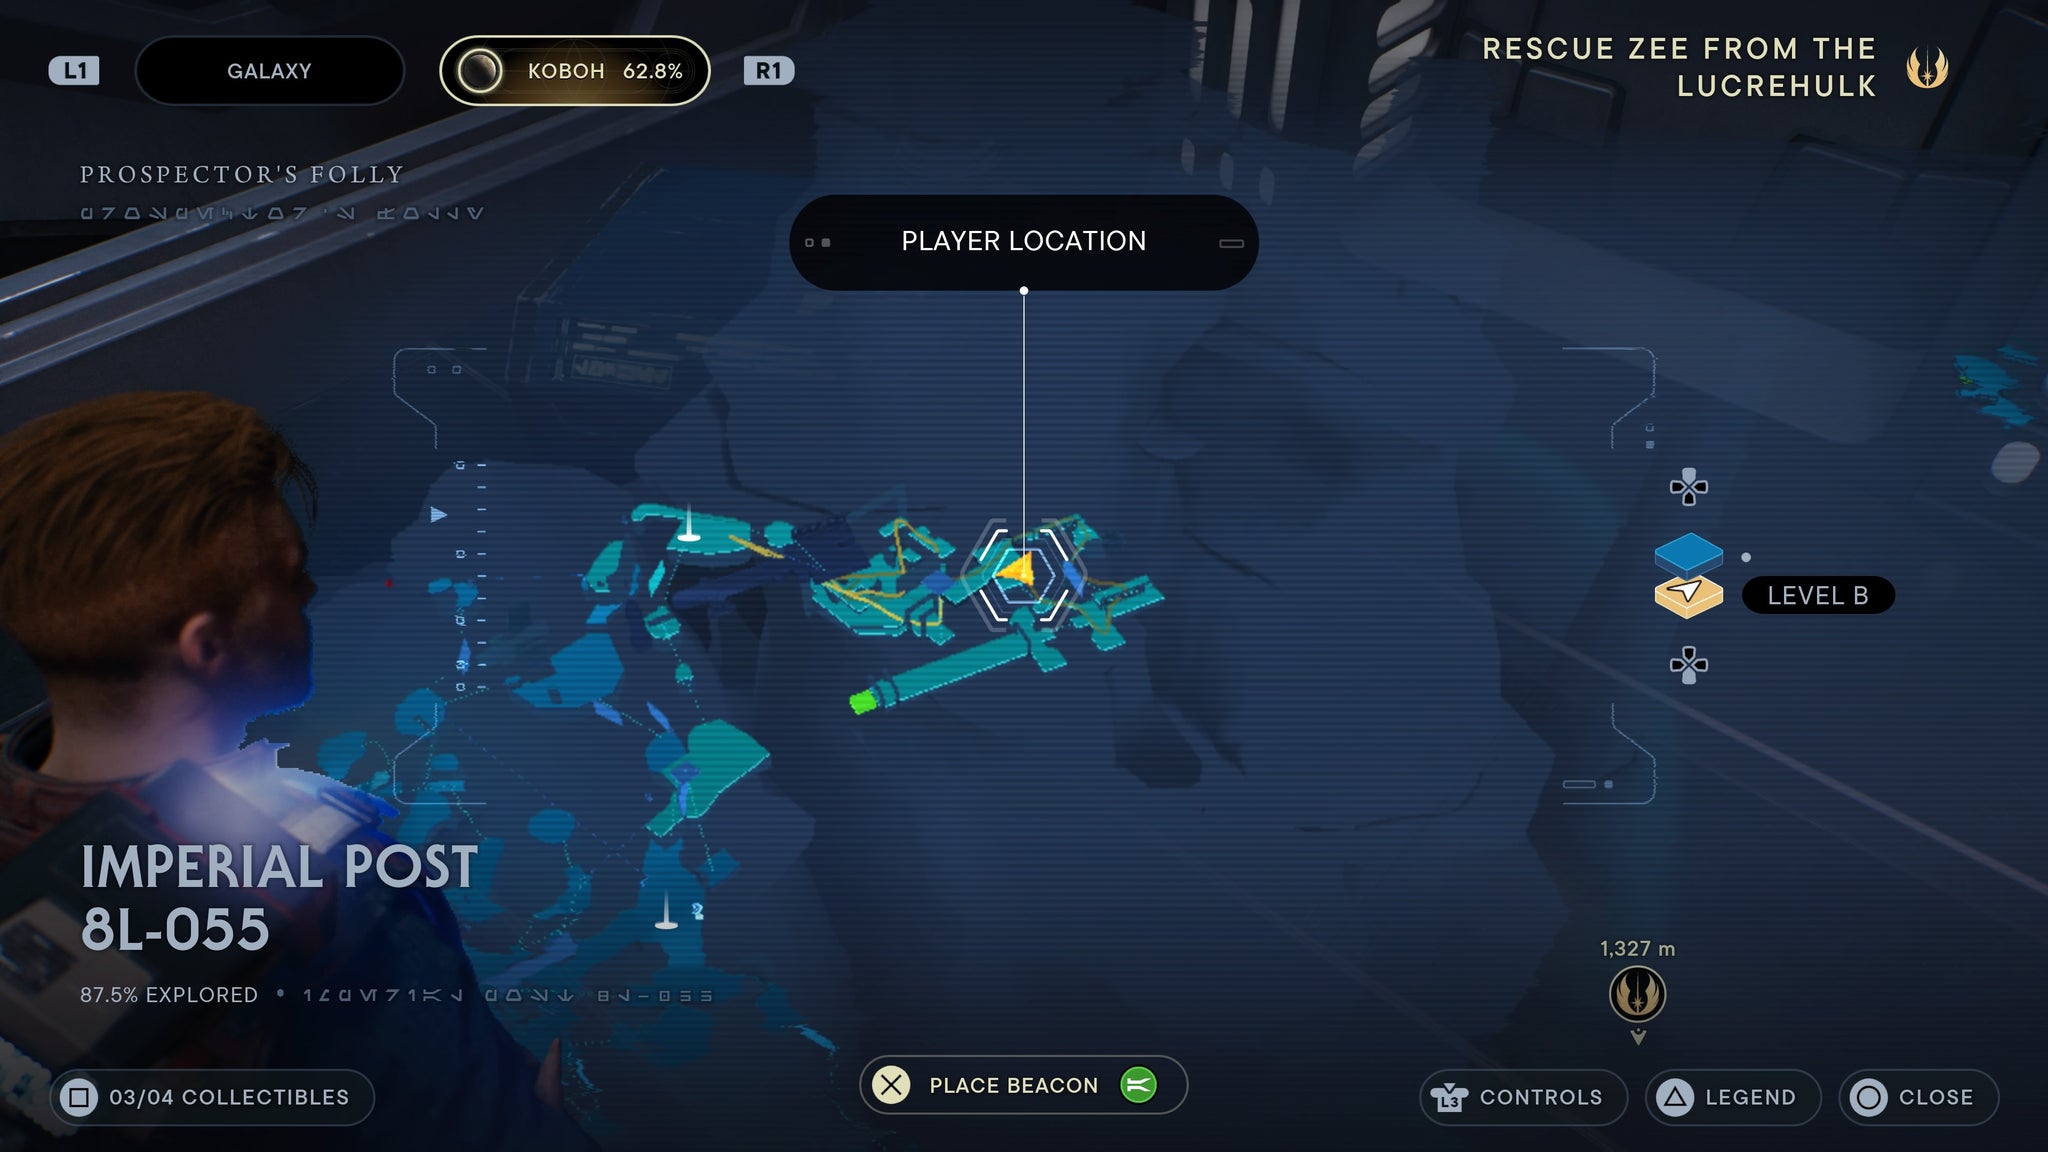
Right at the red room.
Unique Non-metal weapon material
Found in the Chamber of Clarity. As you enter, pull the box beneath you to the right so you can cross the gap to the other side. Before you jump across it, leap down to where it was in the wall. There will be a side path you can climb up inside. Run across the walls to the platform above, and follow the path around. Pull the two boxes ahead of you to reach the other side of the room. Once you reach the other side, there will be a chest you can loot.
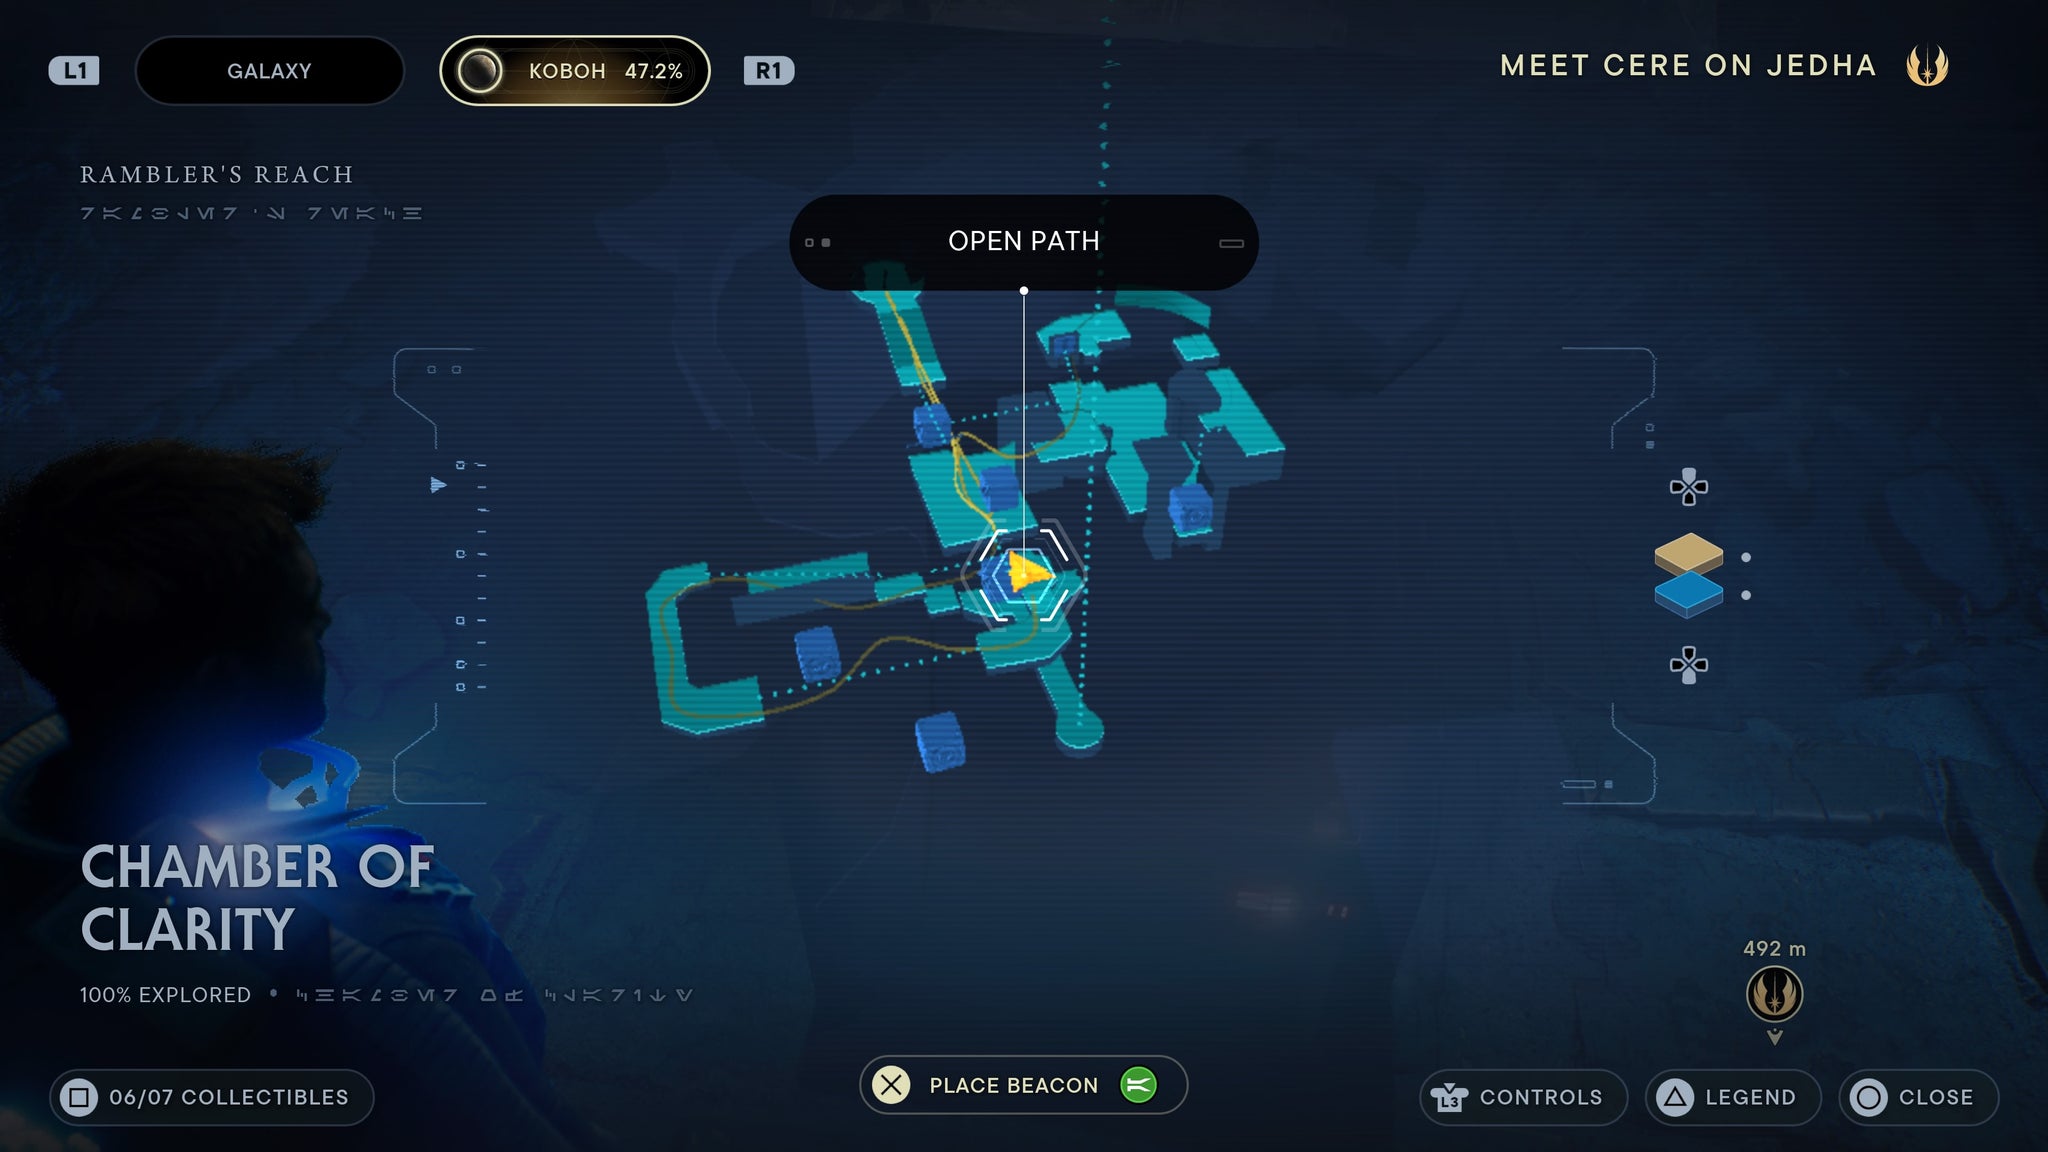
Hidden in the chamber!
Two Tone Metal weapon material
Requires electro shot. Found in Derelict Dam. Head into the firelit room in the mines, then shoot the machine near the roof. This will unlock the chest nearby.

Use the dart and prepare for a fight!
Arakyd Heavy Grip (blaster)
make use of that electo dart!
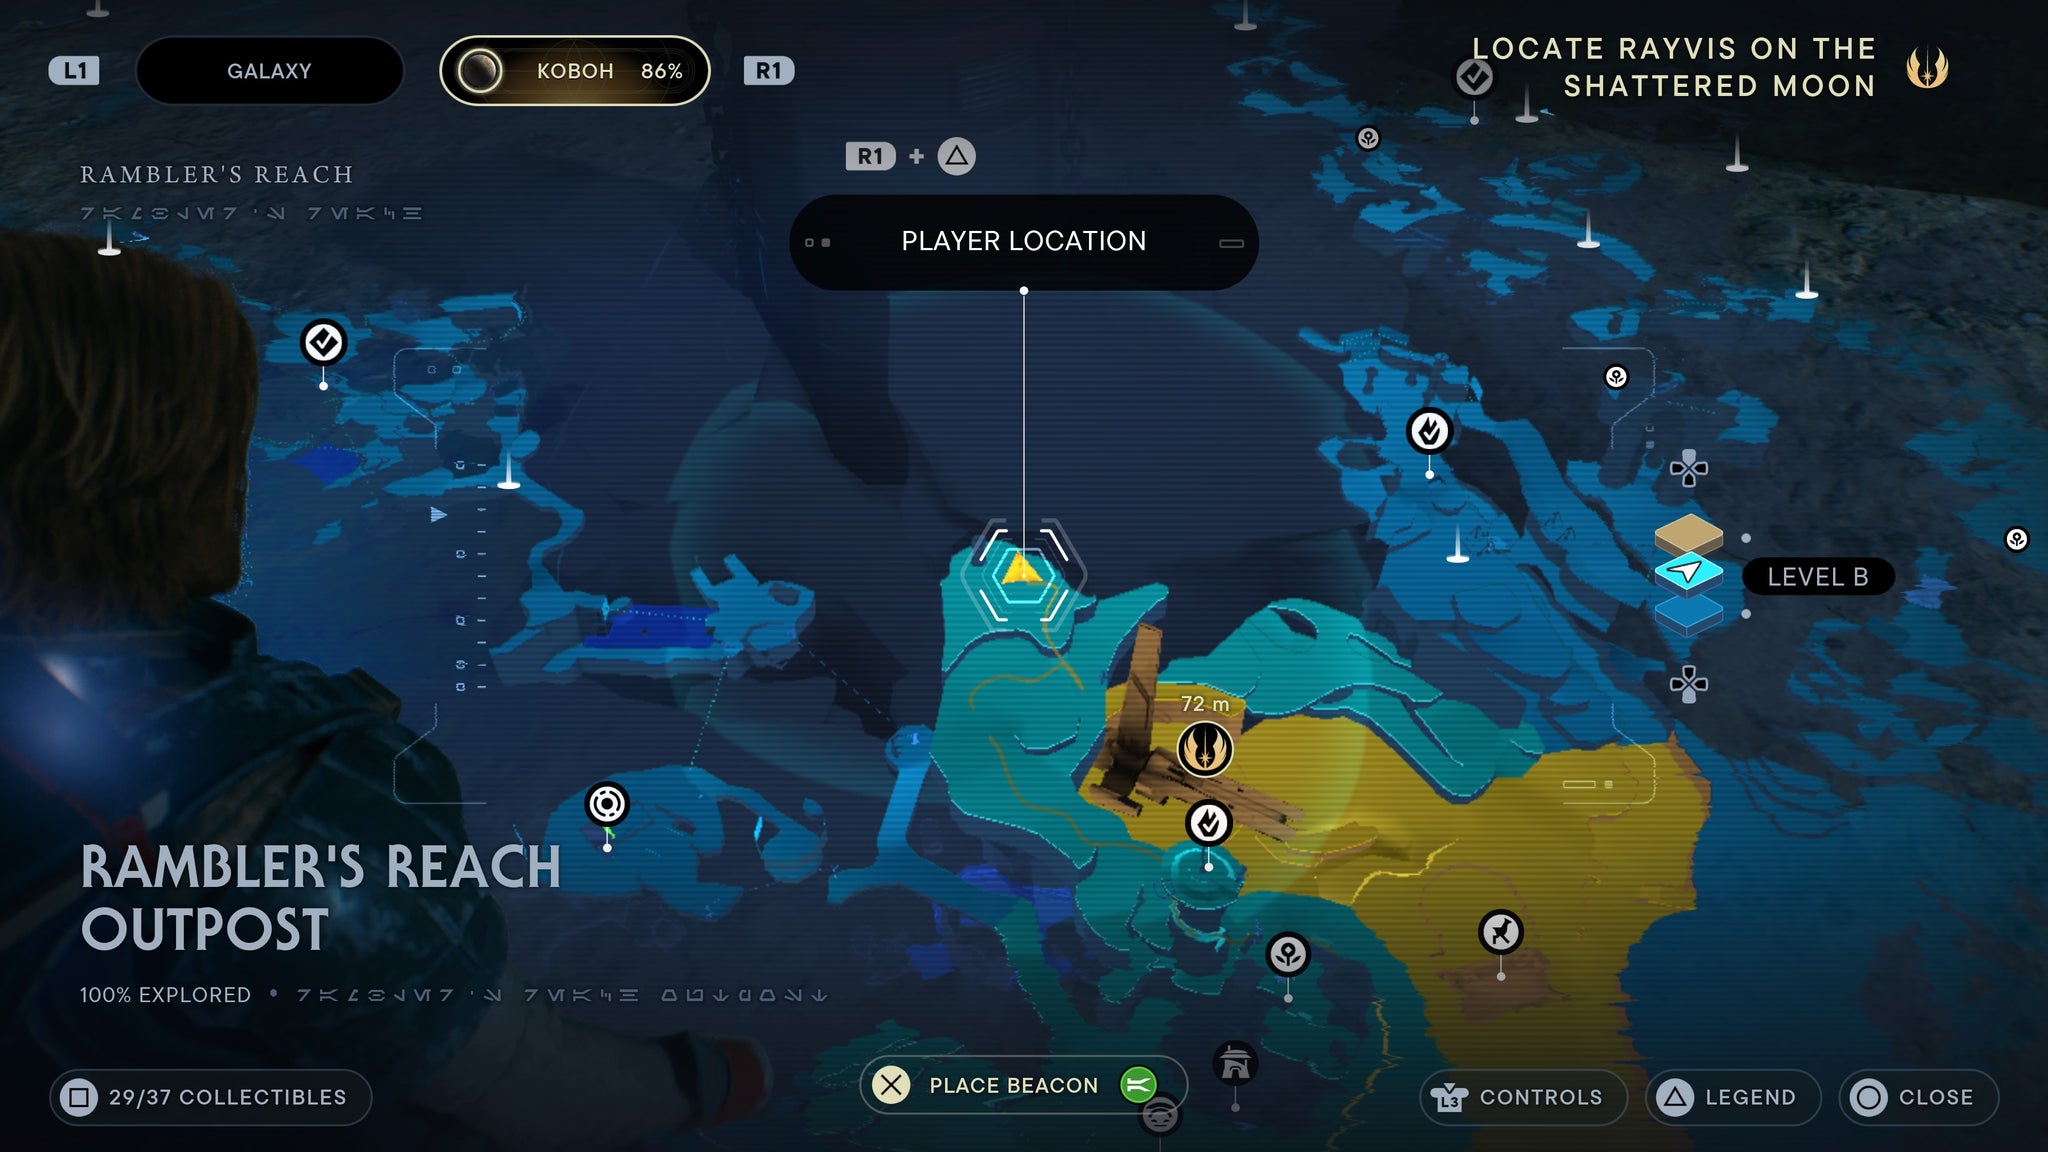
Swoop blaster (all parts)
Requires electro dart. Found in Rambler’s Reach Outpost. Shoot the dart at the machine in the building in town. From there, climb on the roof and pull the cable to the slot on the same roof. This will open the door below, where the chest is.

Power up the building and a chest is inside!
Enforcer Barrel
Found in the Loading Gantry. Push down the bridge shortcut near the Hangar Rafters meditation point. Right next to where you pushed it down is a chest.
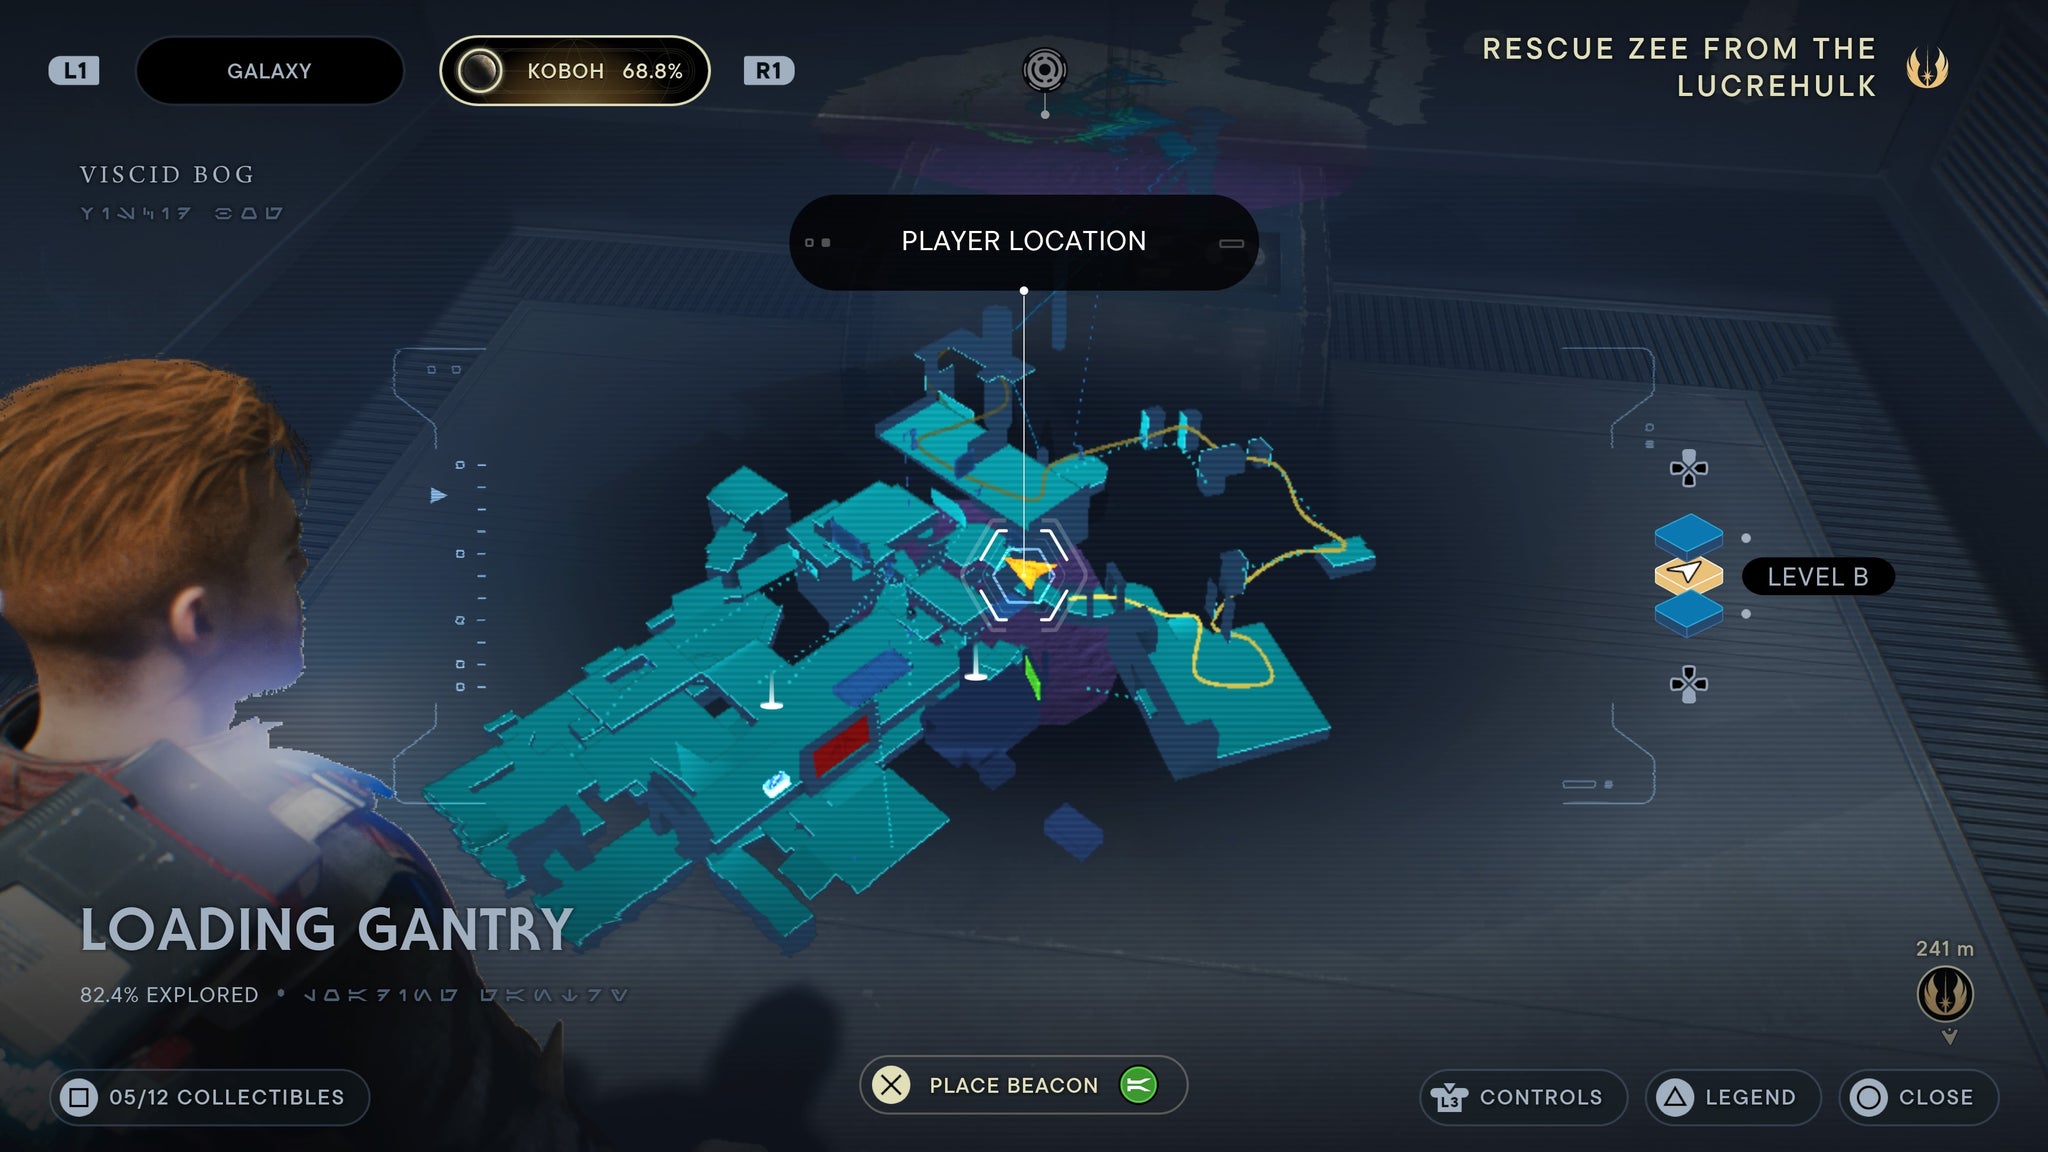
You’ll see it right by the bridge shortcut.
Persistence Grip
Found in the Loading Gantry. From the meditation point, walk through the main door nearby and take a left. Once the droids and raiders are dead, jump up the boxes by the forcefield and you’ll see another forcefield you can dash through. Do so, jump up some walls, and you’ll come to a chest.
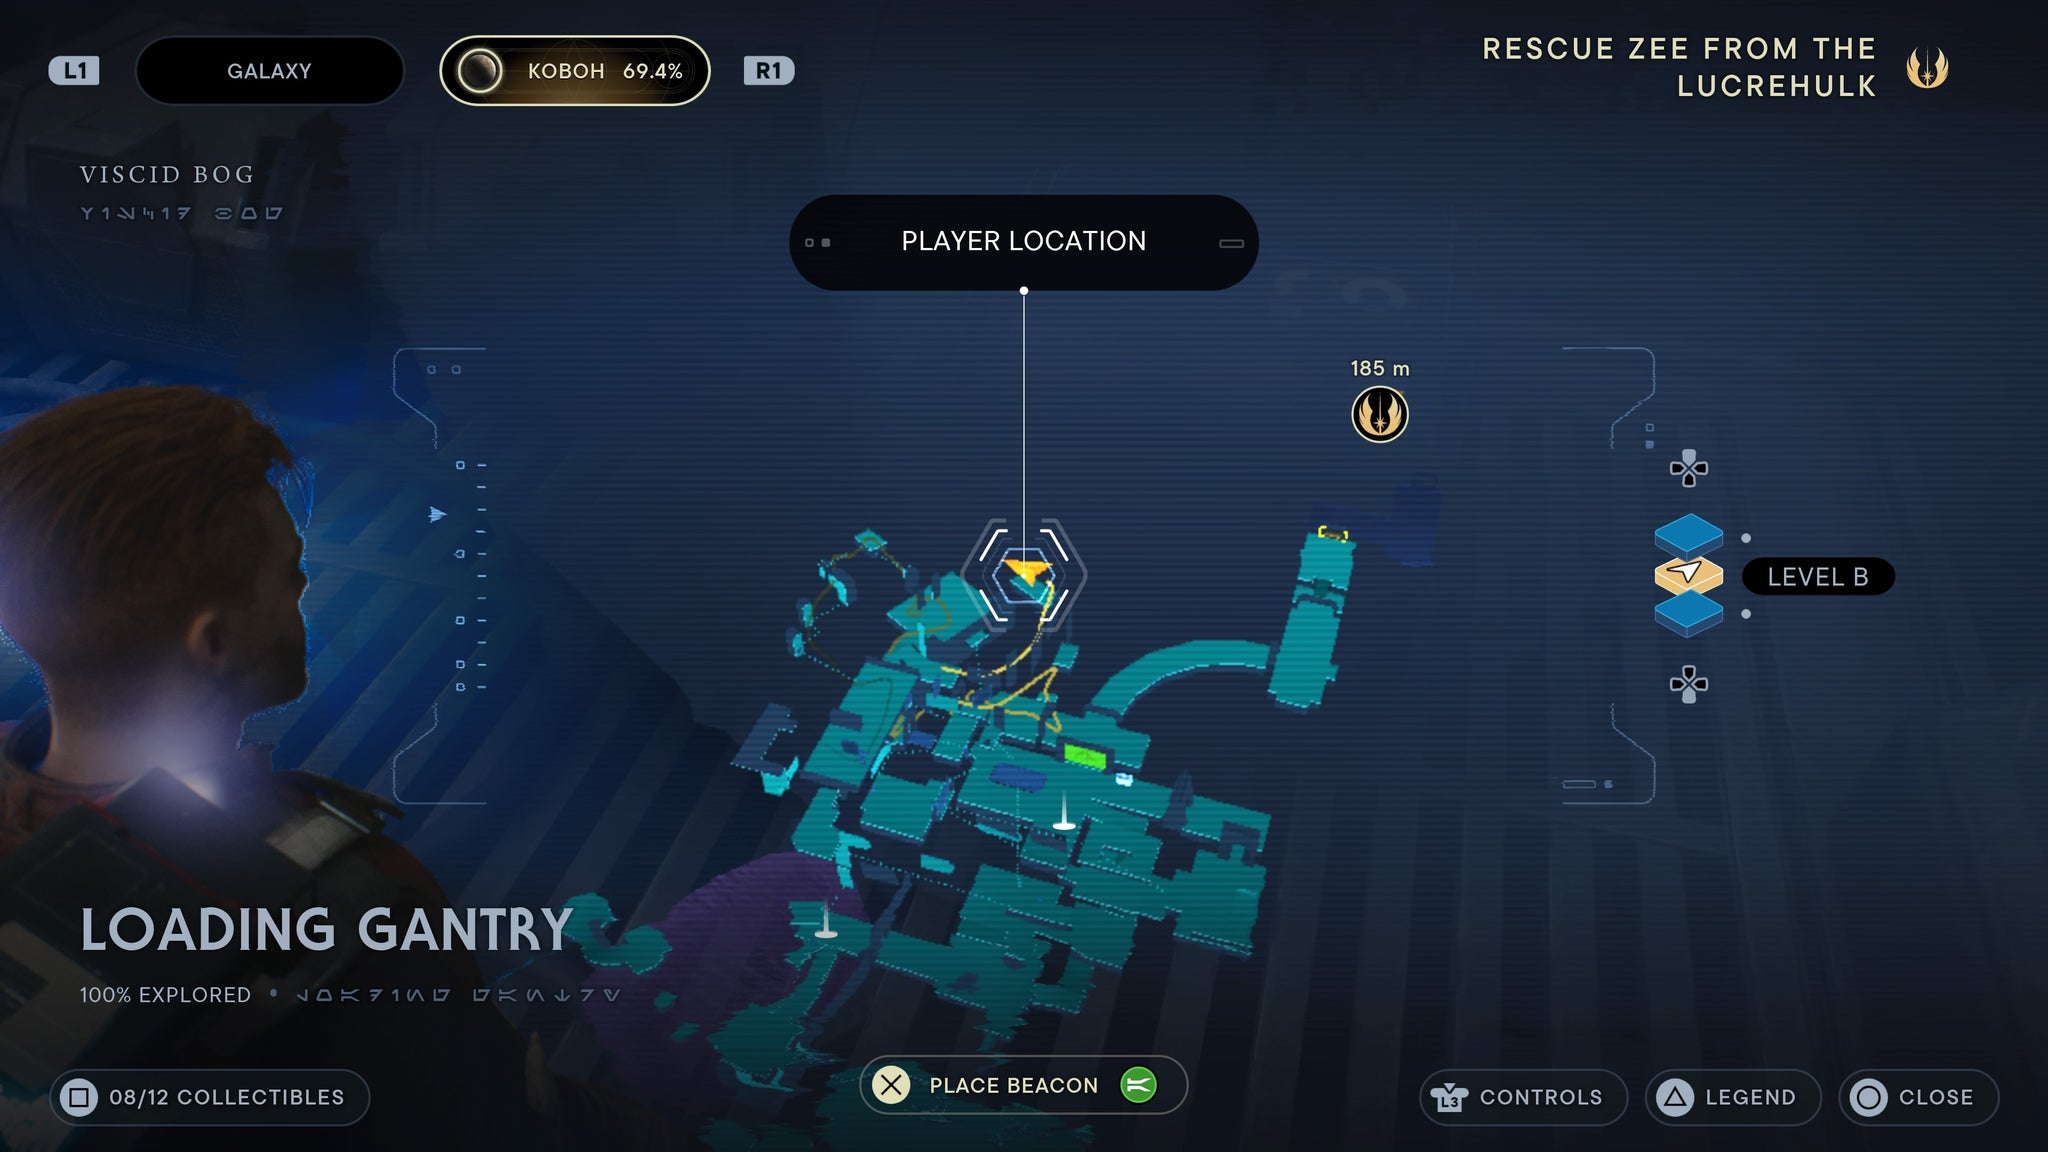
The first chest in this small sub-section.
Enforcer Grip
As you enter the Yurt Barracks, turn right and walk through the cables. You’ll enter a red room. Use the wall ahead of you to climb upwards, then jump. Once you’ve landed, take a right and jump across to the nearby platform to find a locked chest.
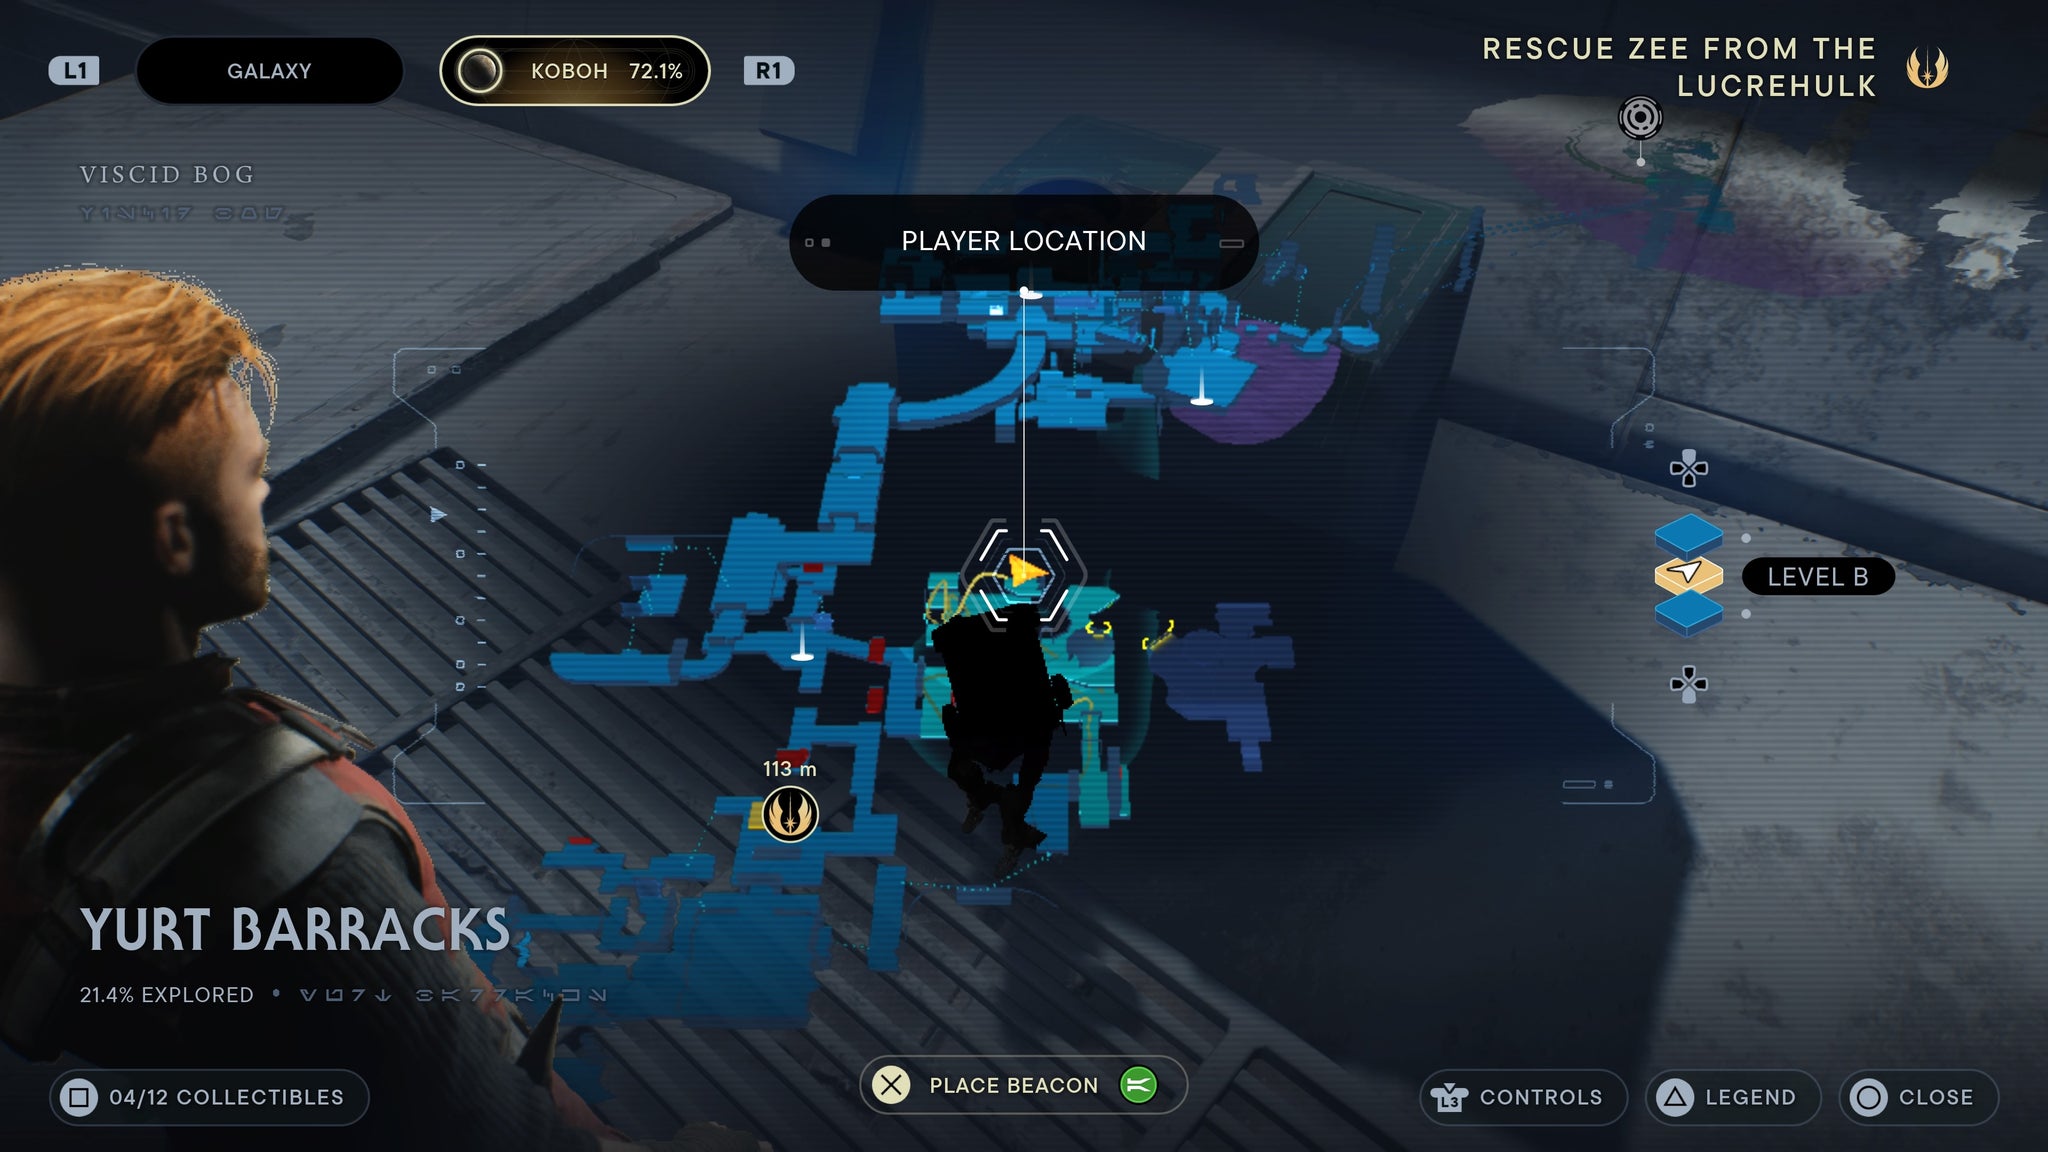
Jump through the red room, find a locked chest!
Enforcer Body
Found in the Yurt Barracks. Make your way to the two droid transports, then walk left of them up the ramp. Turn around and shoot an electro dart into the nearby machine. This will unlock the nearby chest.
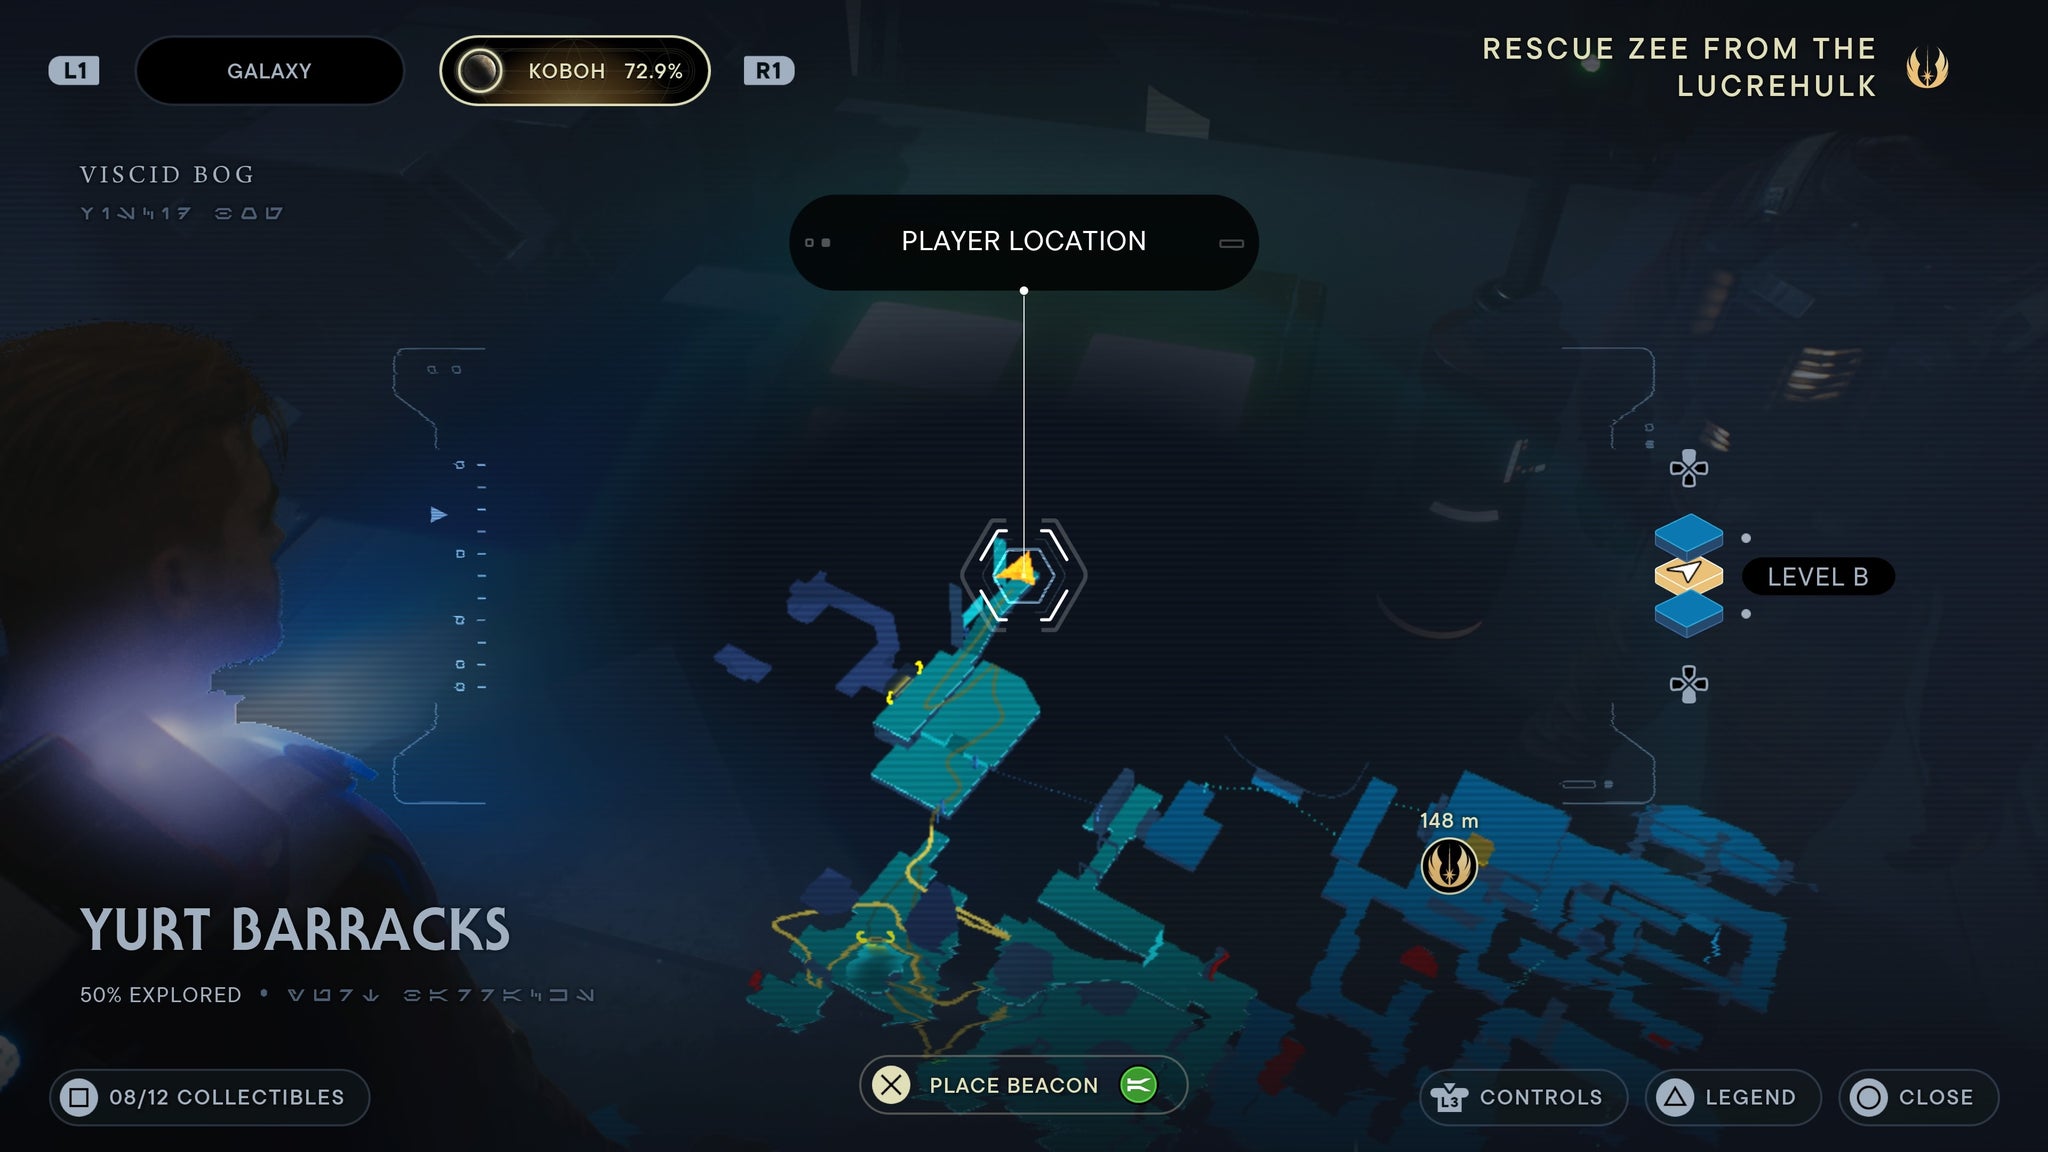
Left of the double droid transports.
Persistence Emitter
Found in the Chamber of Connection. Run the bruning rock path up the stairs and past the door, then lead it back down to the ground floor to clear the doorway below. This will open up a chest.
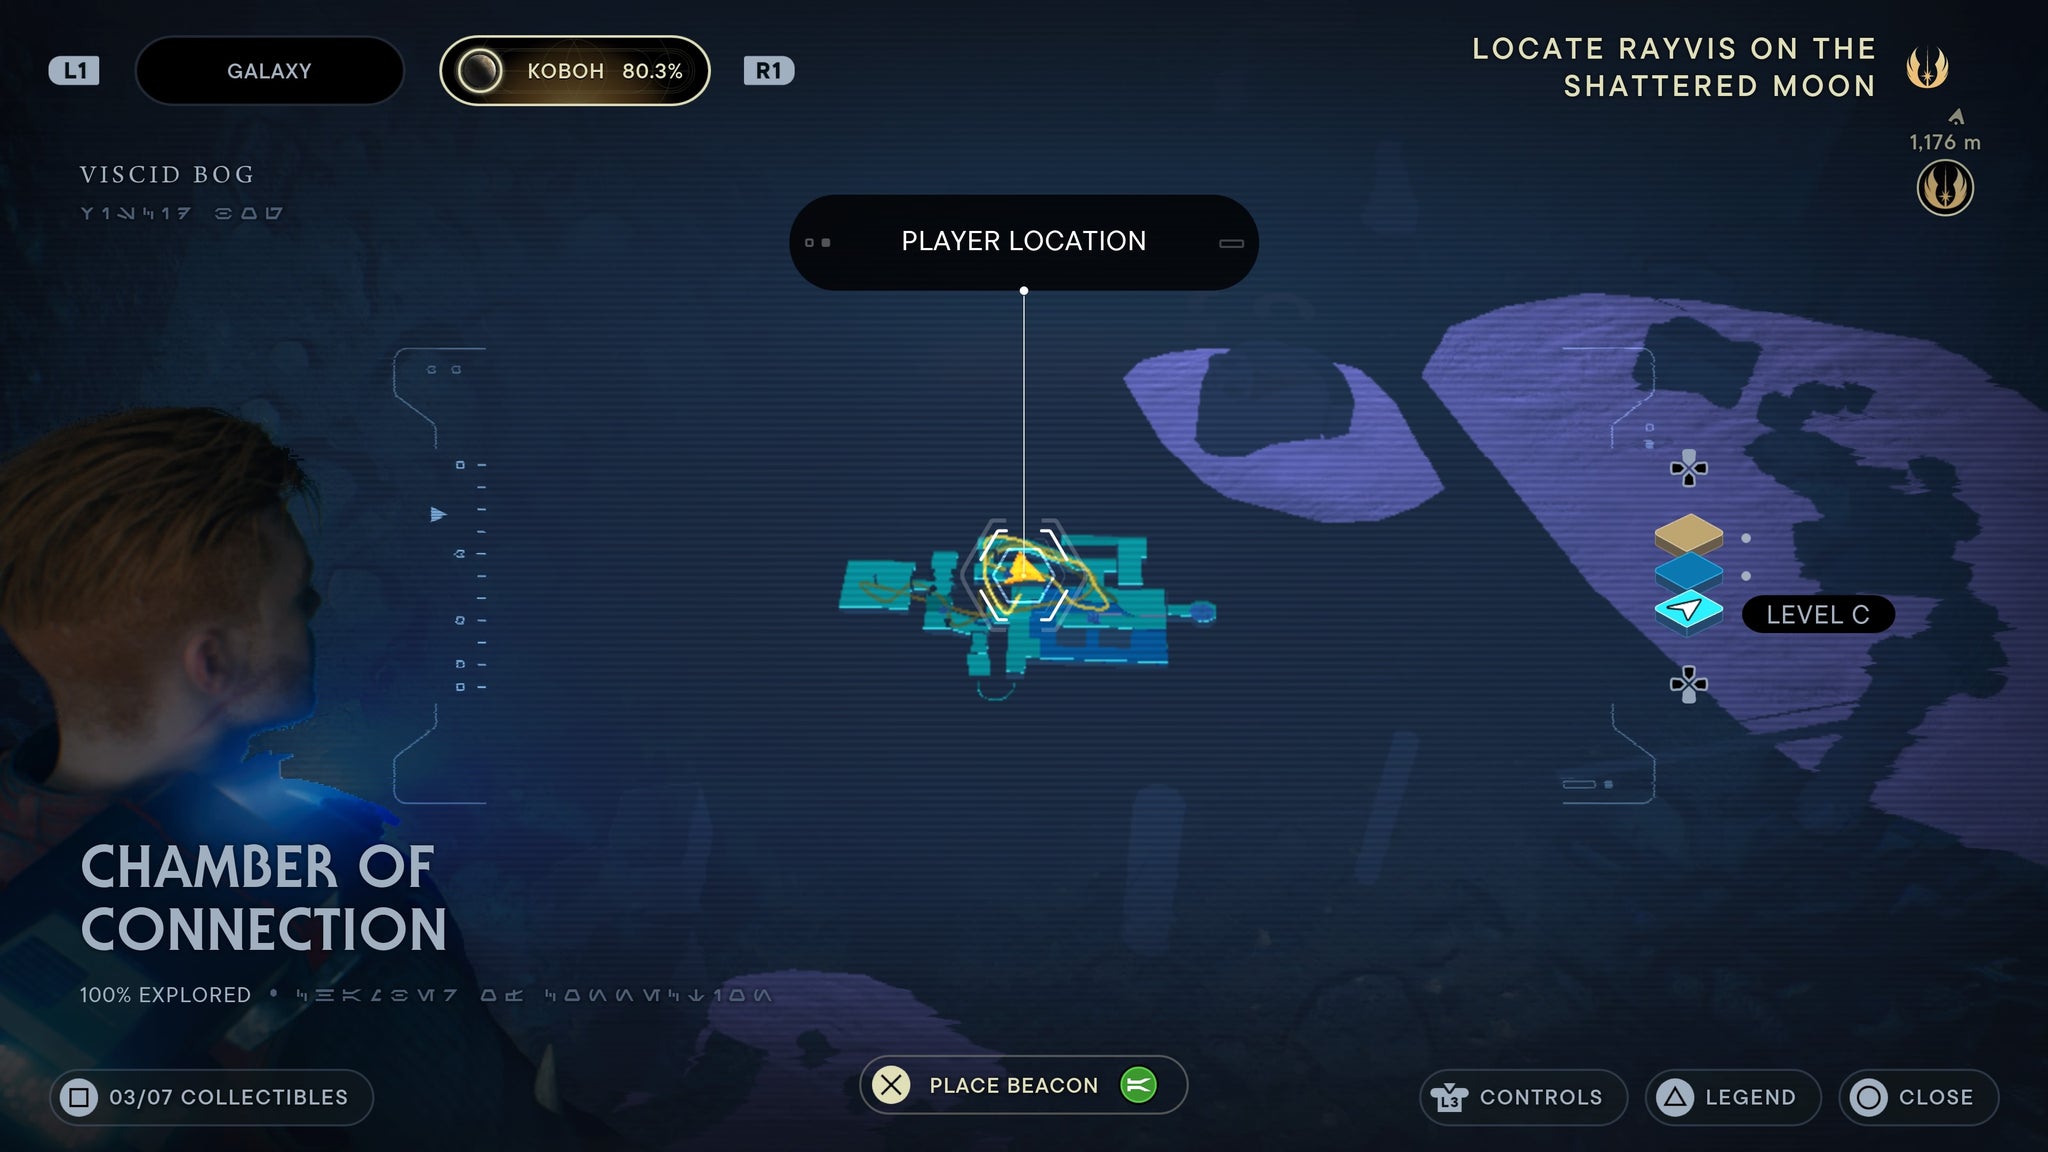
You’ll have to create a long chain of Koboh rocks.
Persistence Switch
Requires Force lift and slam. Found in the Viscid Bog. Take the lift between the Viscid Bog and the Gorge Crash Site, and jump off half way between the two sides. When you exit, turn right and you’ll find a chest.
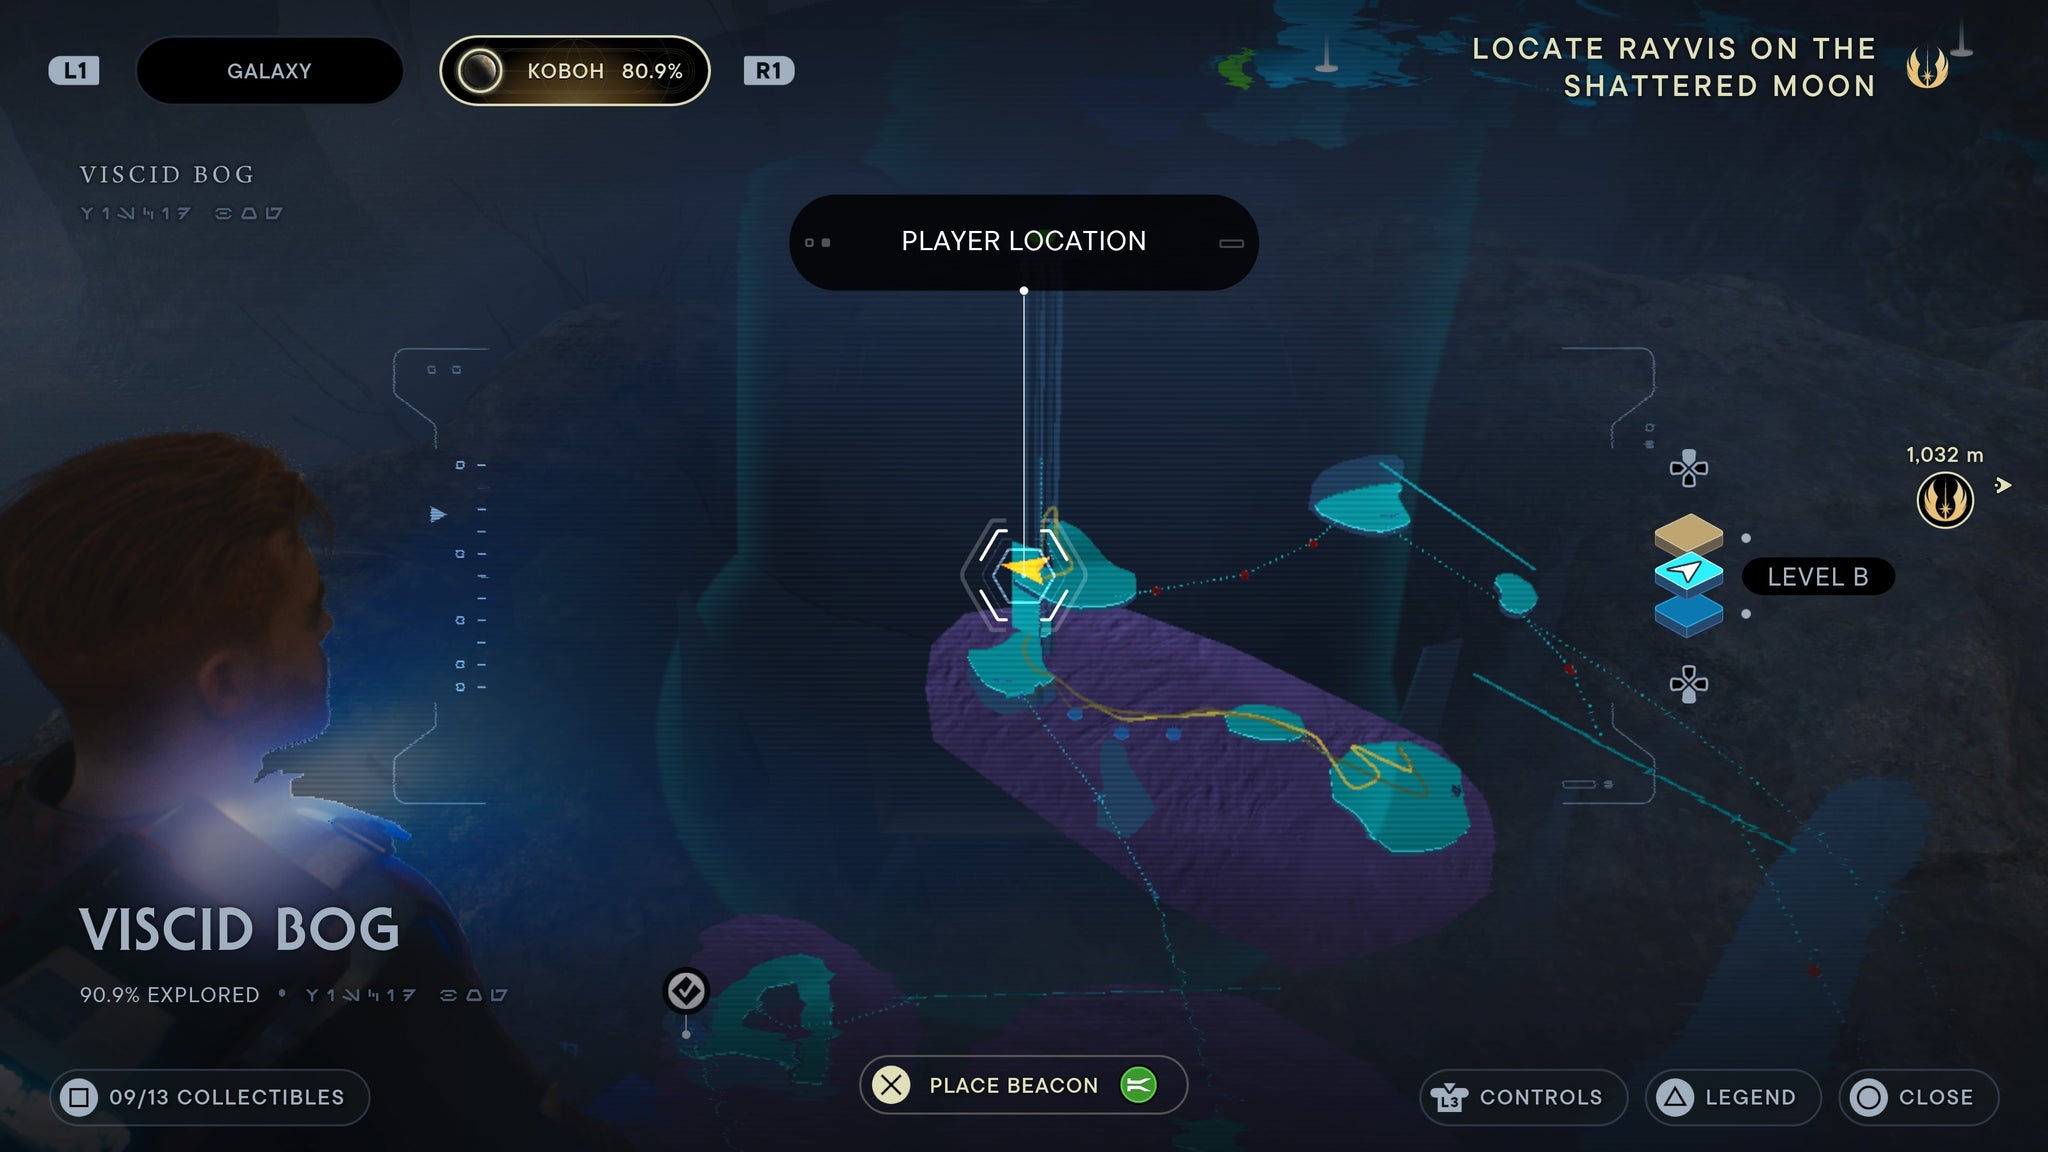
Jump from the elavator for this chest.
Edgehawk Switch
Found in the Water Treatment Works. Drop down the hatch in the Southern Reaches, then make your way right until you reach a chest.
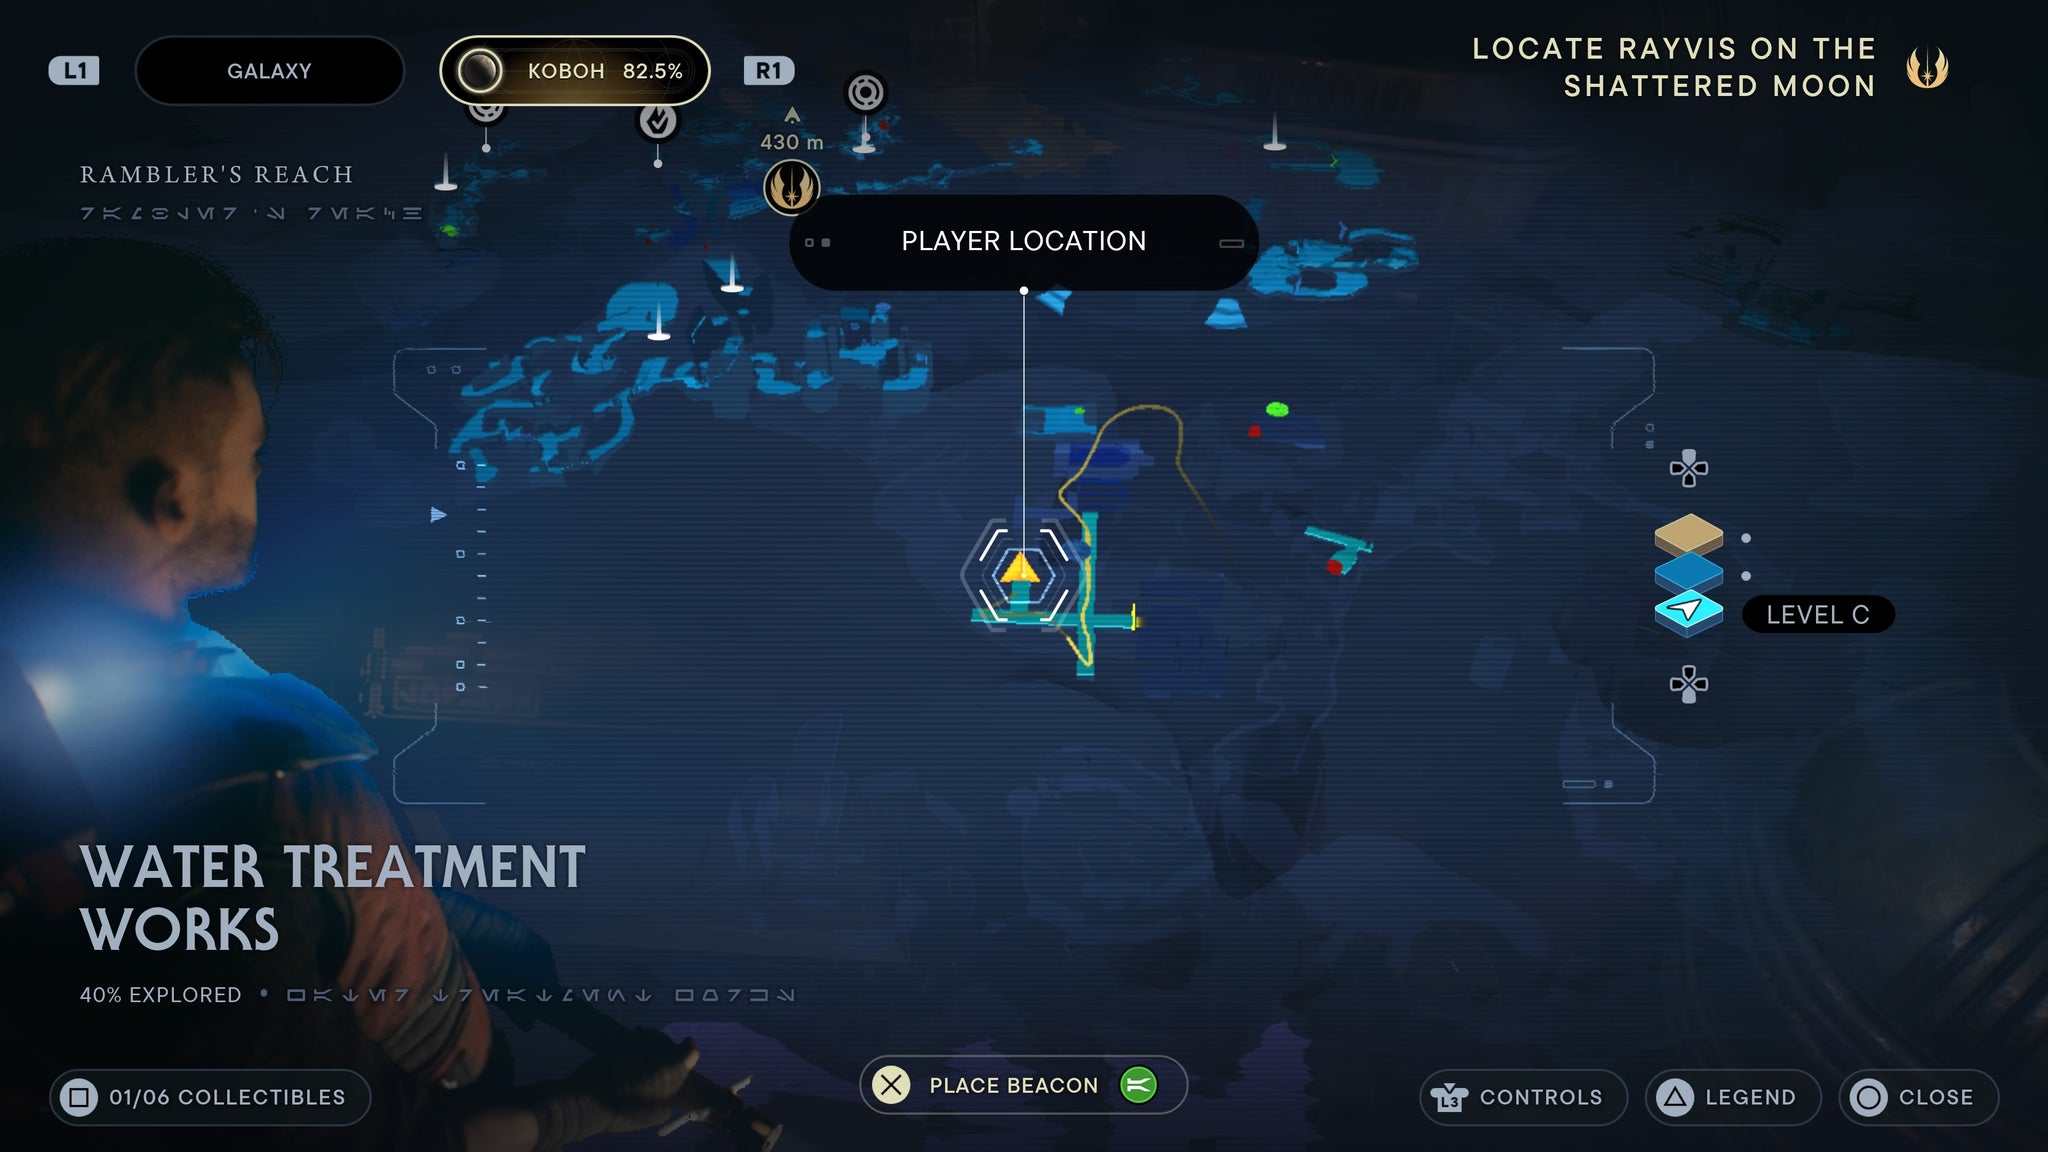
Very dark!
Edgehawk Grip
Requires force lift and slam. Found in the Water Treatment Works. Drop down through the Southern Reach hatch and climb to the second floor of the large lit room. Force push some rubble out of your path, and you’ll find a chest.
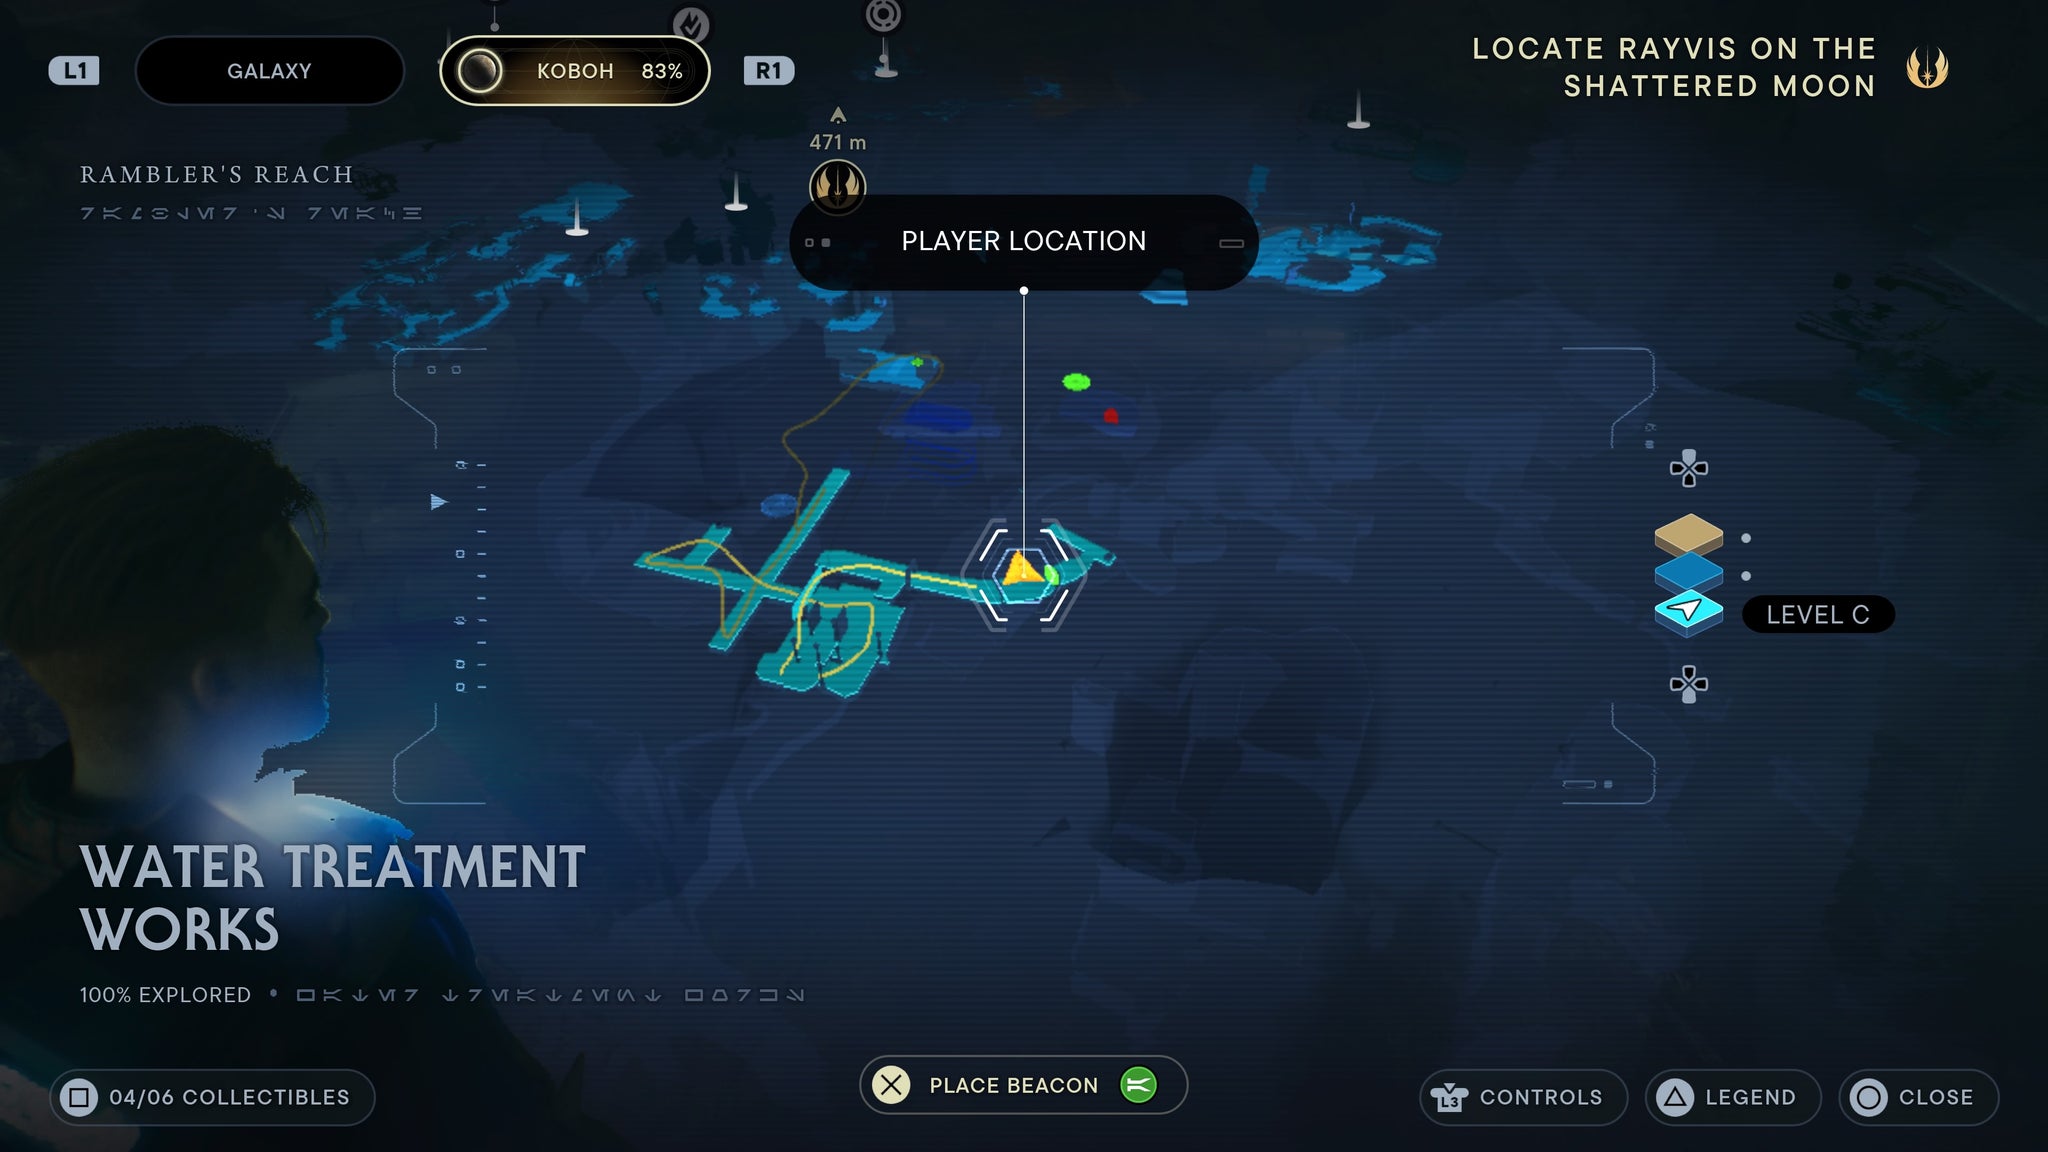
One push and the chest is yours!
Coated Metal weapon material
Requires for lift and slam. Located in the Flooded Bunker. Enter the warehouse in Southern Reaches, take out the turret, then drop down. Swim into the next room, then climb up the vines. Turn around, raise the platform, then jump across. Here you’ll find a chest.
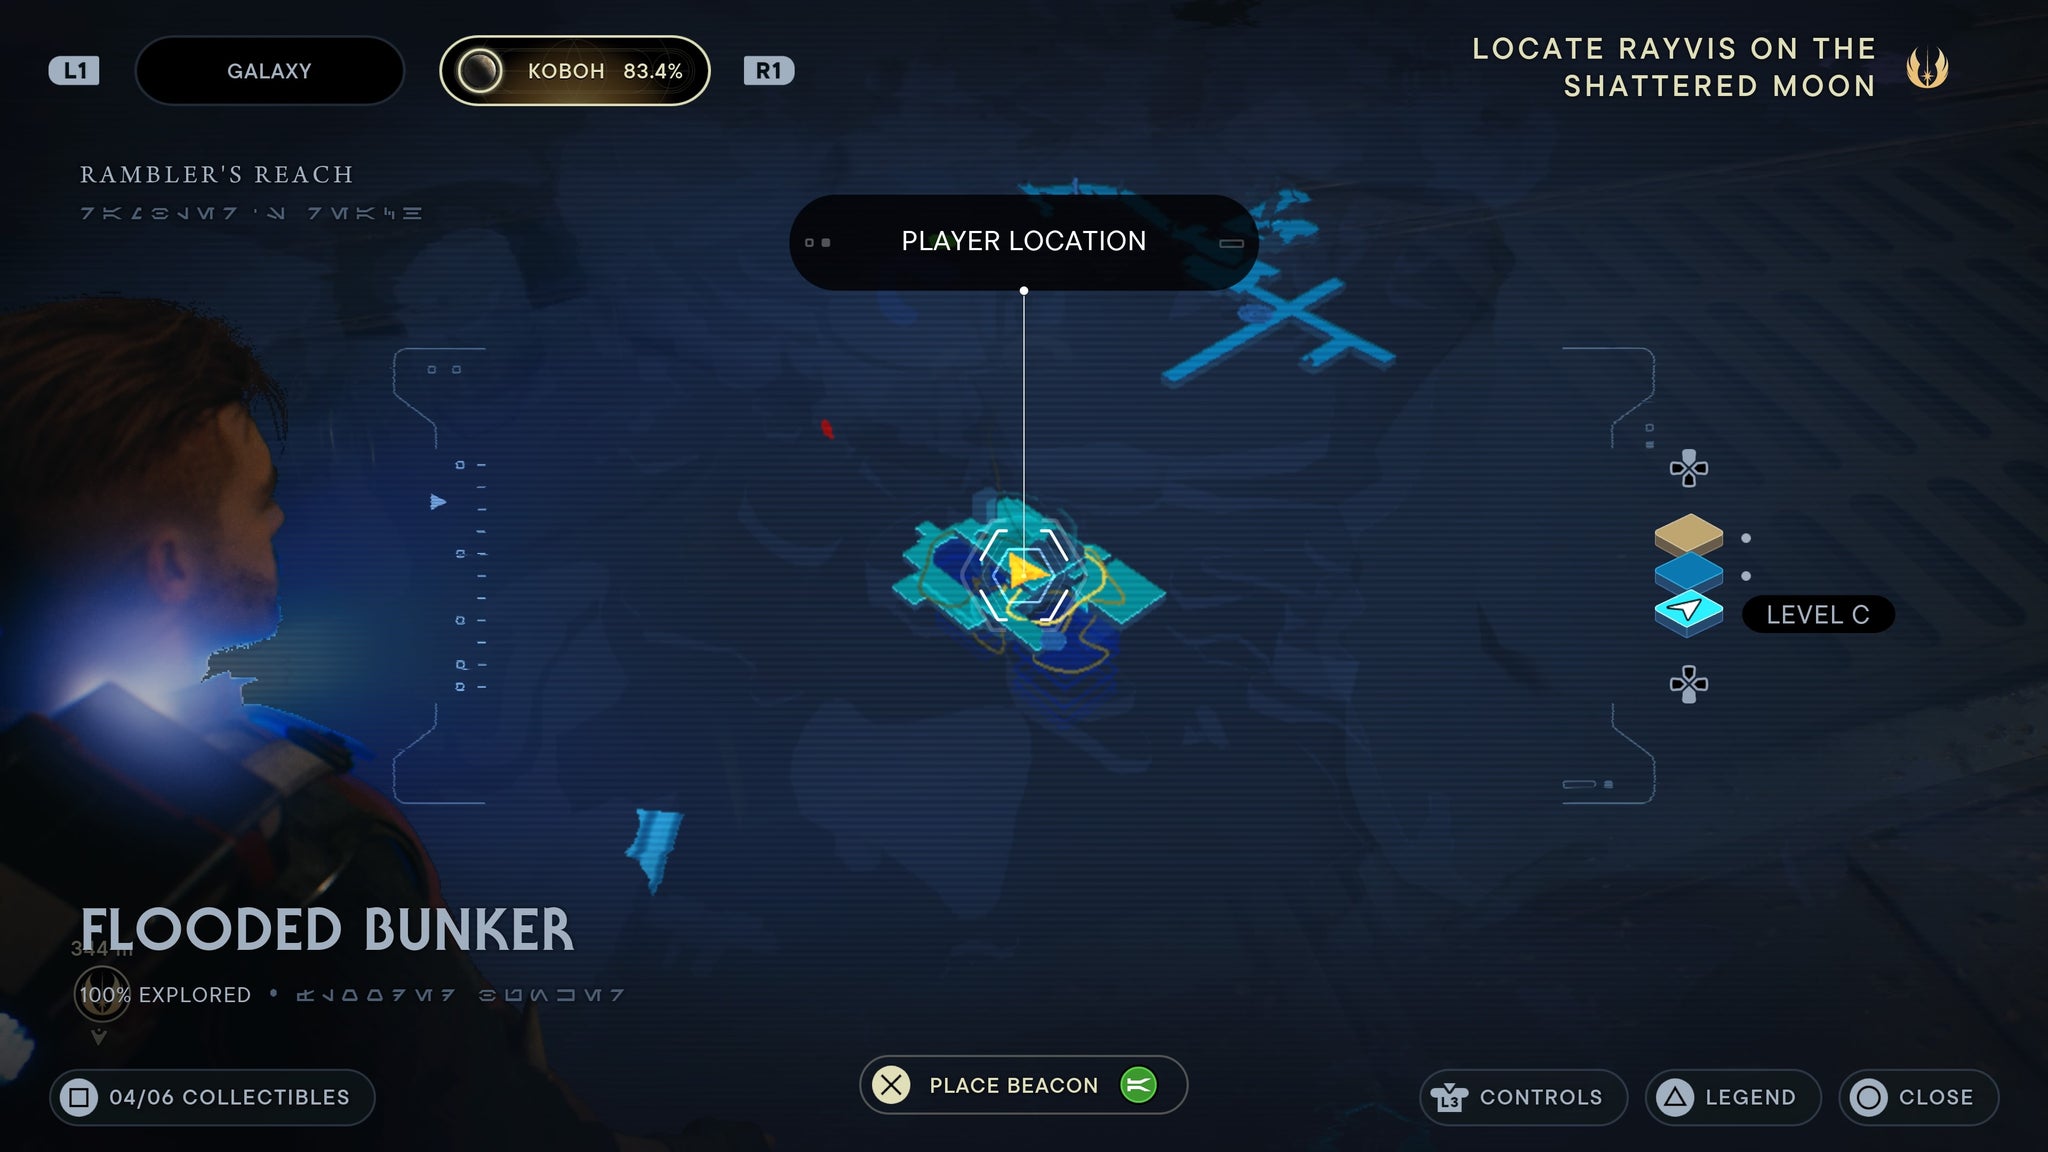
Should be quickly visible.
Arakyd Heavy body
Requires force lift and slam. Located in the Corroded Silo. Ride the zipline across and climb up. Once you kill the raider, look left and jump up. You’ll find a slammable chest there.
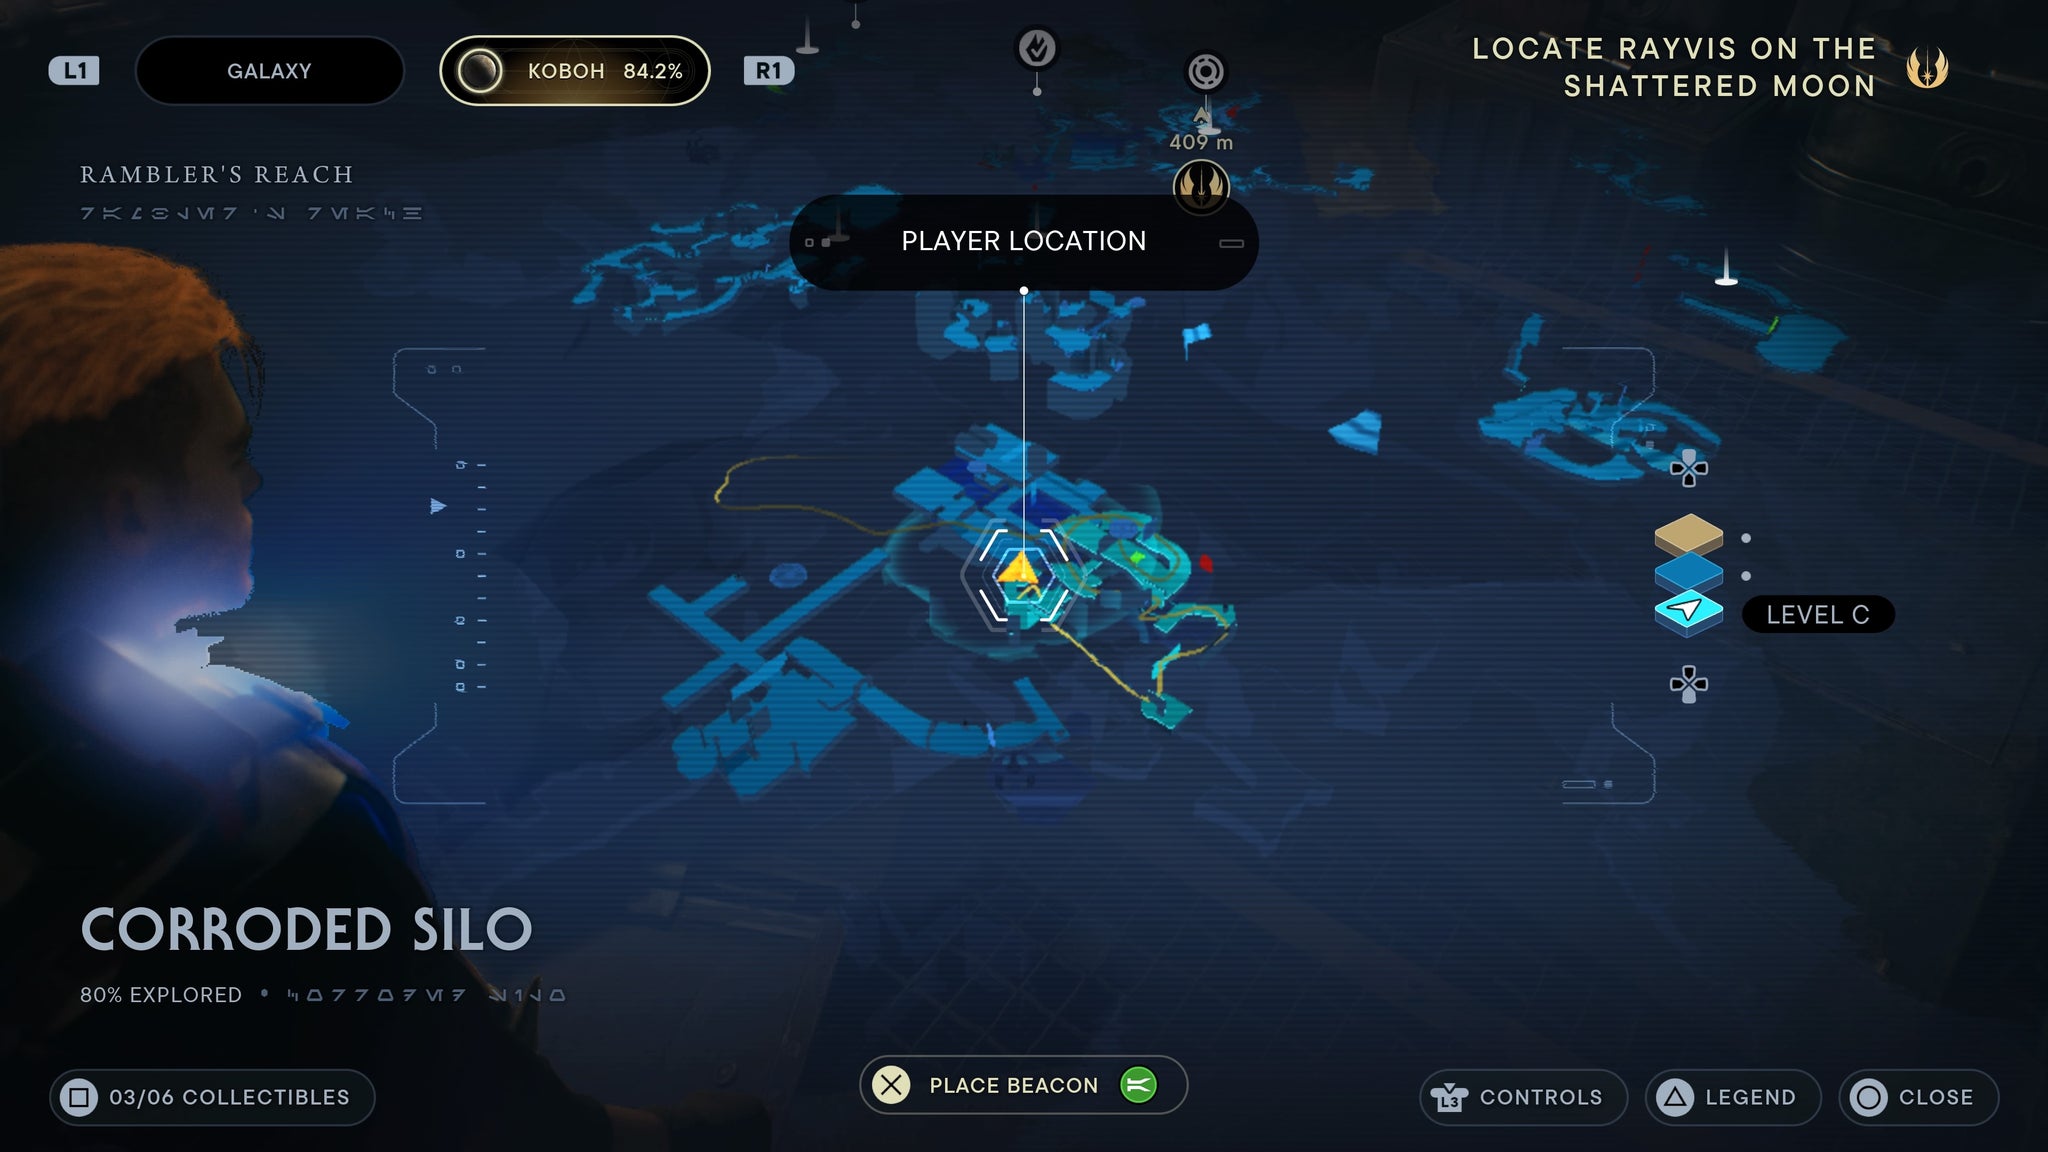
Jump up after the zipline and the chest will be waiting.
Bumpy Rubber weapon material
Requires force lift and slam. Located in the Corroded Silo. Ride the zipline across and climb up. Once you kill the raider,look down where he was standing and you’ll see a chest you can slam through the floor.
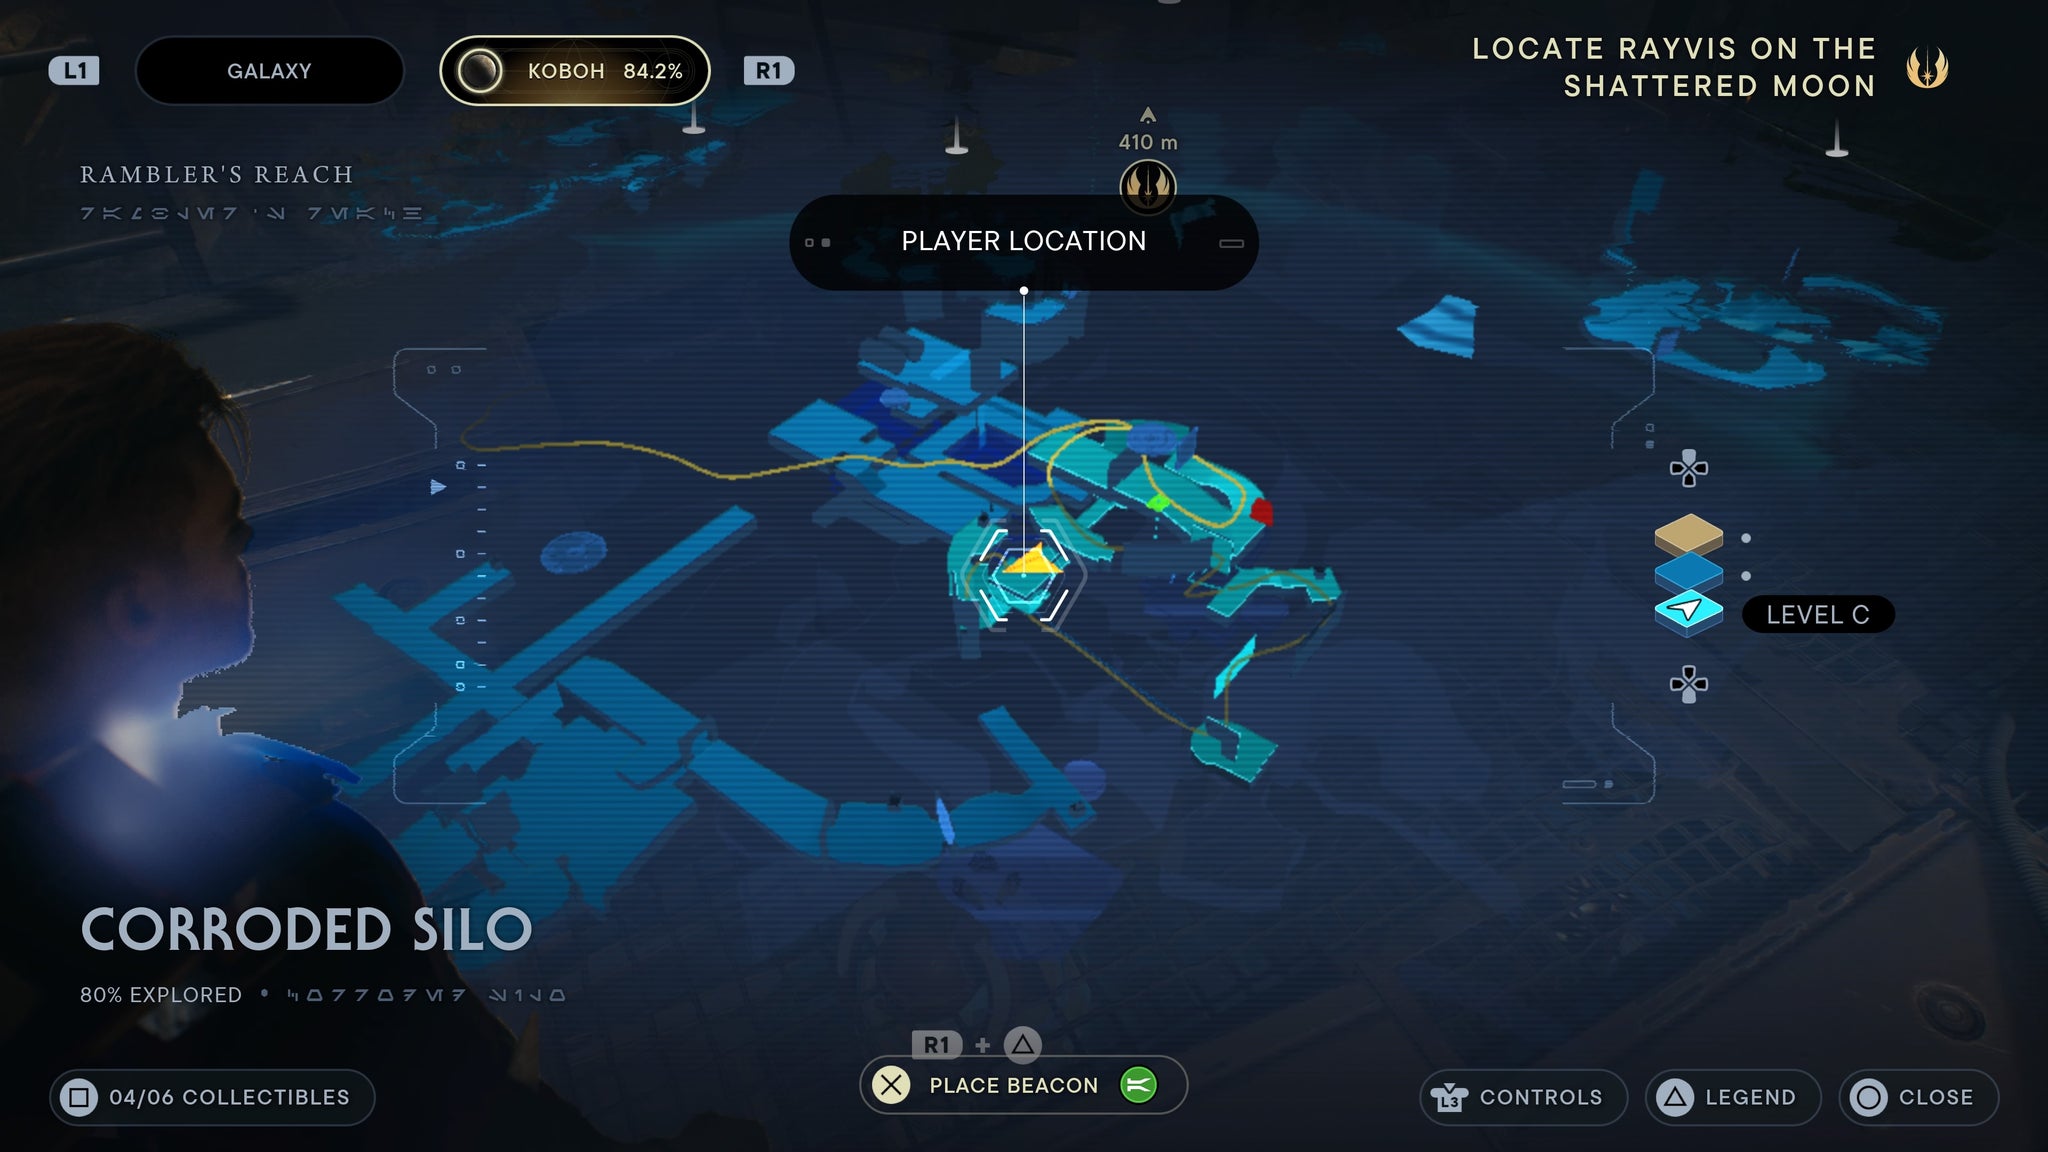
You can slam it through the floor. Or, circle back later.
Quickdraw pistol (all parts)
Requires force lift and slam. Located in Southern Reach.. First, use force lift to raise the heavy door in Hunter’s Quarry and head inside. Finish up the mini-puzzle and it’ll shoot a beam out into Rambler’s Ranch Outpost. Use the koboh grinder to create a burning path into the house nearby. This will blow it up. Once you’ve done that, head inside and you’ll find a chest.
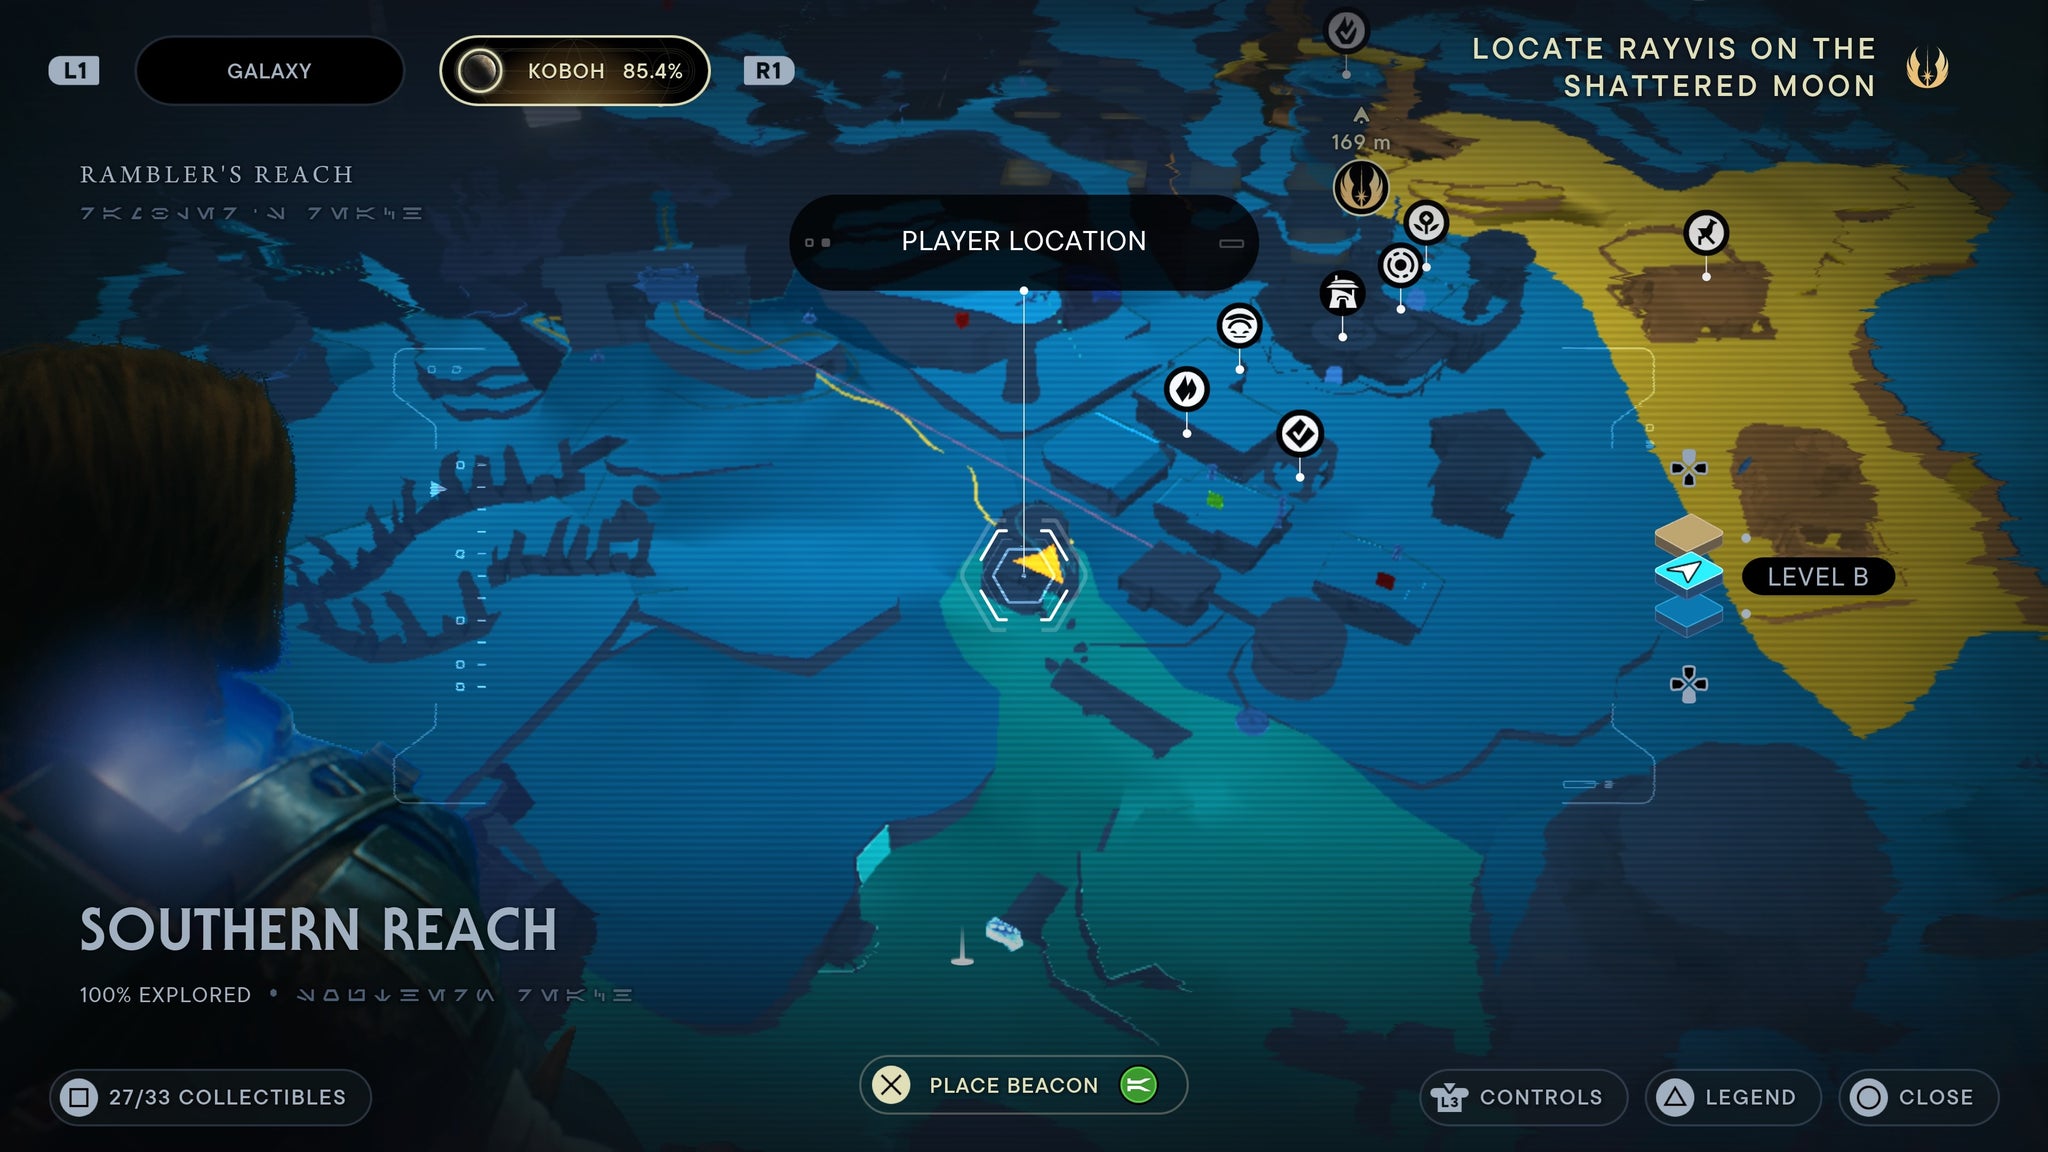
Blow up the building!
Edgehawk Pommel
Requires force lift and slam. Found in the Rambler’s Reach Outpost. Climb up the vines on the tower on top of Pyloon’s Saloon, then jump on top of the raised area below you. At the end of the path there, you’ll find a chest you can smash open.
A bit of edge on the ledge.
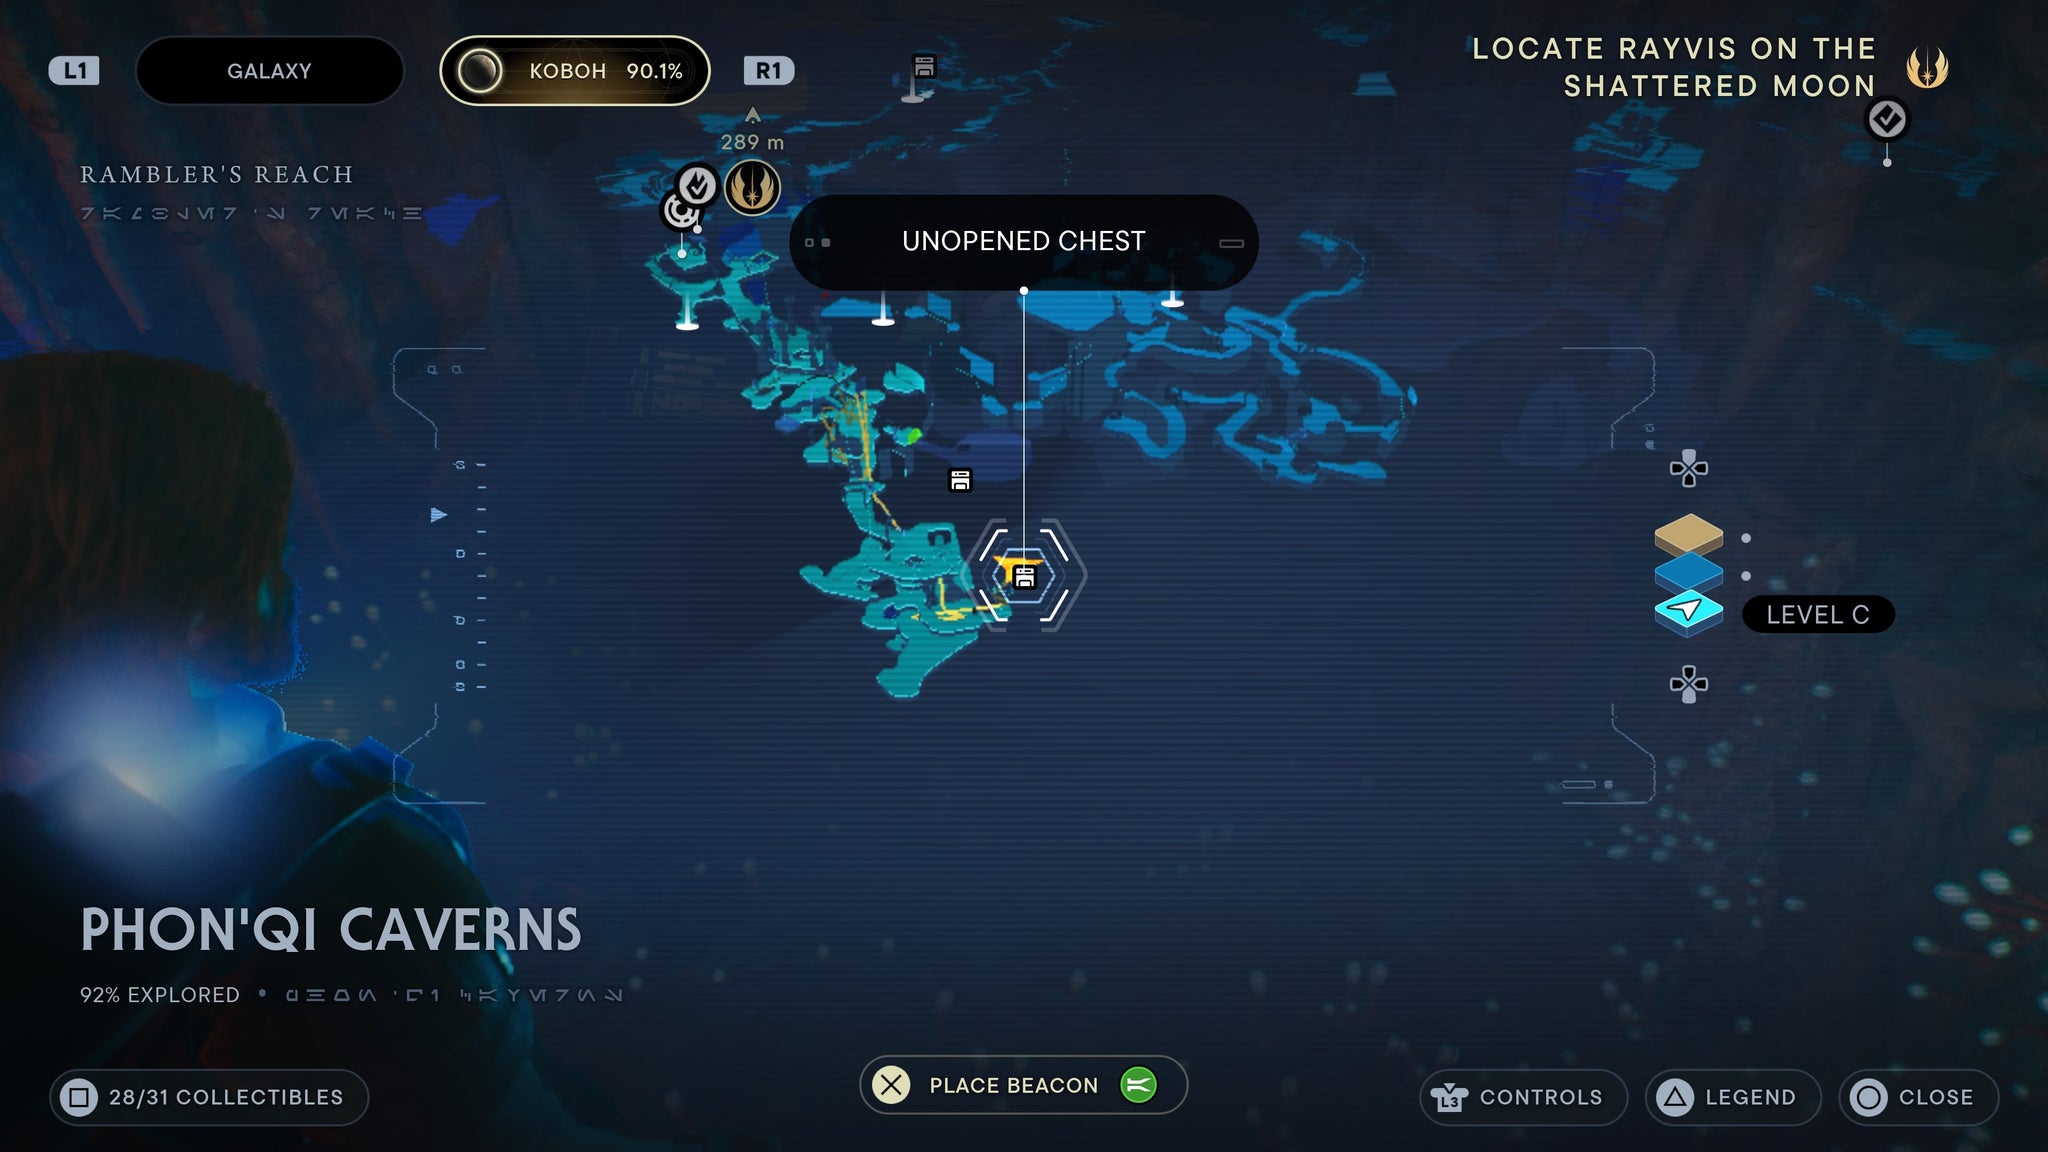
Duelist Pommel
Requires force lift and slam. Found in the Phon’Qi Caverns. Make your way all the way to the bottom of the caverns where Skoova is. Once there, dive to the bottom of the water. You’ll find a chest.
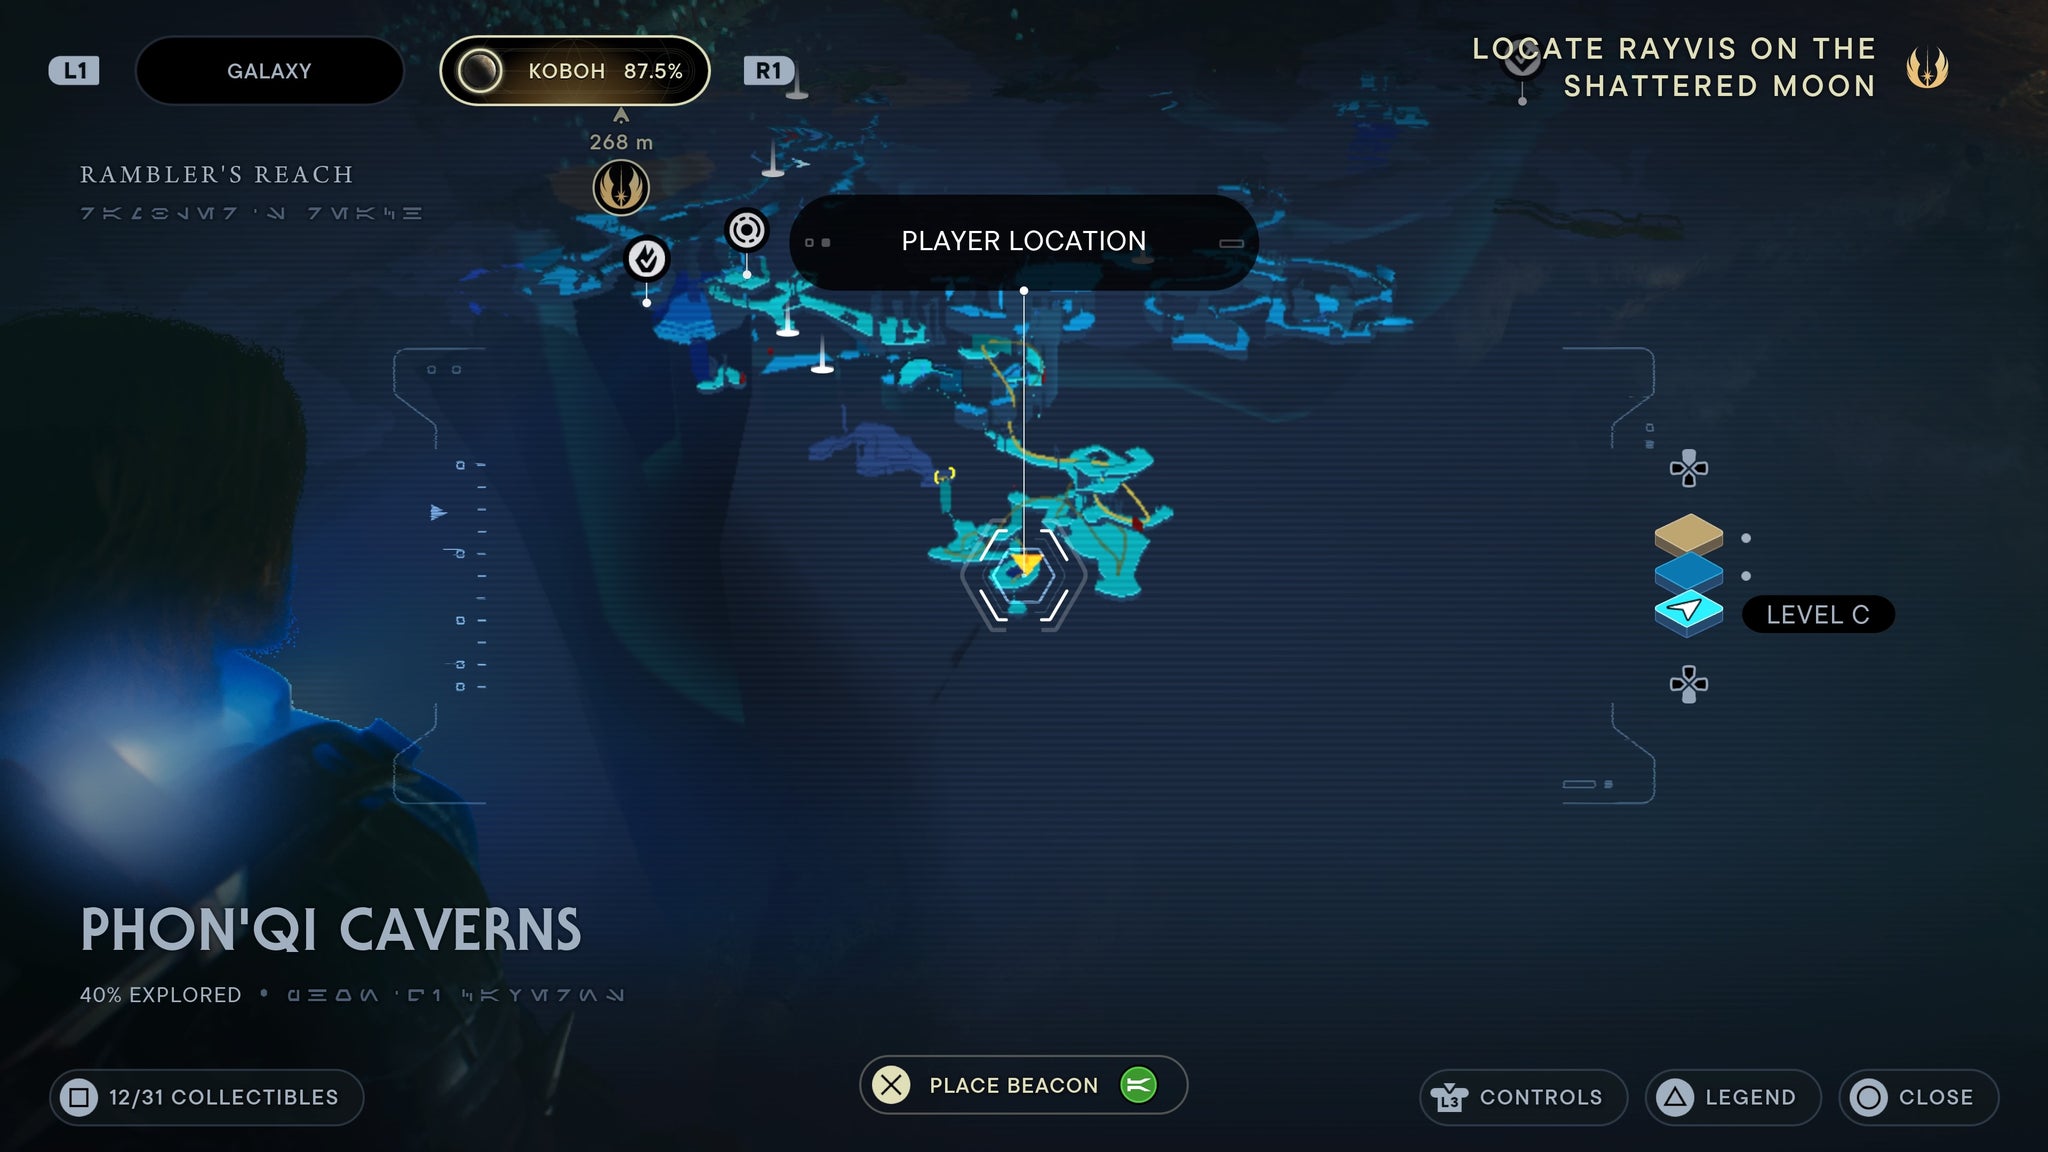
Dive dwon past Skoova.
Duelist Grip
Requires force lift and slam. Found in the Phon’Qi Caverns. Head to the large room filled with pots. Grab an acid plant and throw it at the electrified door. Inside you’ll find a chest.
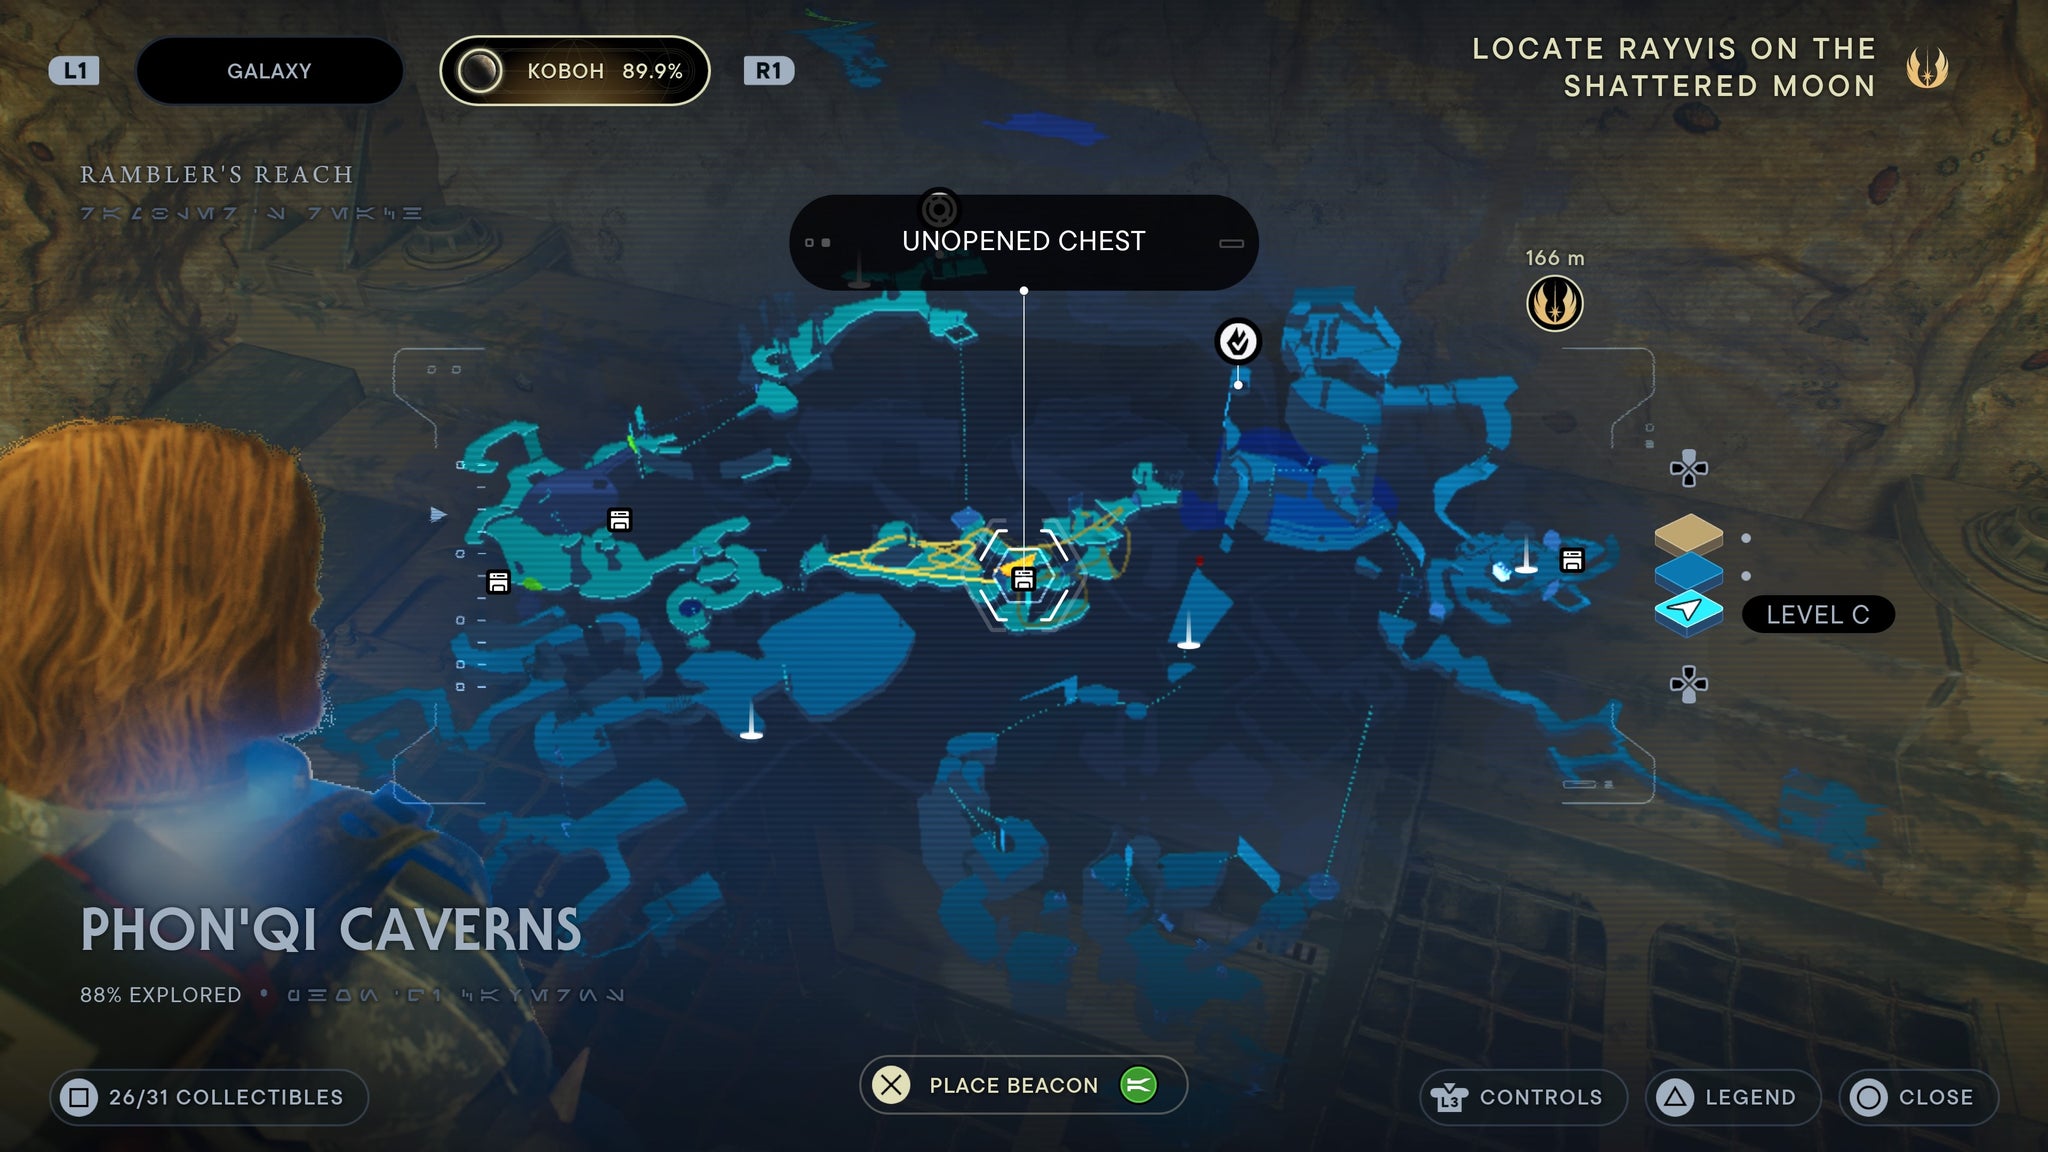
Head inside the electrifed door, then look left.
Duelist Switch
Found in the Phon’Qi Caverns. Requires force lift and slam. Use an acid plant to break open the electrified door in the room you drop down into. A boss will spawn. Once they are dead, head inside and grapple up to a chest above.
Kill the boss, head up, grab the chest.
Duelist Emitter
Found in the Phon’Qi Caverns. Requires force lift and slam. Grab an acid plant from the lower bridge in the large entry room, then throw it up at the electrified door near the zipline. Inside, pull a rock down near the door. Drop down and you’ll find a chest.
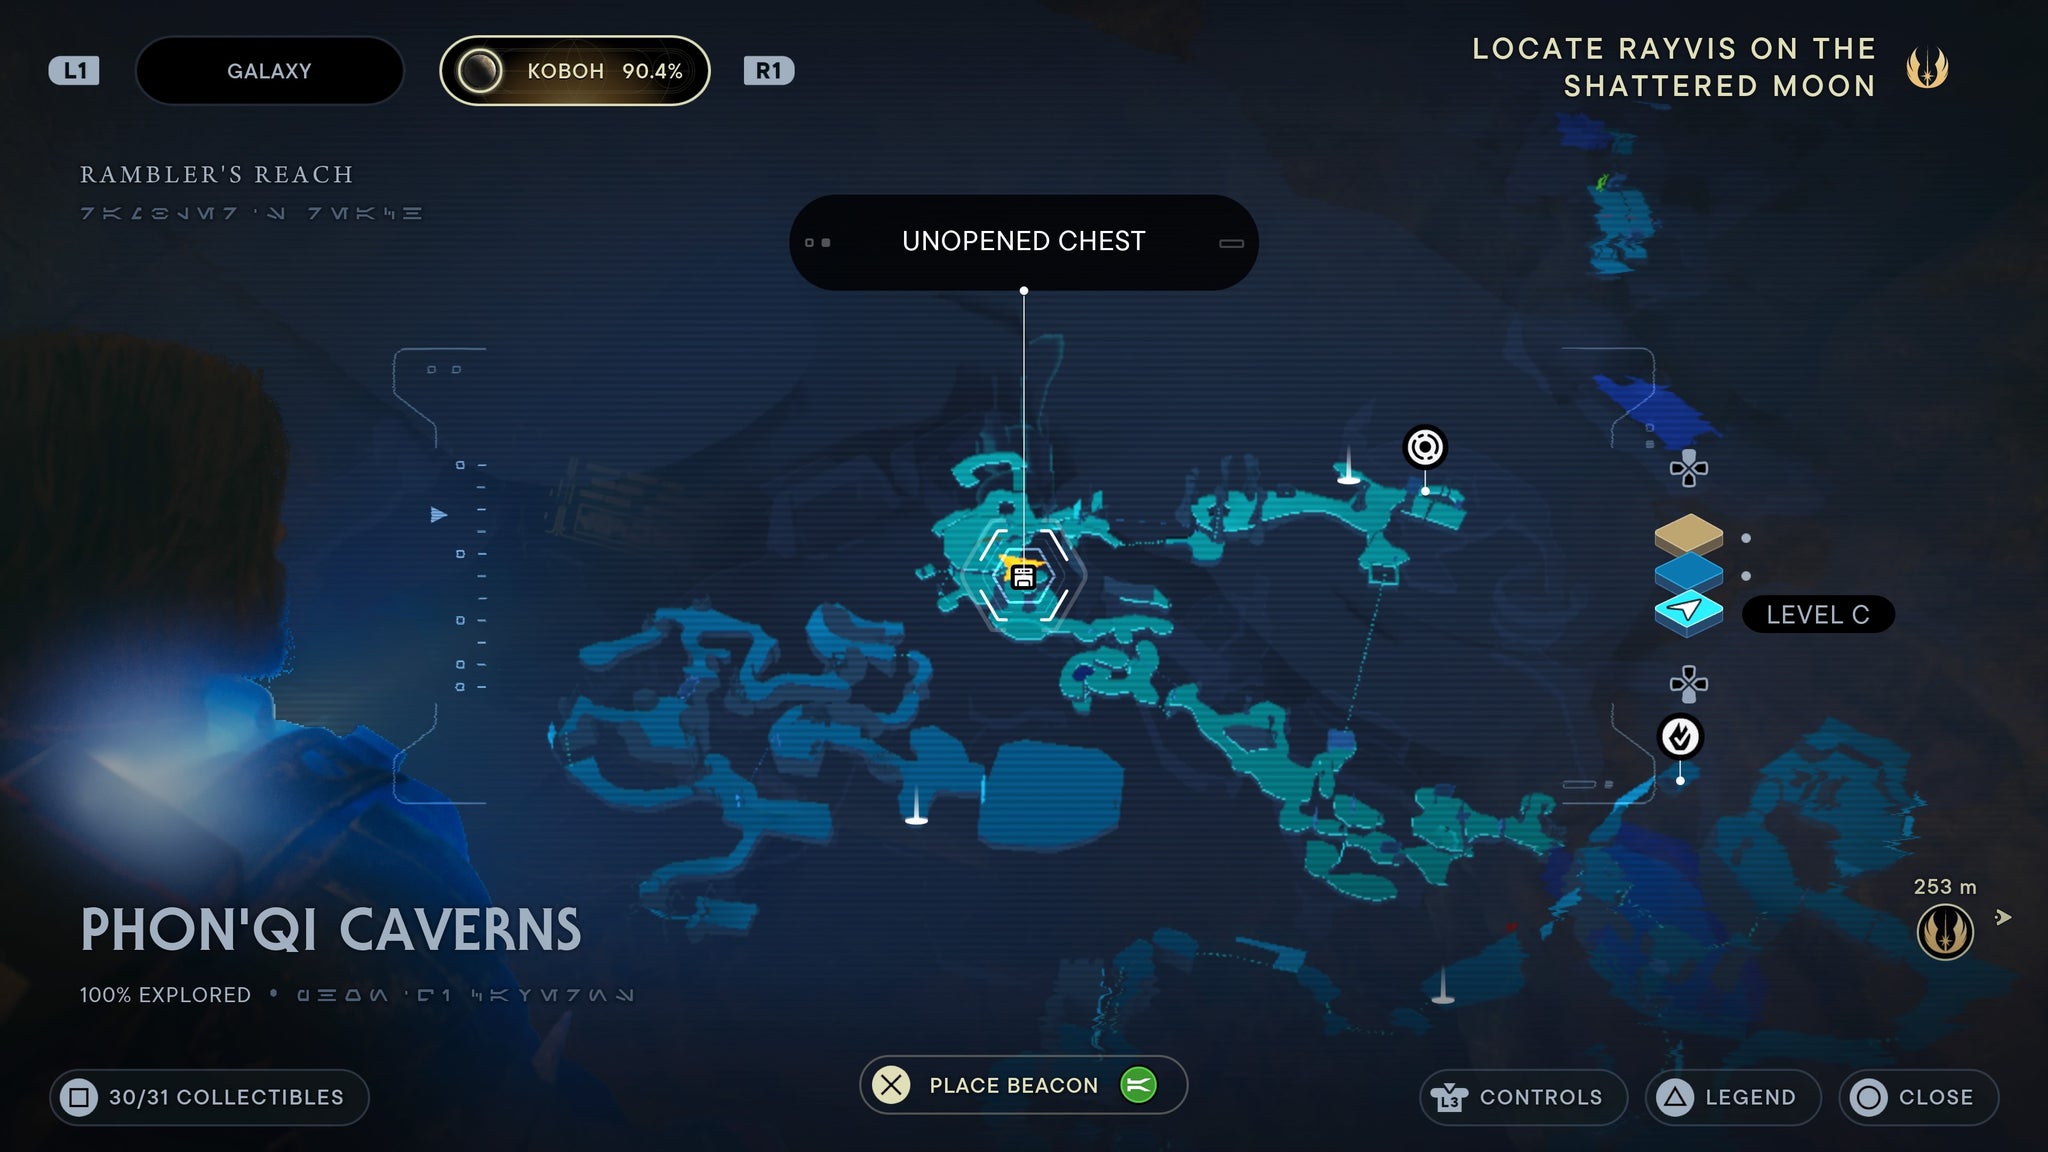
Drop down the hole, and find your final chest in this area.
Detachment Pommel
Requires force lift and slam. Found in the Fogged Expanse. Take the zipline across from the meditation point. Once you land, turn around and you’ll find a chest you can slam open.
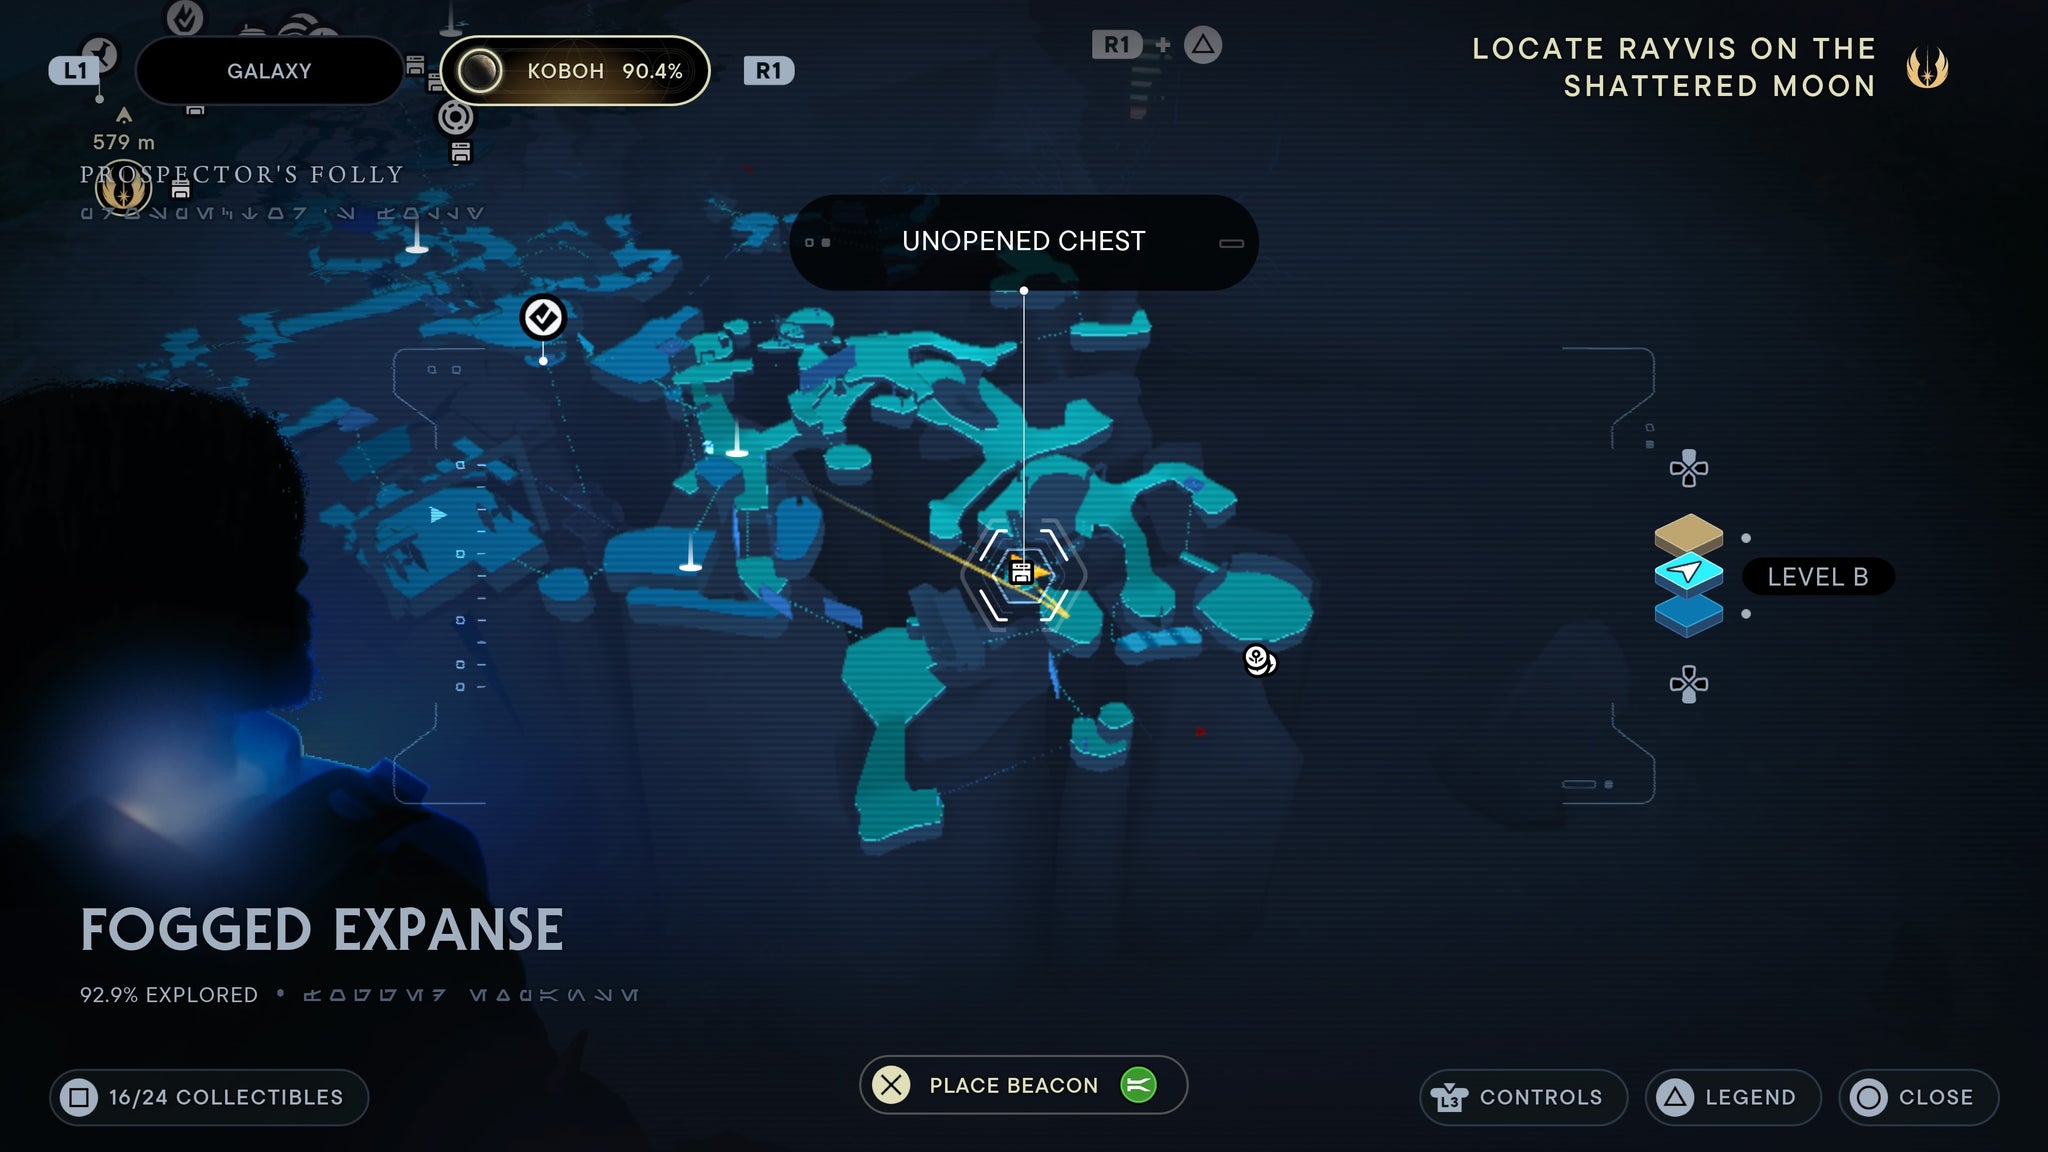
Real close to the zipline.
Arakyd Heavy Barrel
Requires force lift and slam. Found in the Rambler’s Reach Outpost. You can find a slammable chest on a cliff overlooking the Hunter’s Quarry.
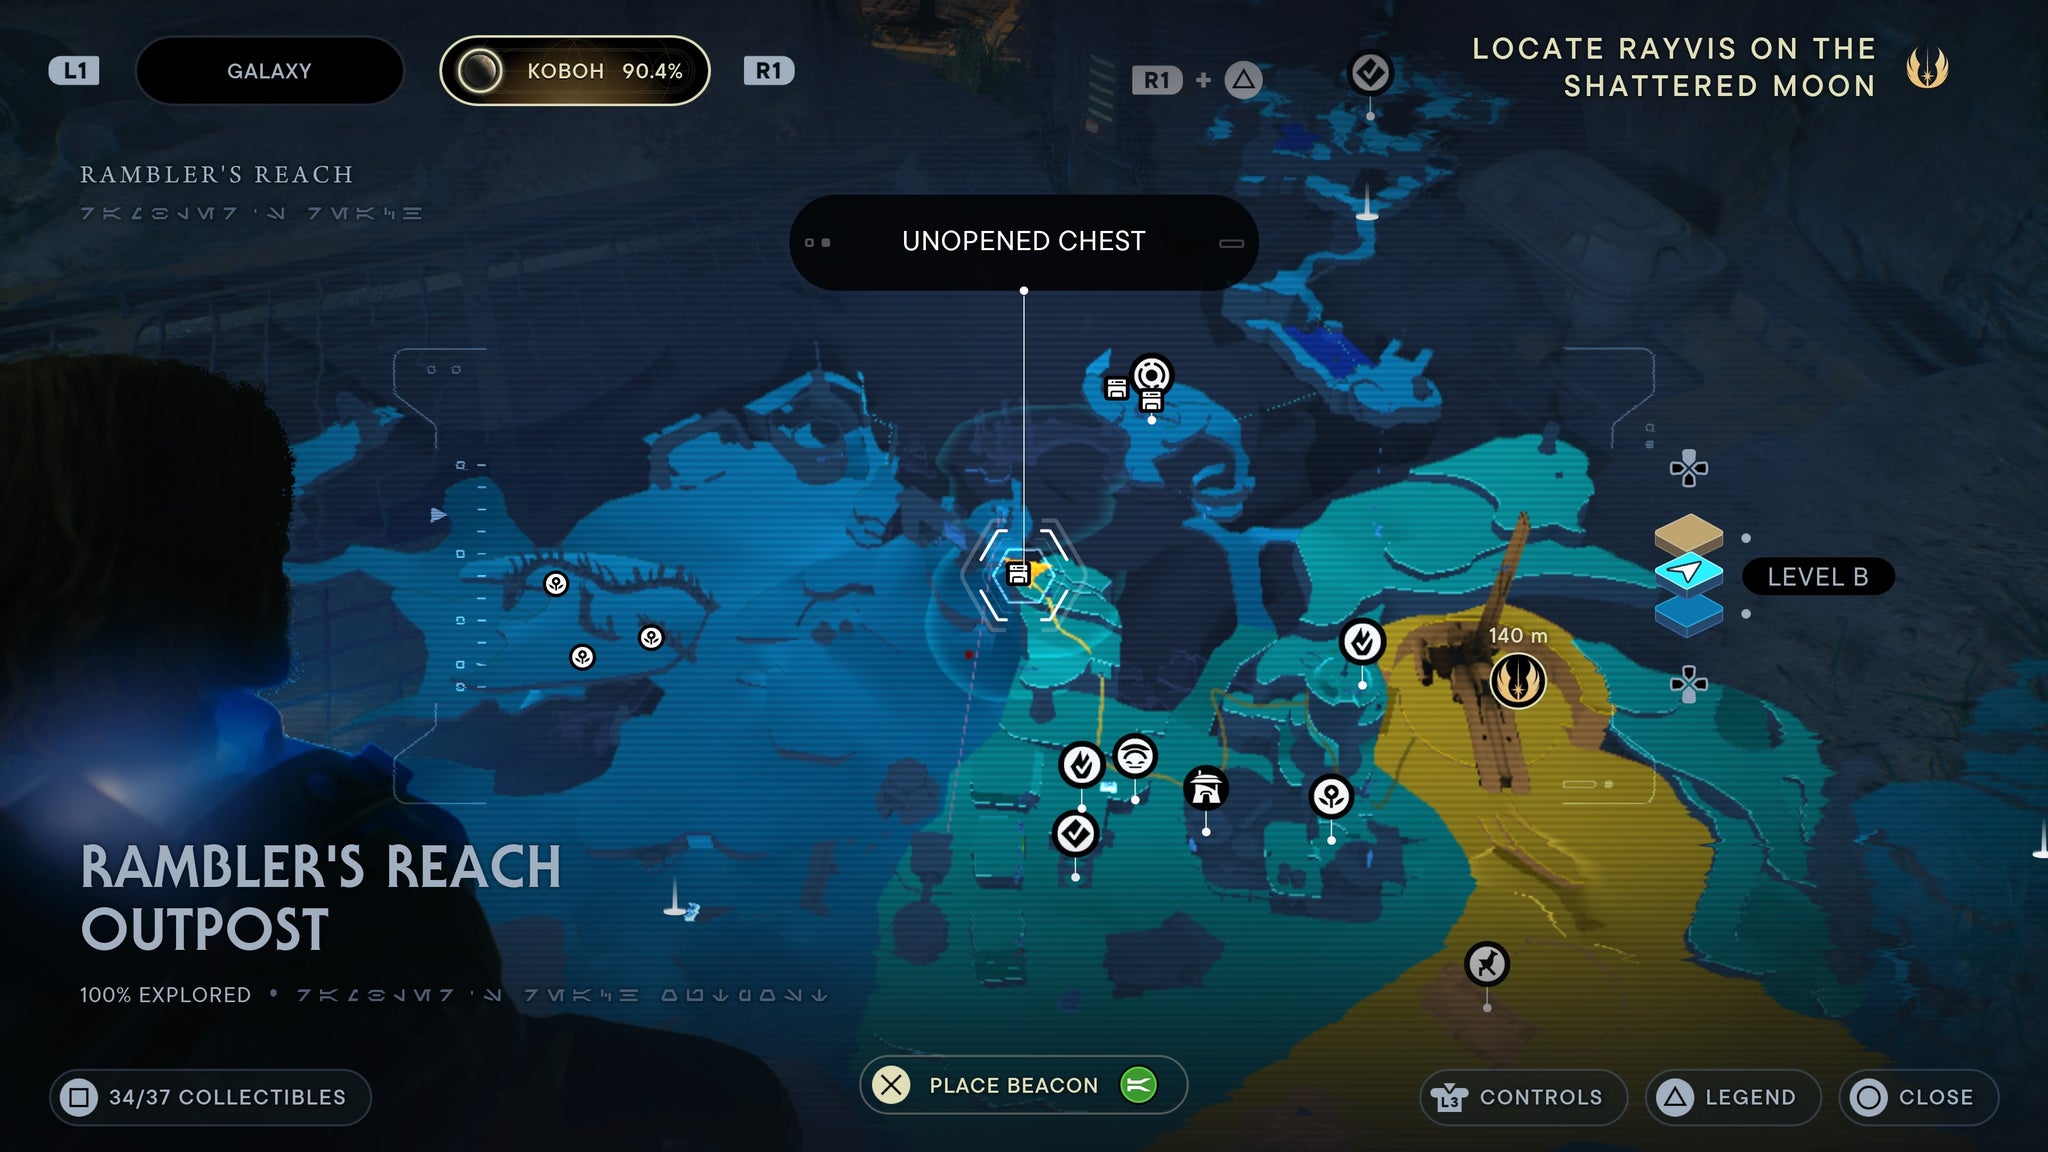
Grapple up then slam it open.
Persistence Pommel
Requires force lift and slam. Found in the Lucrehulk Core. Make your way to the back of the zone and you’ll find a room with four roof turrets in it. Destroy them all, then slam open the chest behind it.
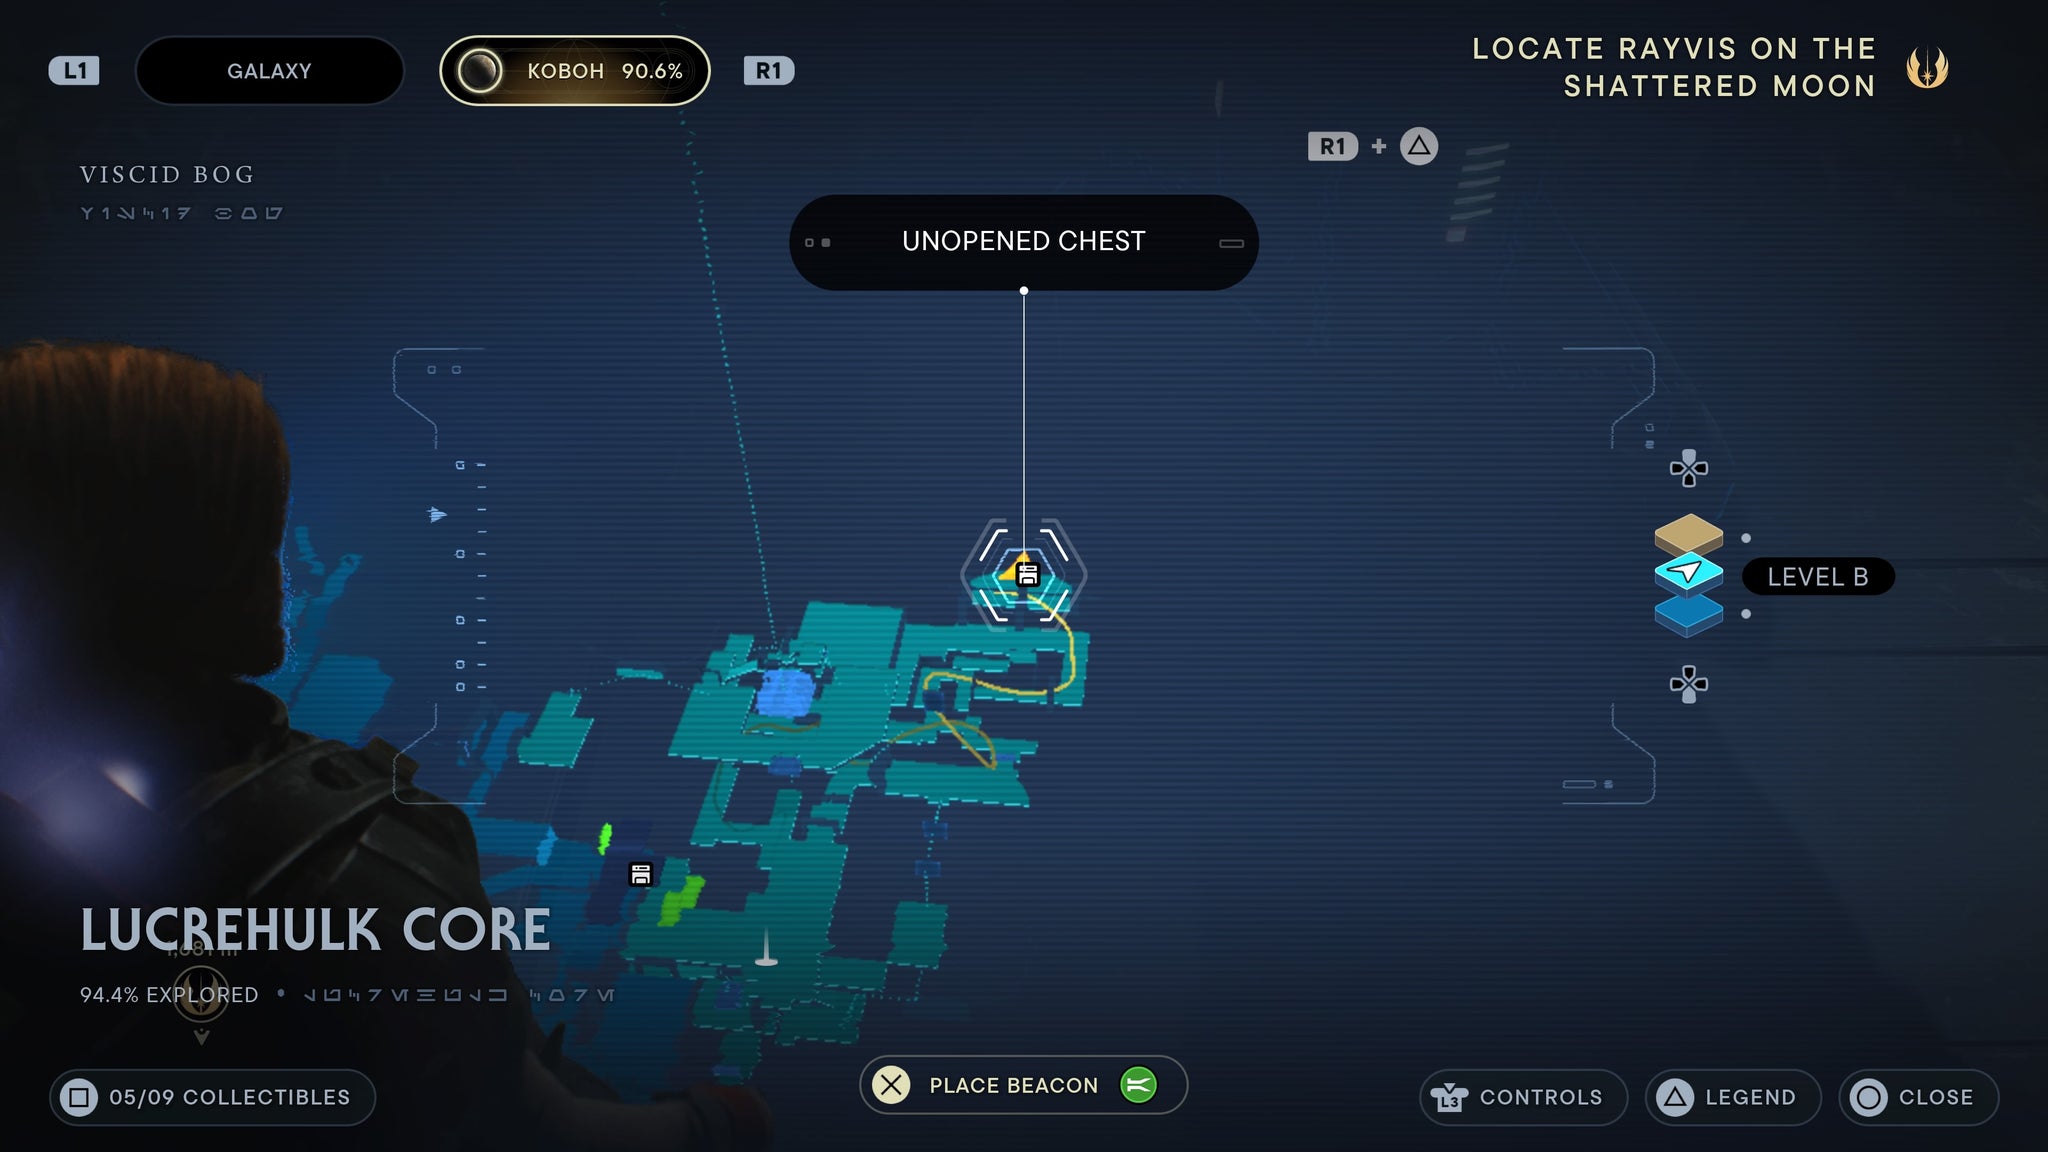
Get revenge on these awful turrets. They stay dead by the way.
Edgehawk emitter
Requires air dash. Found in the Water Treatment Works. Air dash over to the highest point in the main room. There you’ll find a chest.

Top of the main room.
Showdown Grip
Found in the Observatory Understructure. Take the central elevator up from the base of the zone, then go through the right door once you reach the top. Drop down a level, then turn around. Drop down and jump through into a hidden room. There you’ll find a chest.
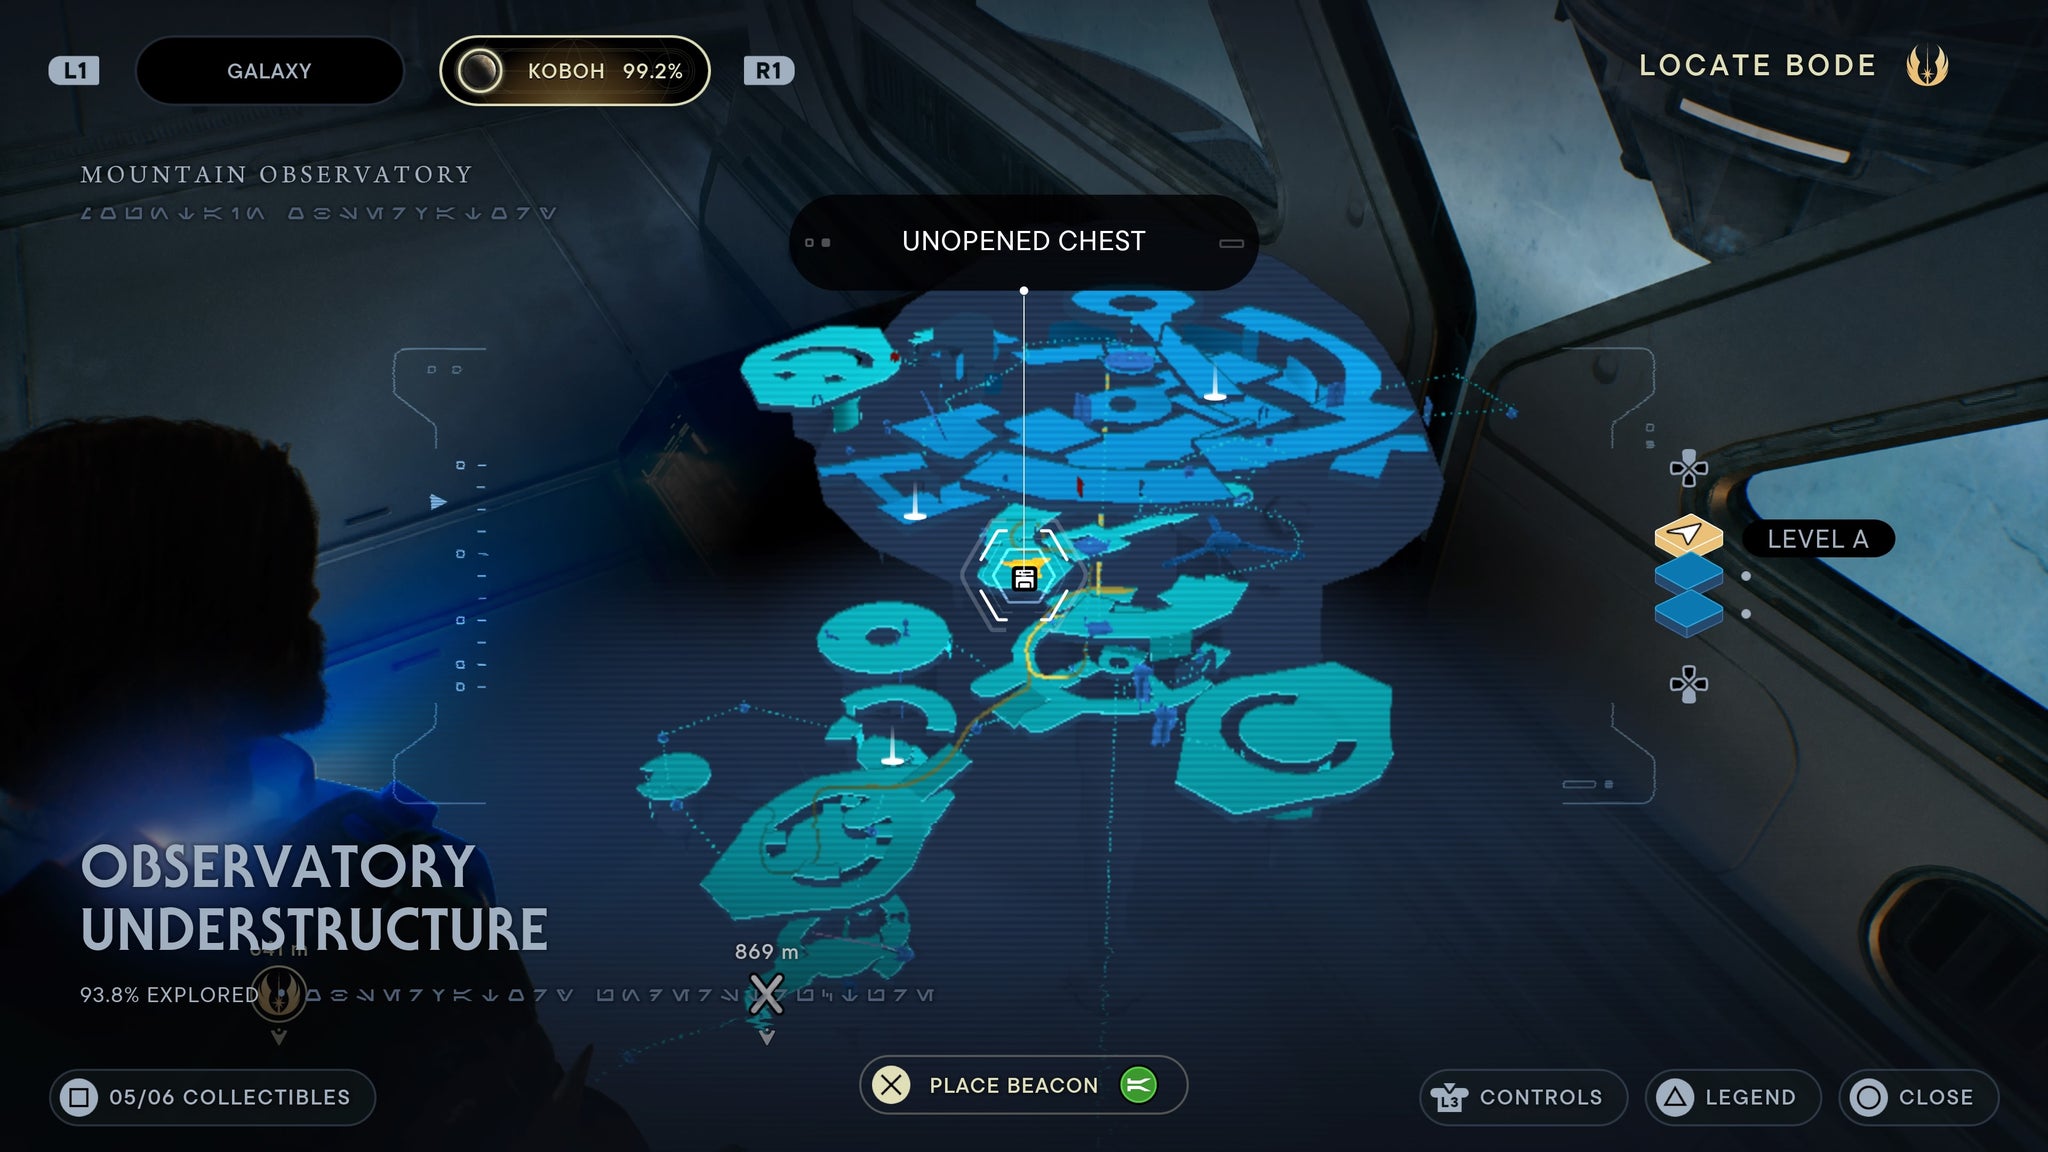
You’re looking for a small gap between levels to drop through.
Droid Paint weapon material
Requires balloon grapple. Found in Foothill Falls. Grapple the balloon above the abandoned shack in Foothill Falls. On a metal platform is a chest you can slam.
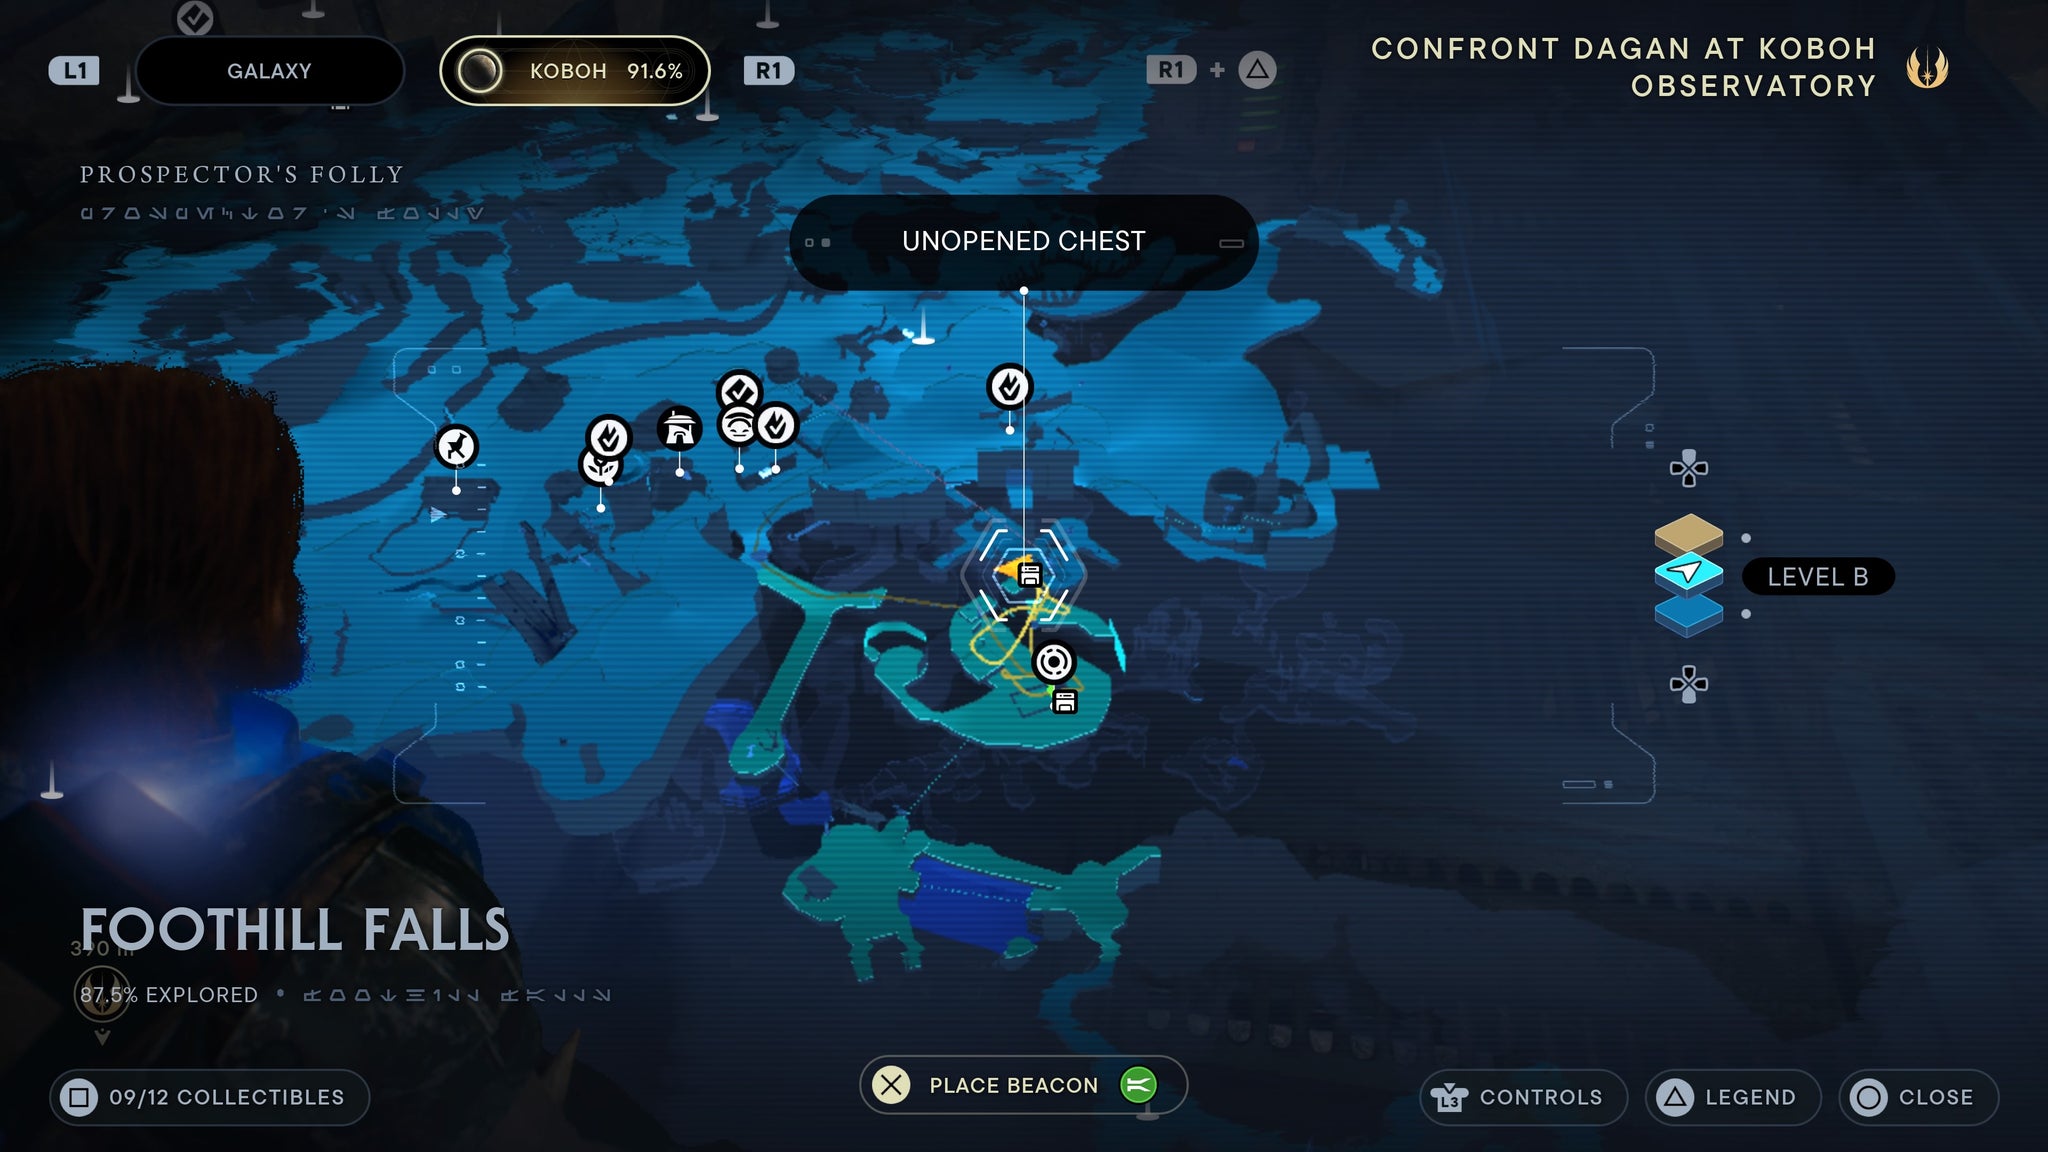
Up above the shack!
Caij Vanda blaster (all parts)
Automatically obtained once you beat the Caij Vanda boss fight. Requires completion of all bounty missions.
Anodized Metal material
Beat Tulakt in the Holotactics minigame.
Diligence emitter
Found in the Chamber of Reason. Throw an orb through the yellow gap in the wall on the highest floor. This will open the gate, leading you to a chest.

Requires a tricky shot, but well worth the effort.
Jedha Lightsaber parts
Serenity Emitter
Bought from Sister Taske’s shop on Jedha for 4 Jedha scrolls.
Assembly Emitter
Bought from Sister Taske’s shop on Jedha for 4 Jedha scrolls.
Justice Emitter
Bought from Sister Taske’s shop on Jedha for 4 Jedha scrolls.
Assembly Switch
Bought from Sister Taske’s shop on Jedha for 3 Jedha scrolls.
Detachment Switch
Bought from Sister Taske’s shop on Jedha for 3 Jedha scrolls.
Justice Switch
Bought from Sister Taske’s shop on Jedha for 3 Jedha scrolls.
Assembly Grip
Bought from Sister Taske’s shop on Jedha for 3 Jedha scrolls.
Serenity Grip
Bought from Sister Taske’s shop on Jedha for 3 Jedha scrolls.
Temperance Grip
Bought from Sister Taske’s shop on Jedha for 3 Jedha scrolls.
Detachment Grip
Bought from Sister Taske’s shop on Jedha for 2 Jedha scrolls.
Assembly Pommel
Bought from Sister Taske’s shop on Jedha for 2 Jedha scrolls.
Temperance Pommel
Bought from Sister Taske’s shop on Jedha for 2 Jedha scrolls.
Serenity Pommel
Bought from Sister Taske’s shop on Jedha for 2 Jedha scrolls.
Jedha Paint weapon material
Bought from Sister Taske’s shop on Jedha for 2 Jedha scrolls.
Imperial weapon material
Bought from Sister Taske’s shop on Jedha for 2 Jedha scrolls.
Worn Metal weapon material
Bought from Sister Taske’s shop on Jedha for 2 Jedha scrolls.
Soft Leather weapon material
Bought from Sister Taske’s shop on Jedha for 2 Jedha scrolls.
Rebel Paint weapon material
Bought from Sister Taske’s shop on Jedha for 2 Jedha scrolls.
Hard Plastoid weapon material
Bought from Sister Taske’s shop on Jedha for 2 Jedha scrolls.
Scrapyard Pommel
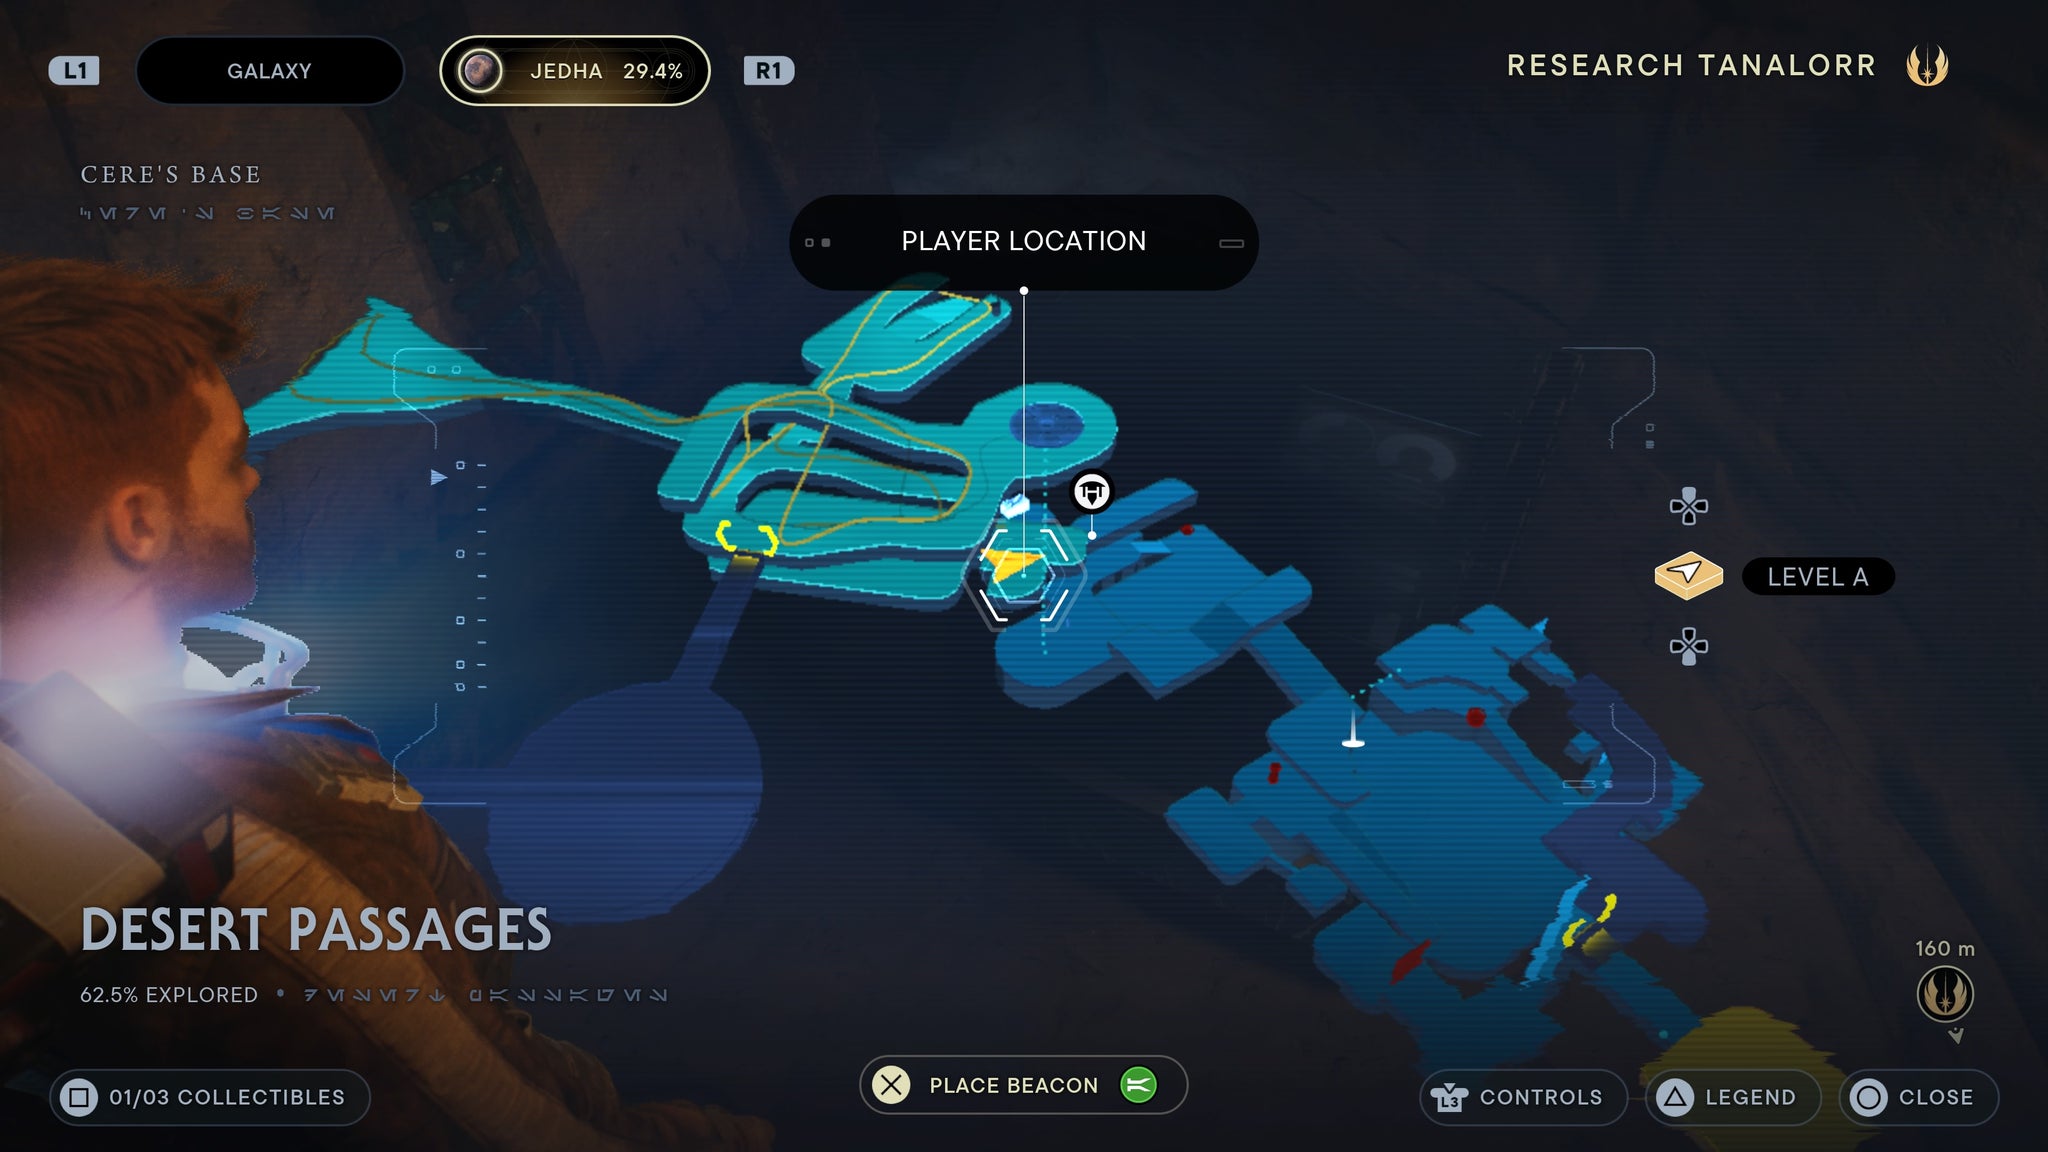
Move some orbs and it’s yours!
Found in the Desert Passages. From the workbench, take the elevator up. In this room, pull both orbs embedded in the walls away from the large door opposite. This will unlock a door on the bottom floor, Head inside, then walk right, and you’ll find a chest.
Justice Grip
Found in the Trailhead Pantheon. As you enter the circular puzzle room, pull the rope above to open the door guarding the box. As it closes, wedge the box between the floor and the door so you can walk inside. There’s a chest there.
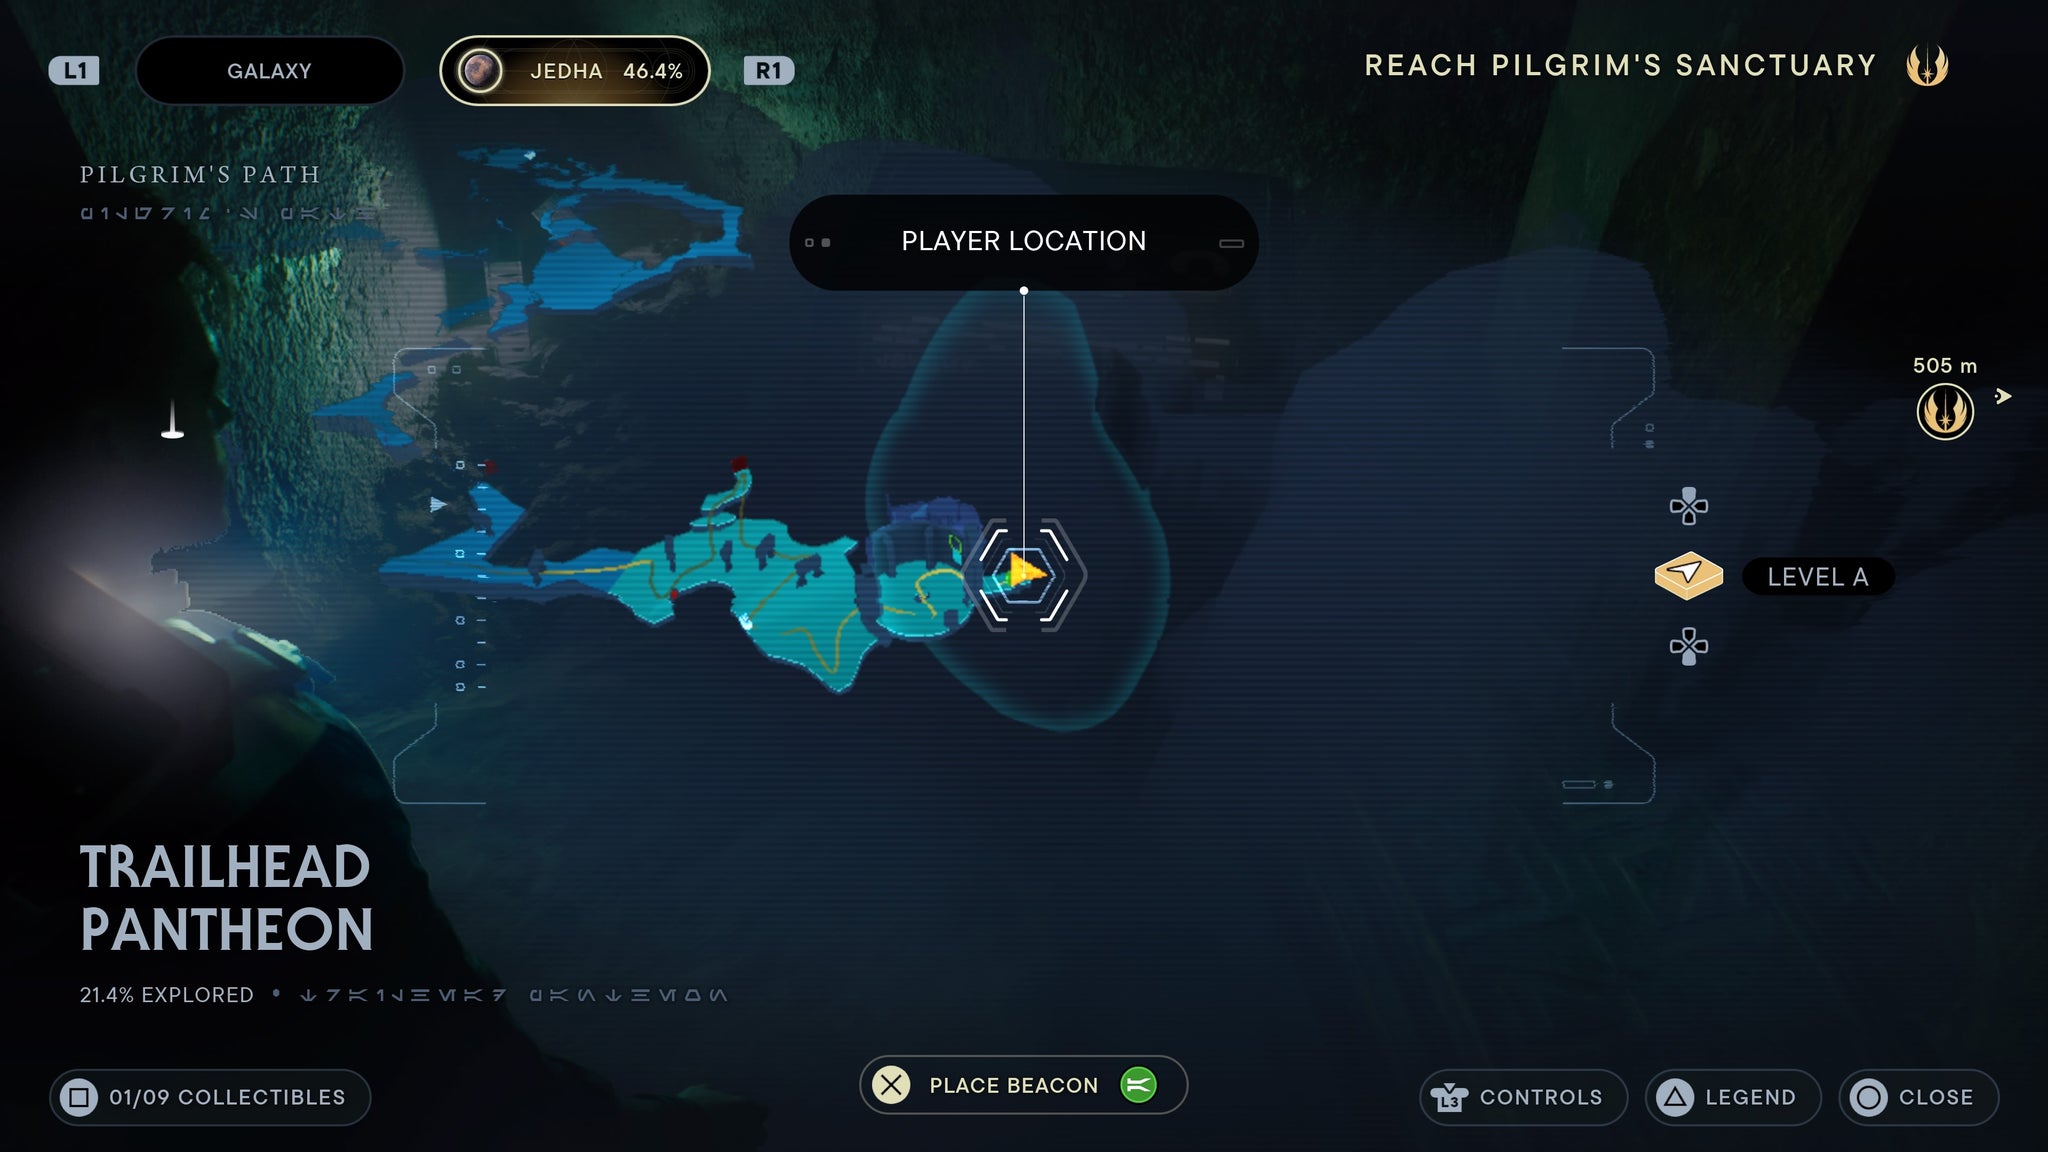
Use the box to keep the door open.
K3 Vindicator barrel
Found in Whistling Drop. Underneath the crashed and burning imperial ship.
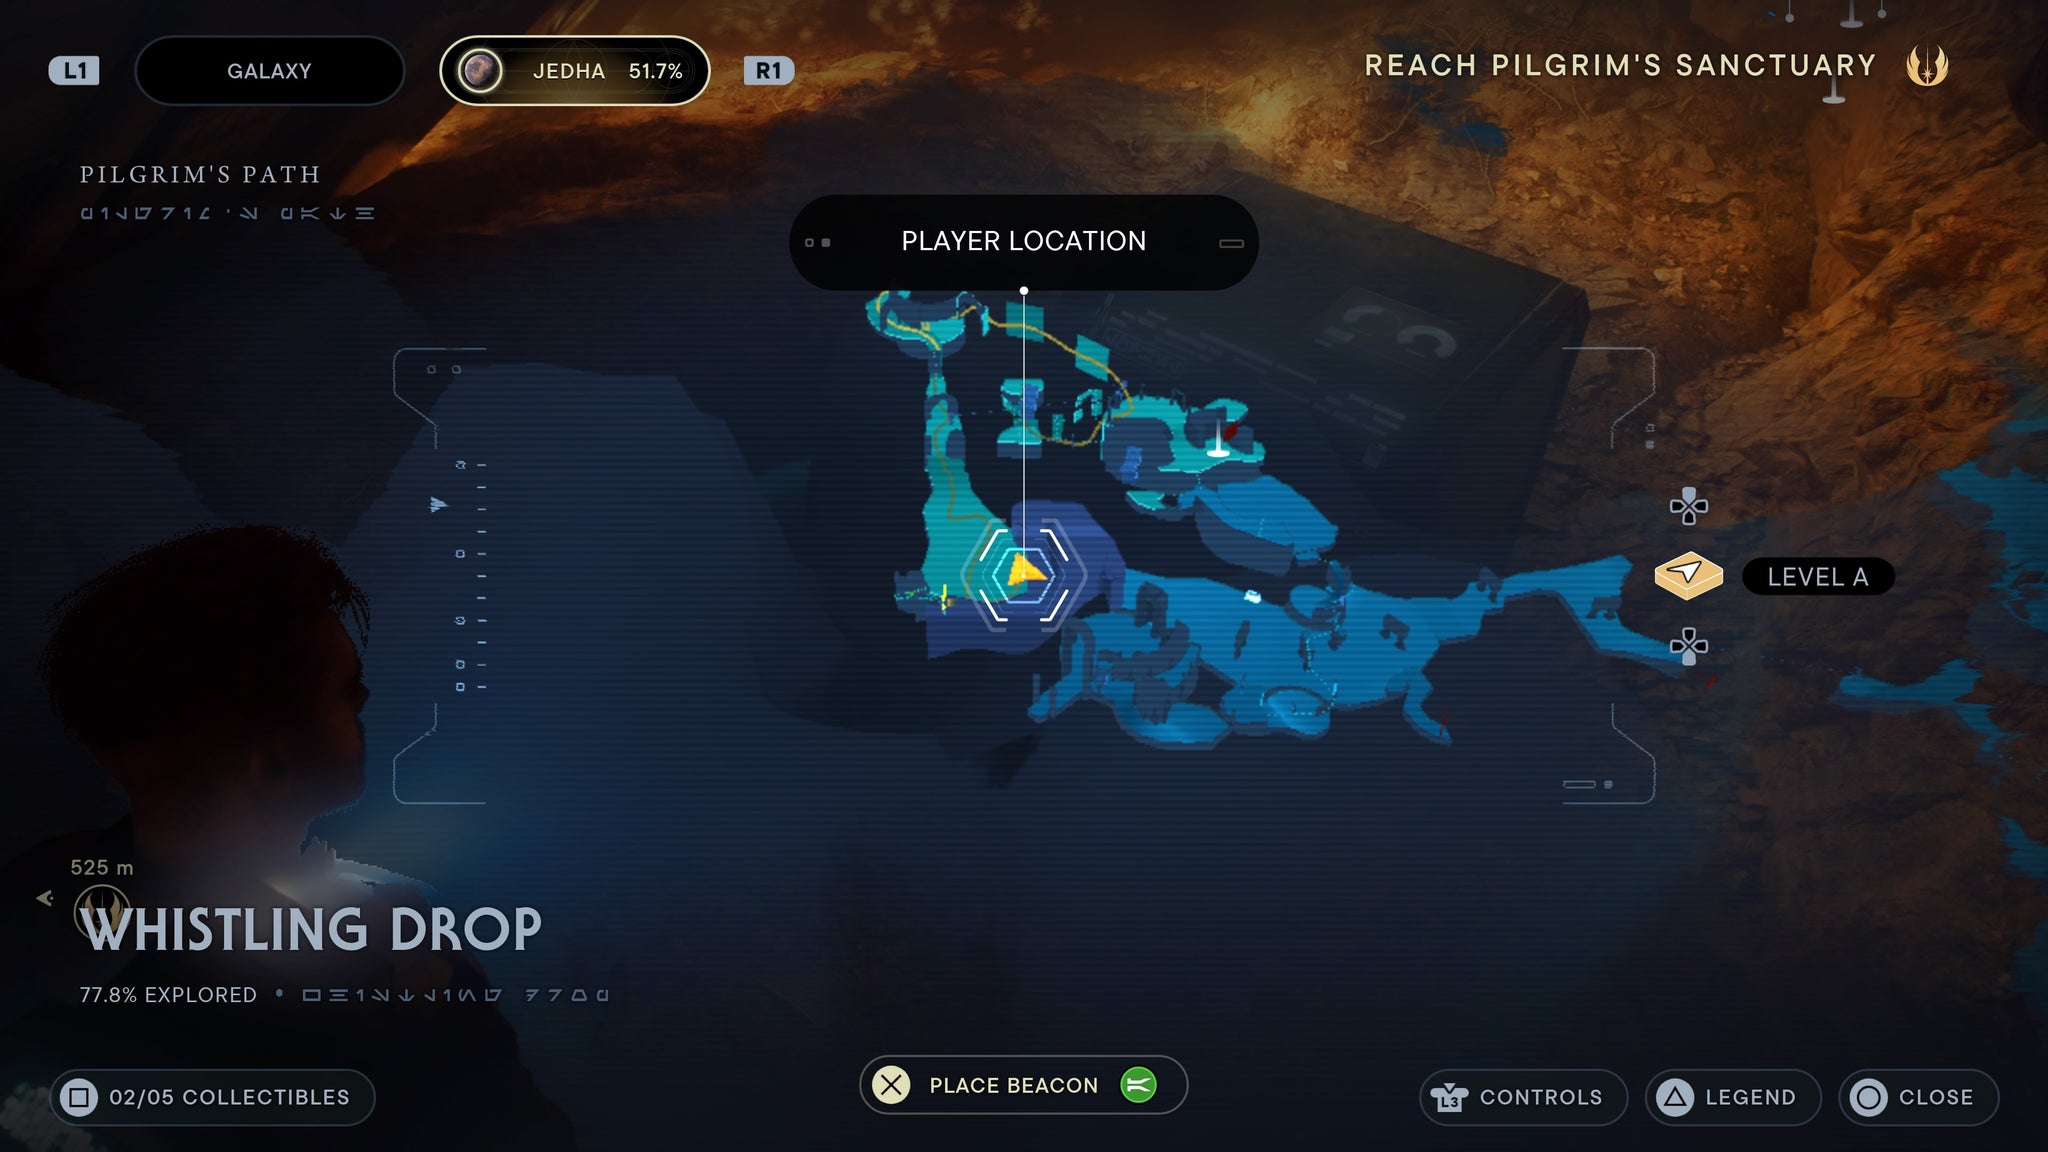
head under the crahsed ship.
Temperance Switch
Found on the Timeworn bridge. Use the zipline shortcut, then drop to a chest on the centre platform.
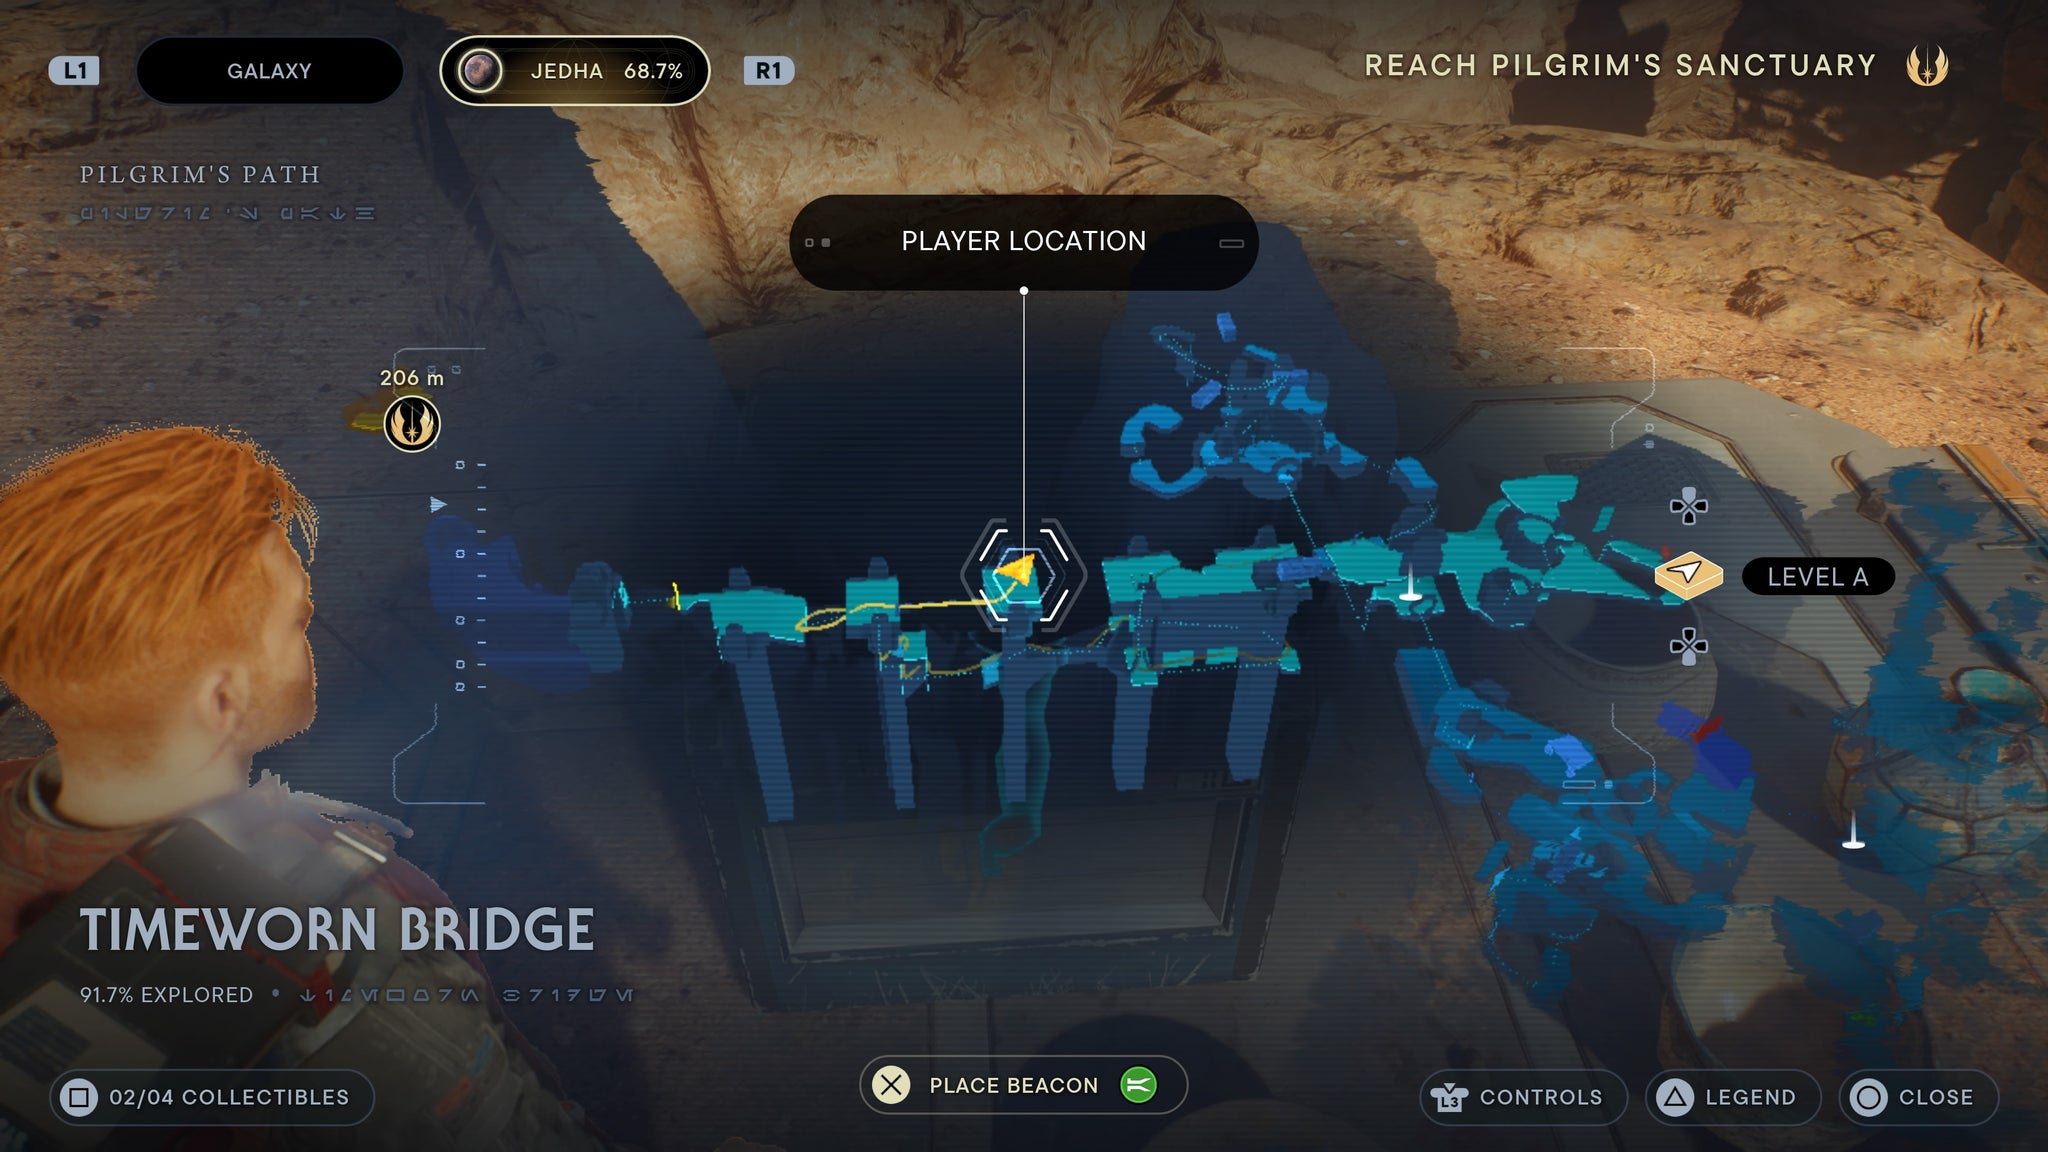
In the middle of the bridge.
K3 Vindicator Grip (blaster)
Requires forcefield dash. Found in the Whistling Drop. From the meditation point, pass through the green forcefield to reach the chest.
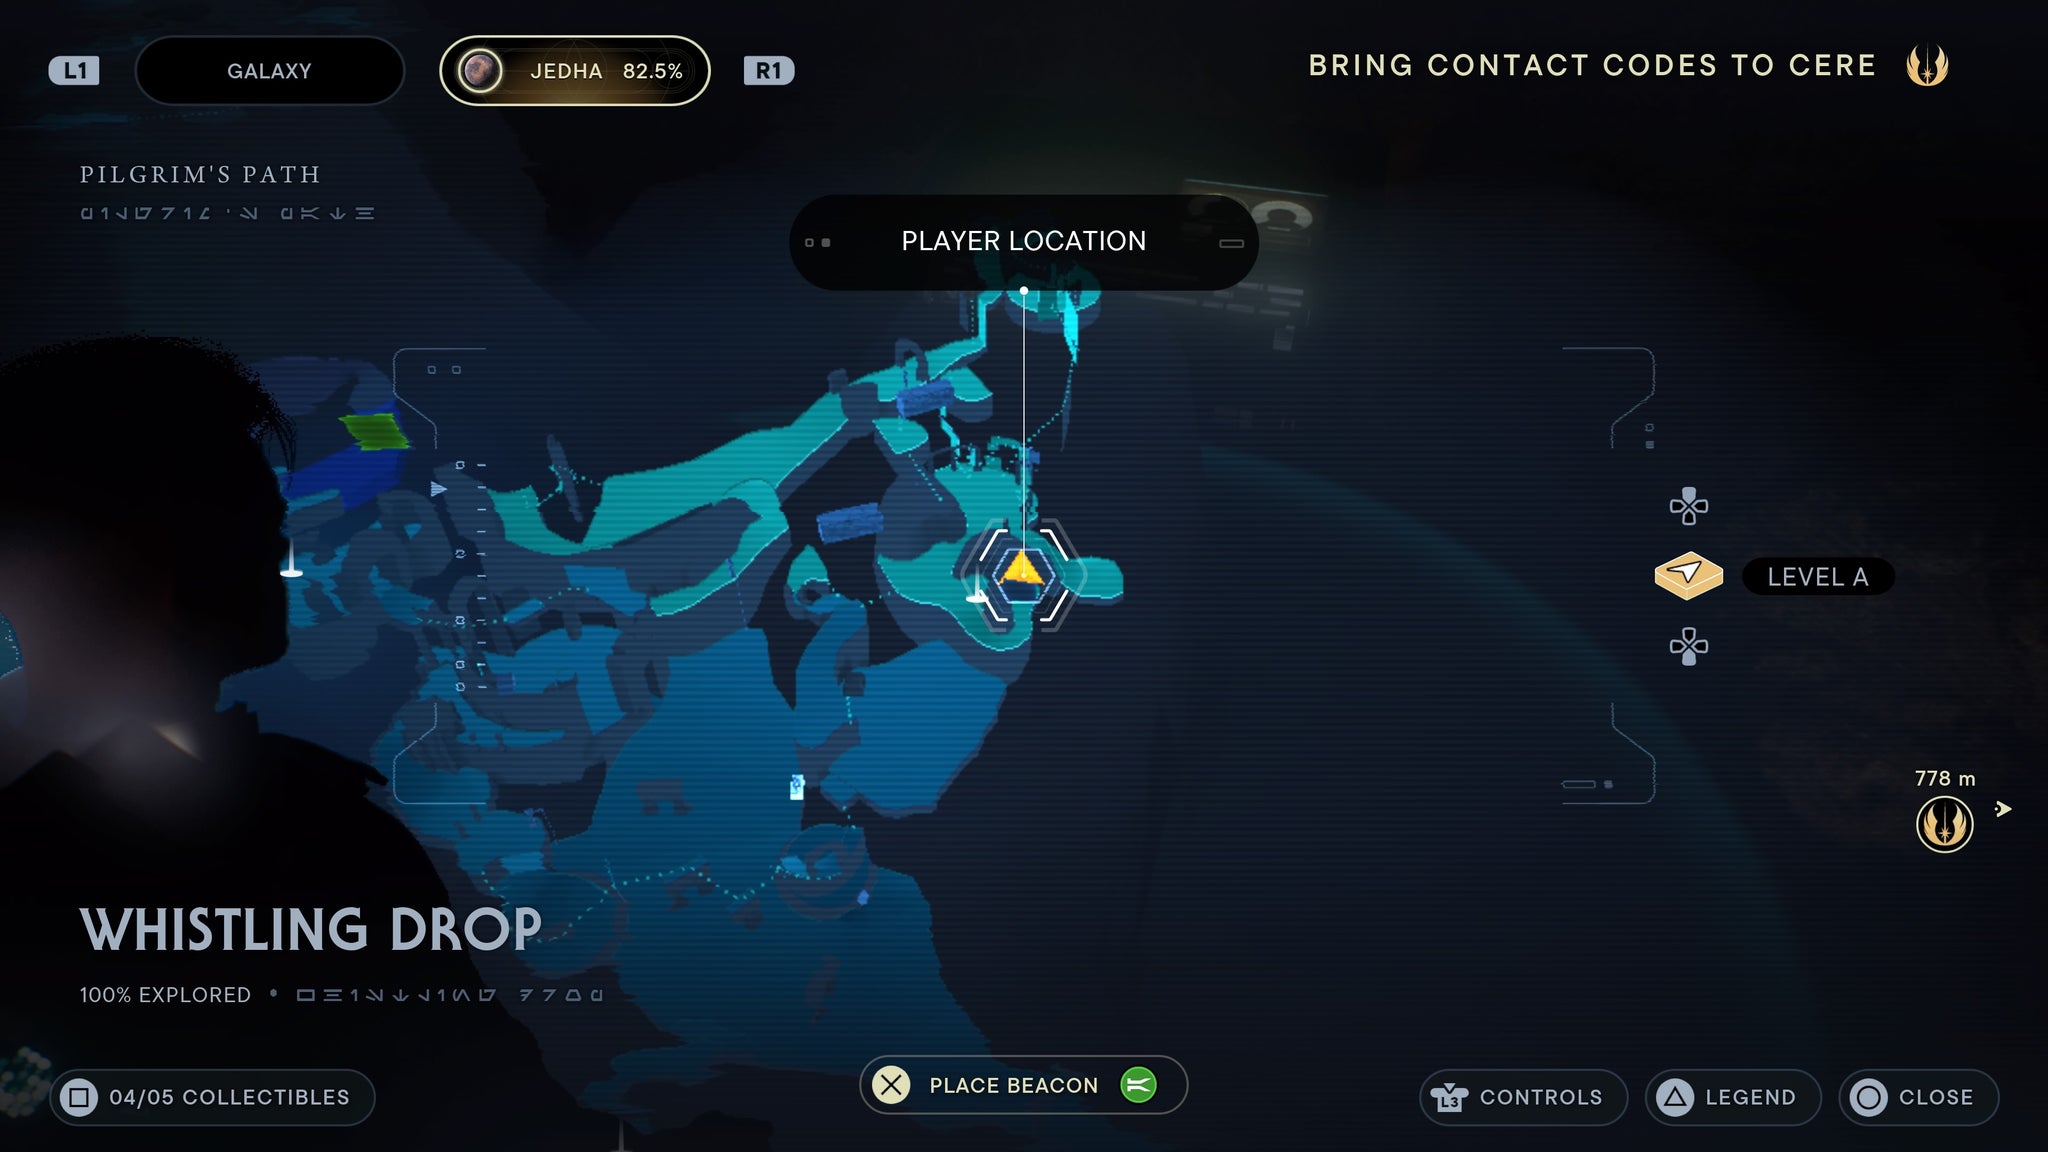
Right by the meditation point.
Scrapyard Emitter
Requires chapter 5 quest completion. Found in the Veiled Hangar. Make your way up the elevator near the Mantis and through the door Cere opened. In a door room on your right is a chest.
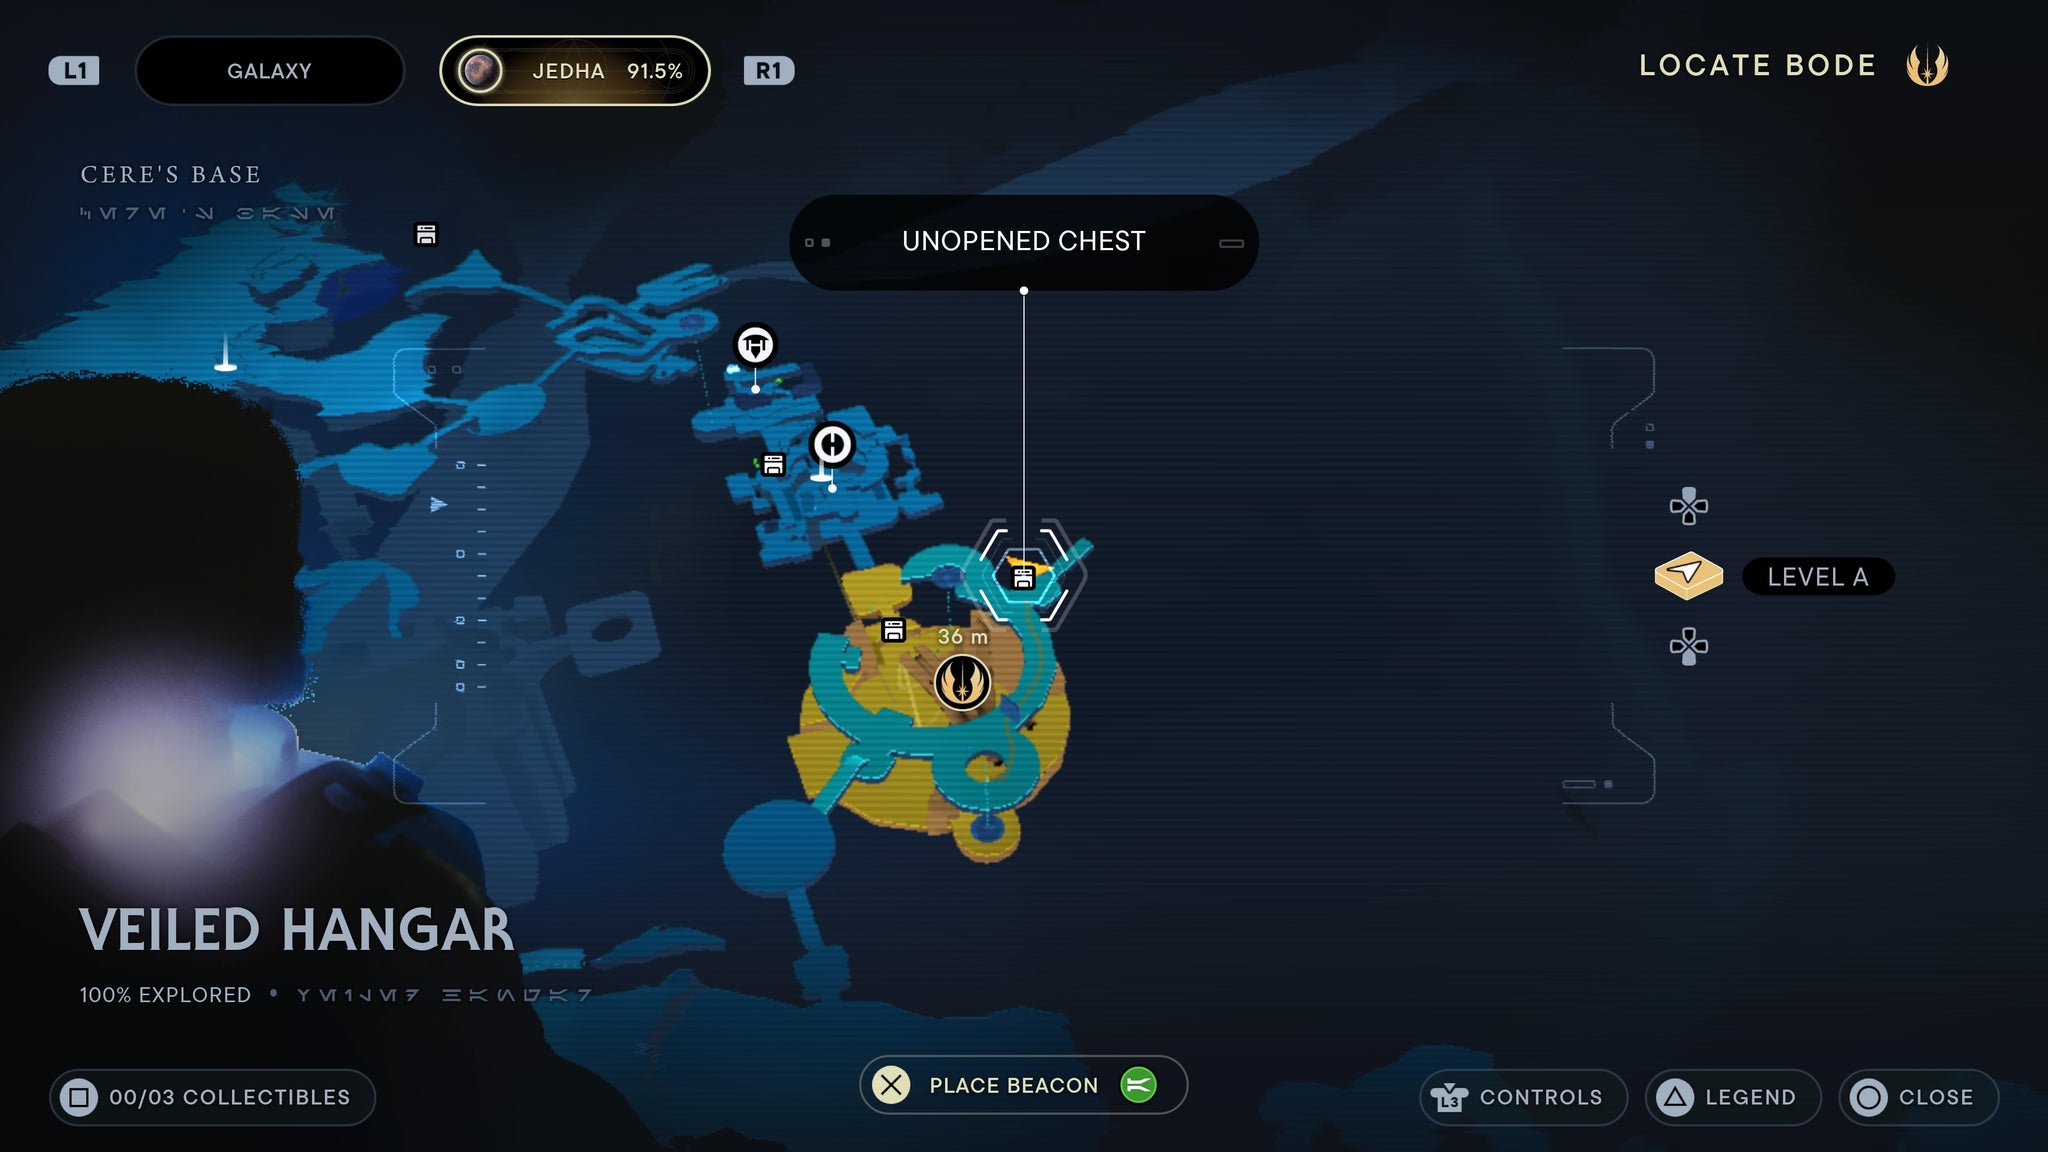
In a very dark corner.
Cere Junda lightsaber (all parts)
Requires chapter 5 quest completion. Found in the Veiled Hangar. Up the small stairs near the entrance to the archives.
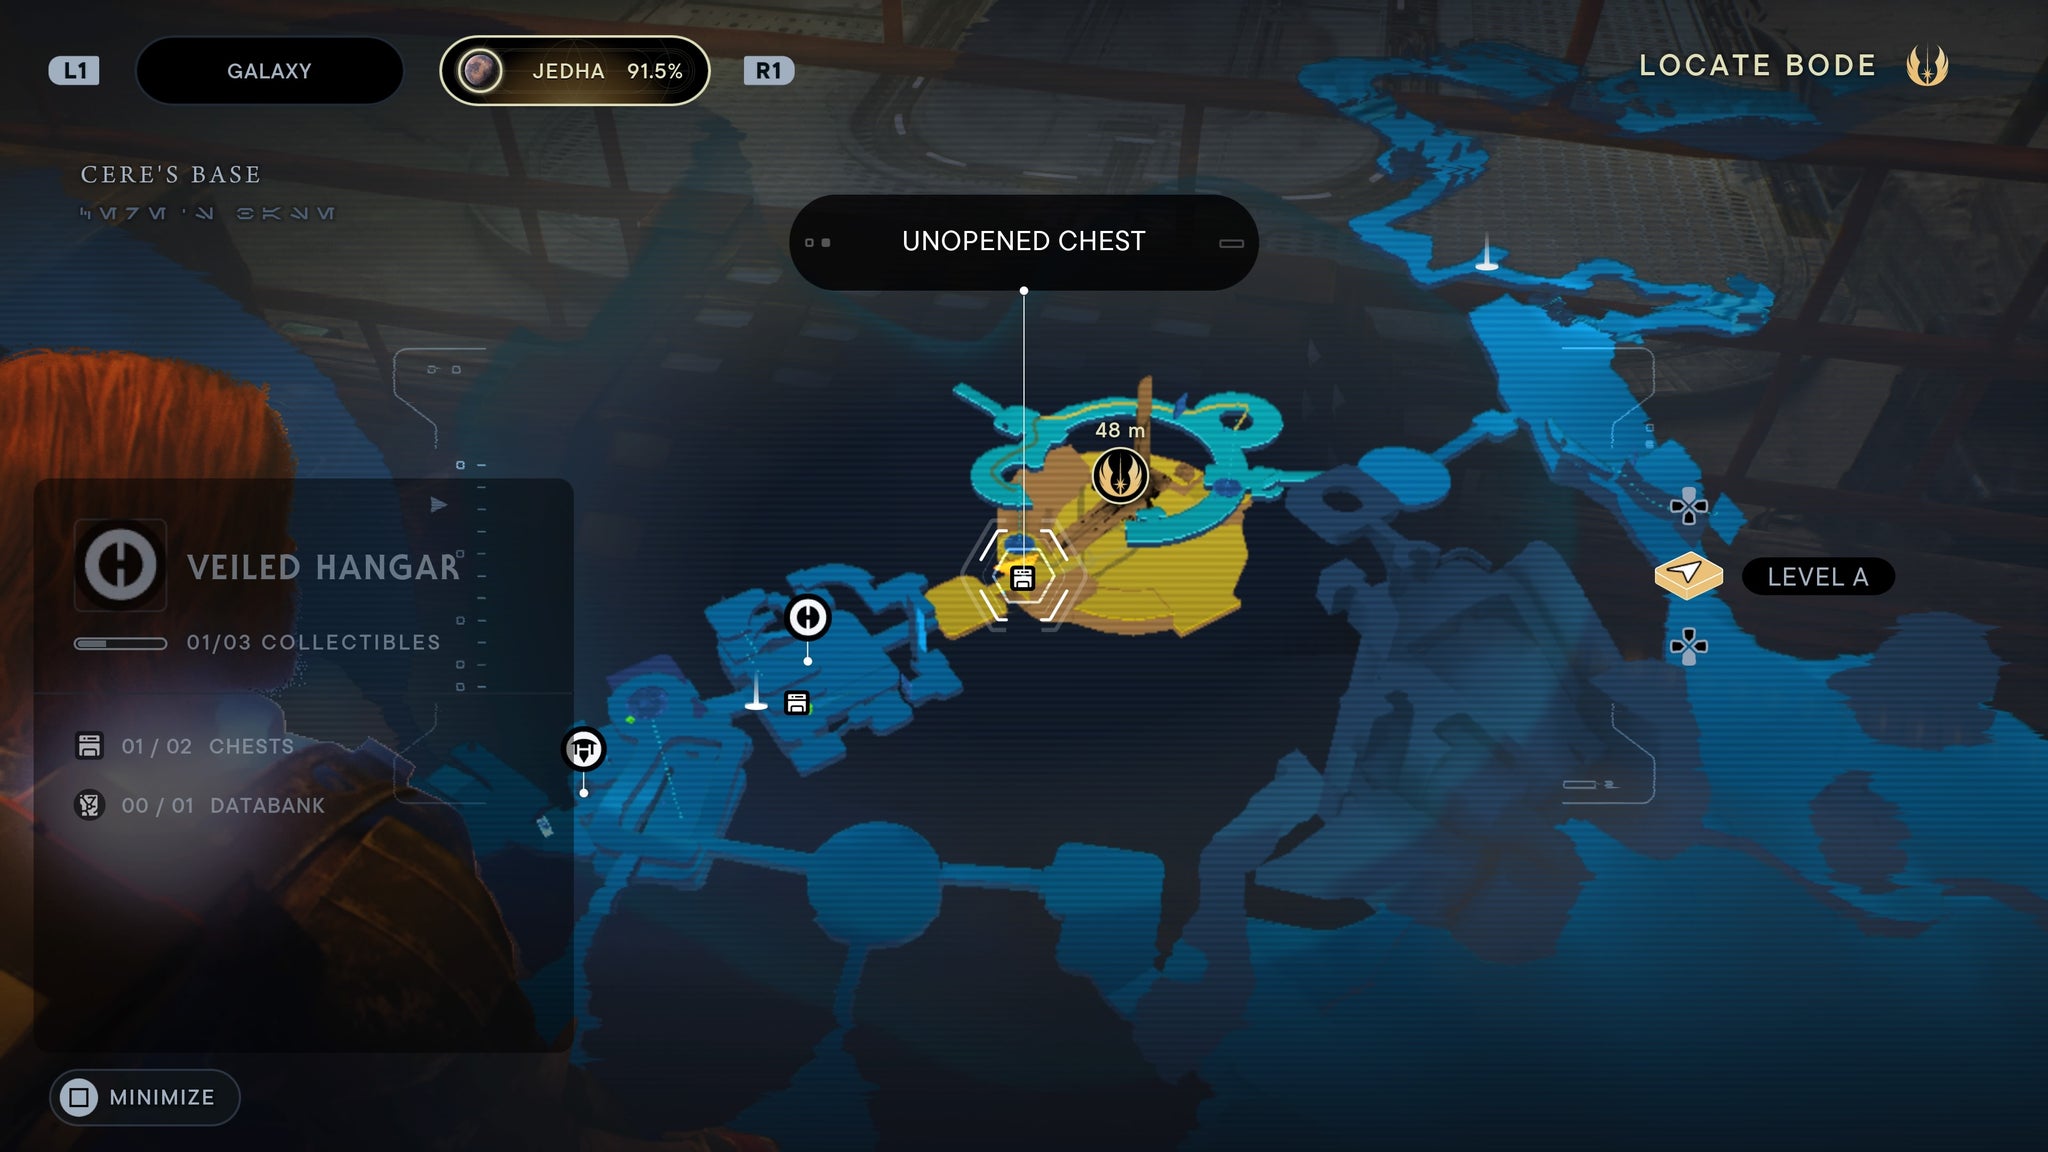
RIP to a real one.
Scrapyard Grip
Requires electro dart. Found in The Archive. Make your way up to the higher floors in the archive until you come to a locked chest. Left of this chest is a hole in the wall you can shoot a dart through. Hit the machine with the dart and the chest will unlock.
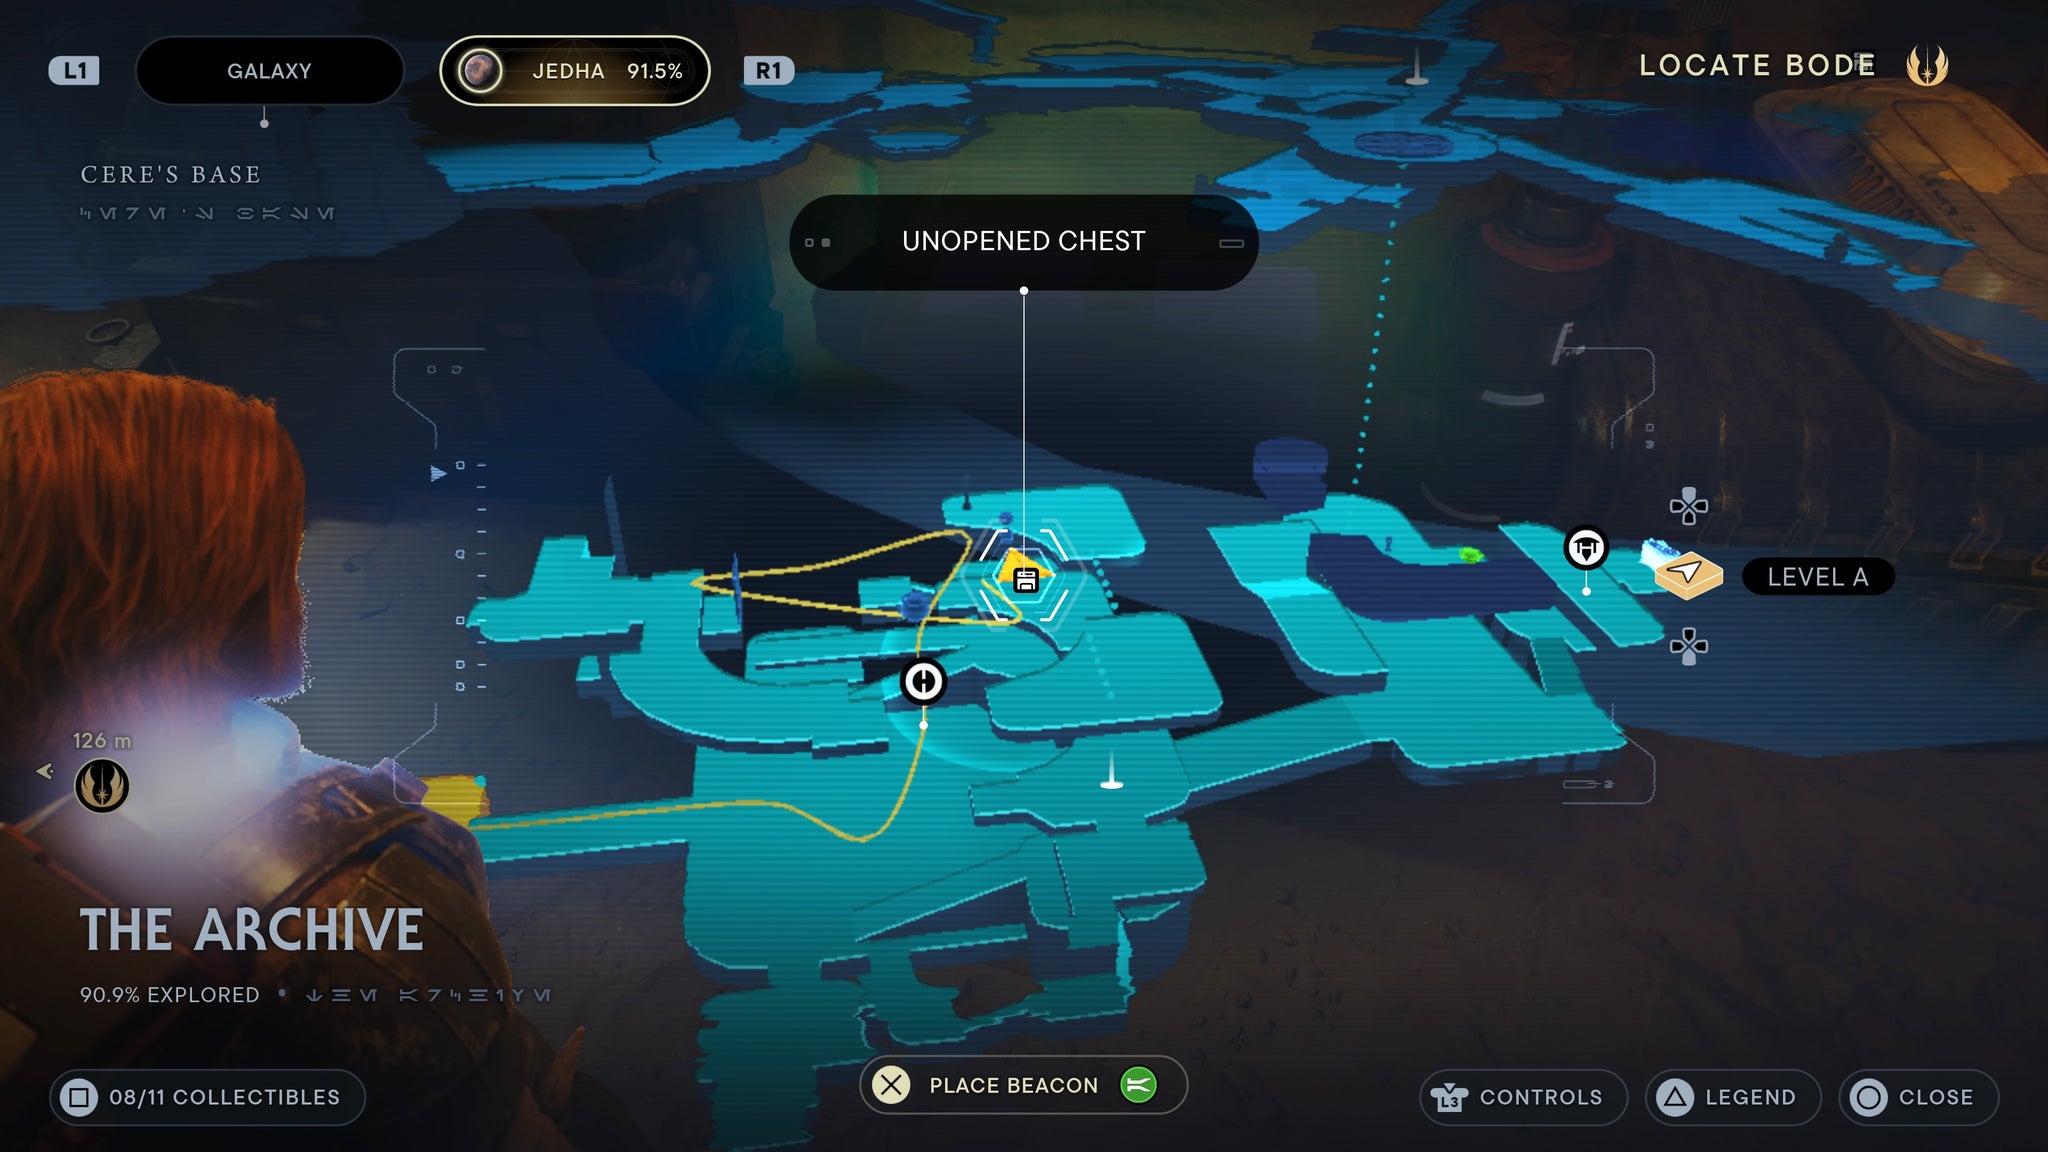
A quick dart shot and it’s yours!
Skeleton Key blaster (all parts)
Requires air dash. Found in Monastery Walls. Make your way to the far left building and grapple up. Jump over the pillars to the force tear, then turn around. Air dash to the wall you can climb up, then dash over to the left. From here, jump up to the higher bridge and walk across. You’ll find a chest at the end.
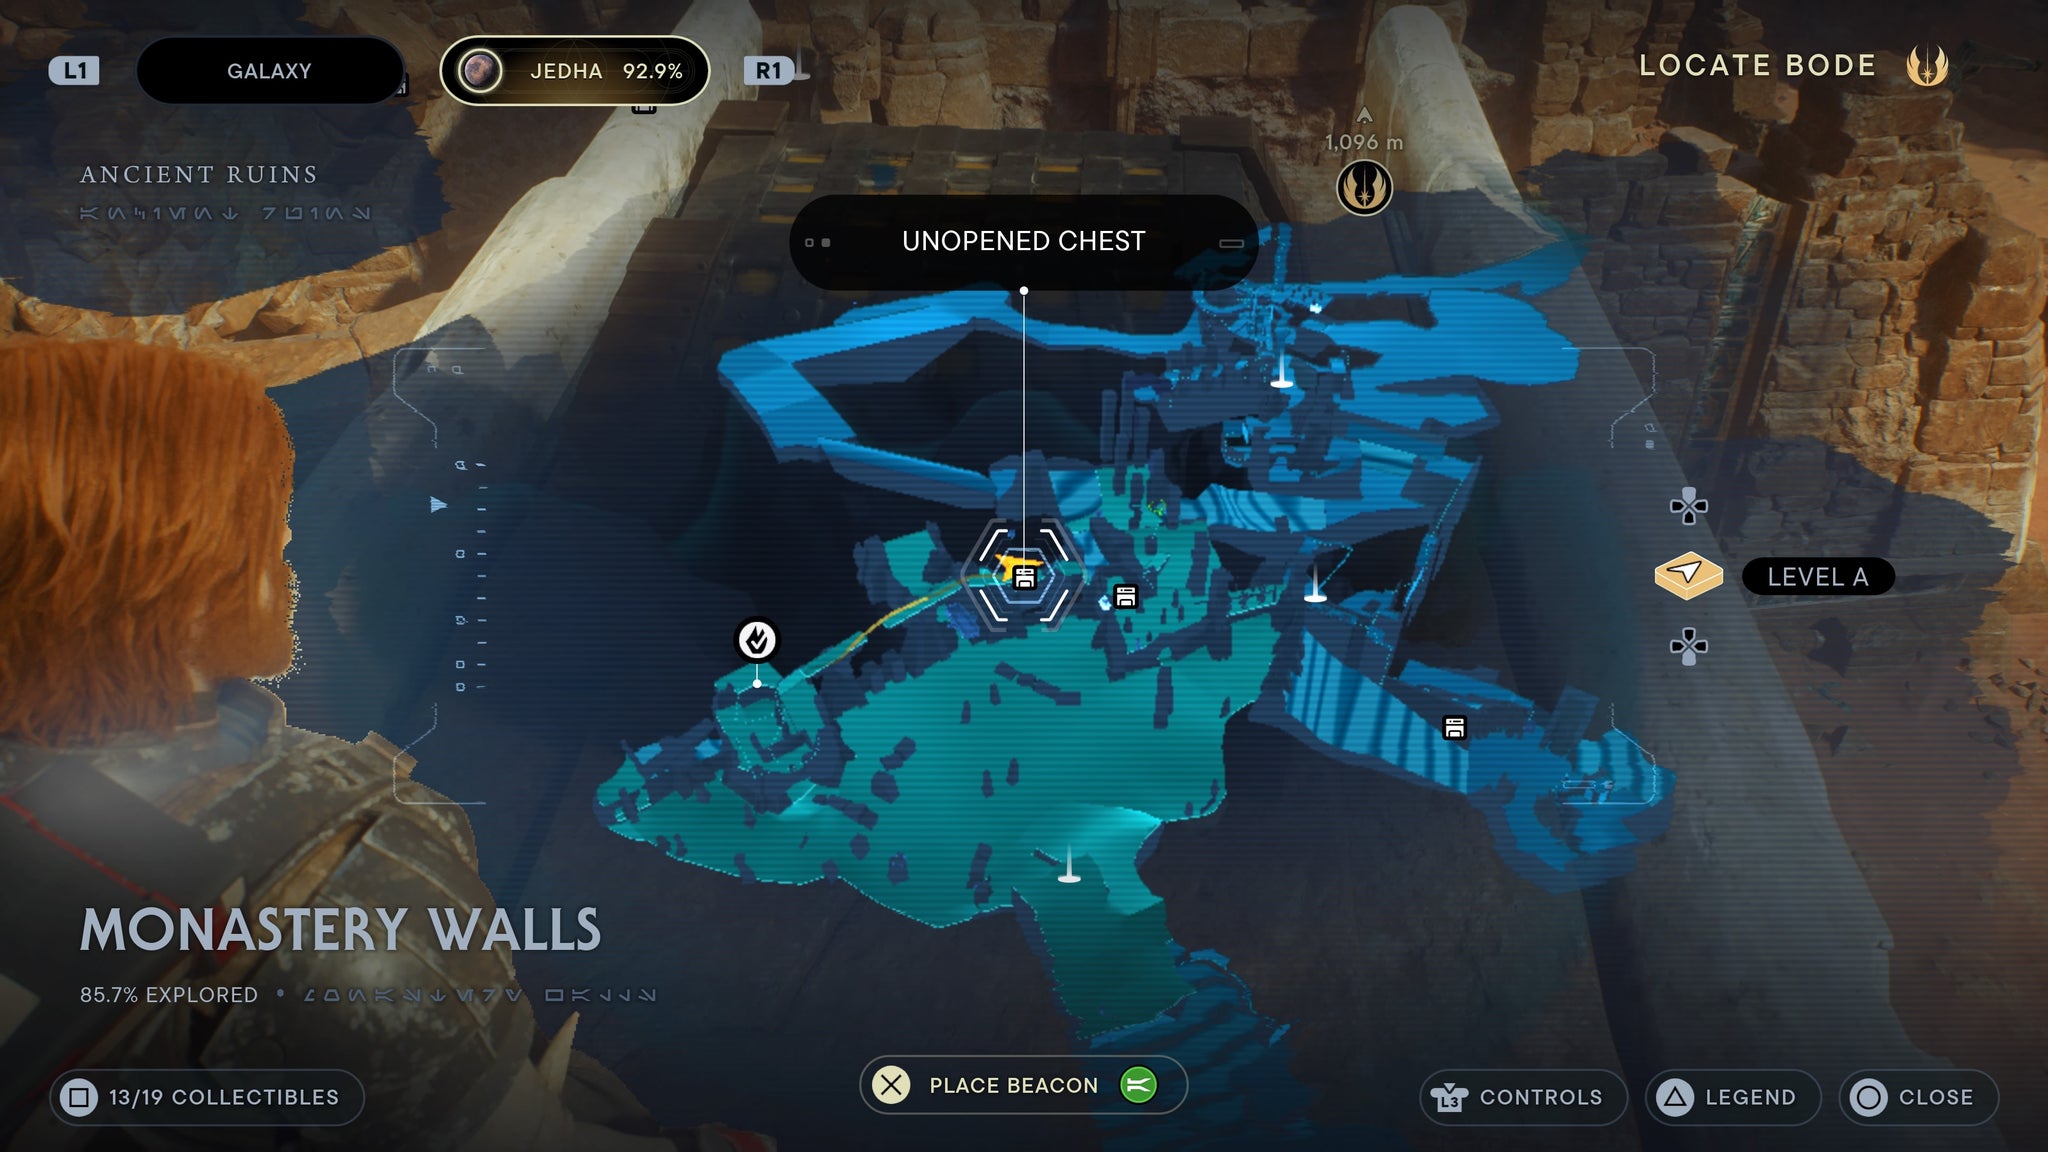
A full blaster in a chest!
Wood weapon materials
Found in the Path of Conviction. Once you use the balloons to jump inside, there’s a chest by two droids.
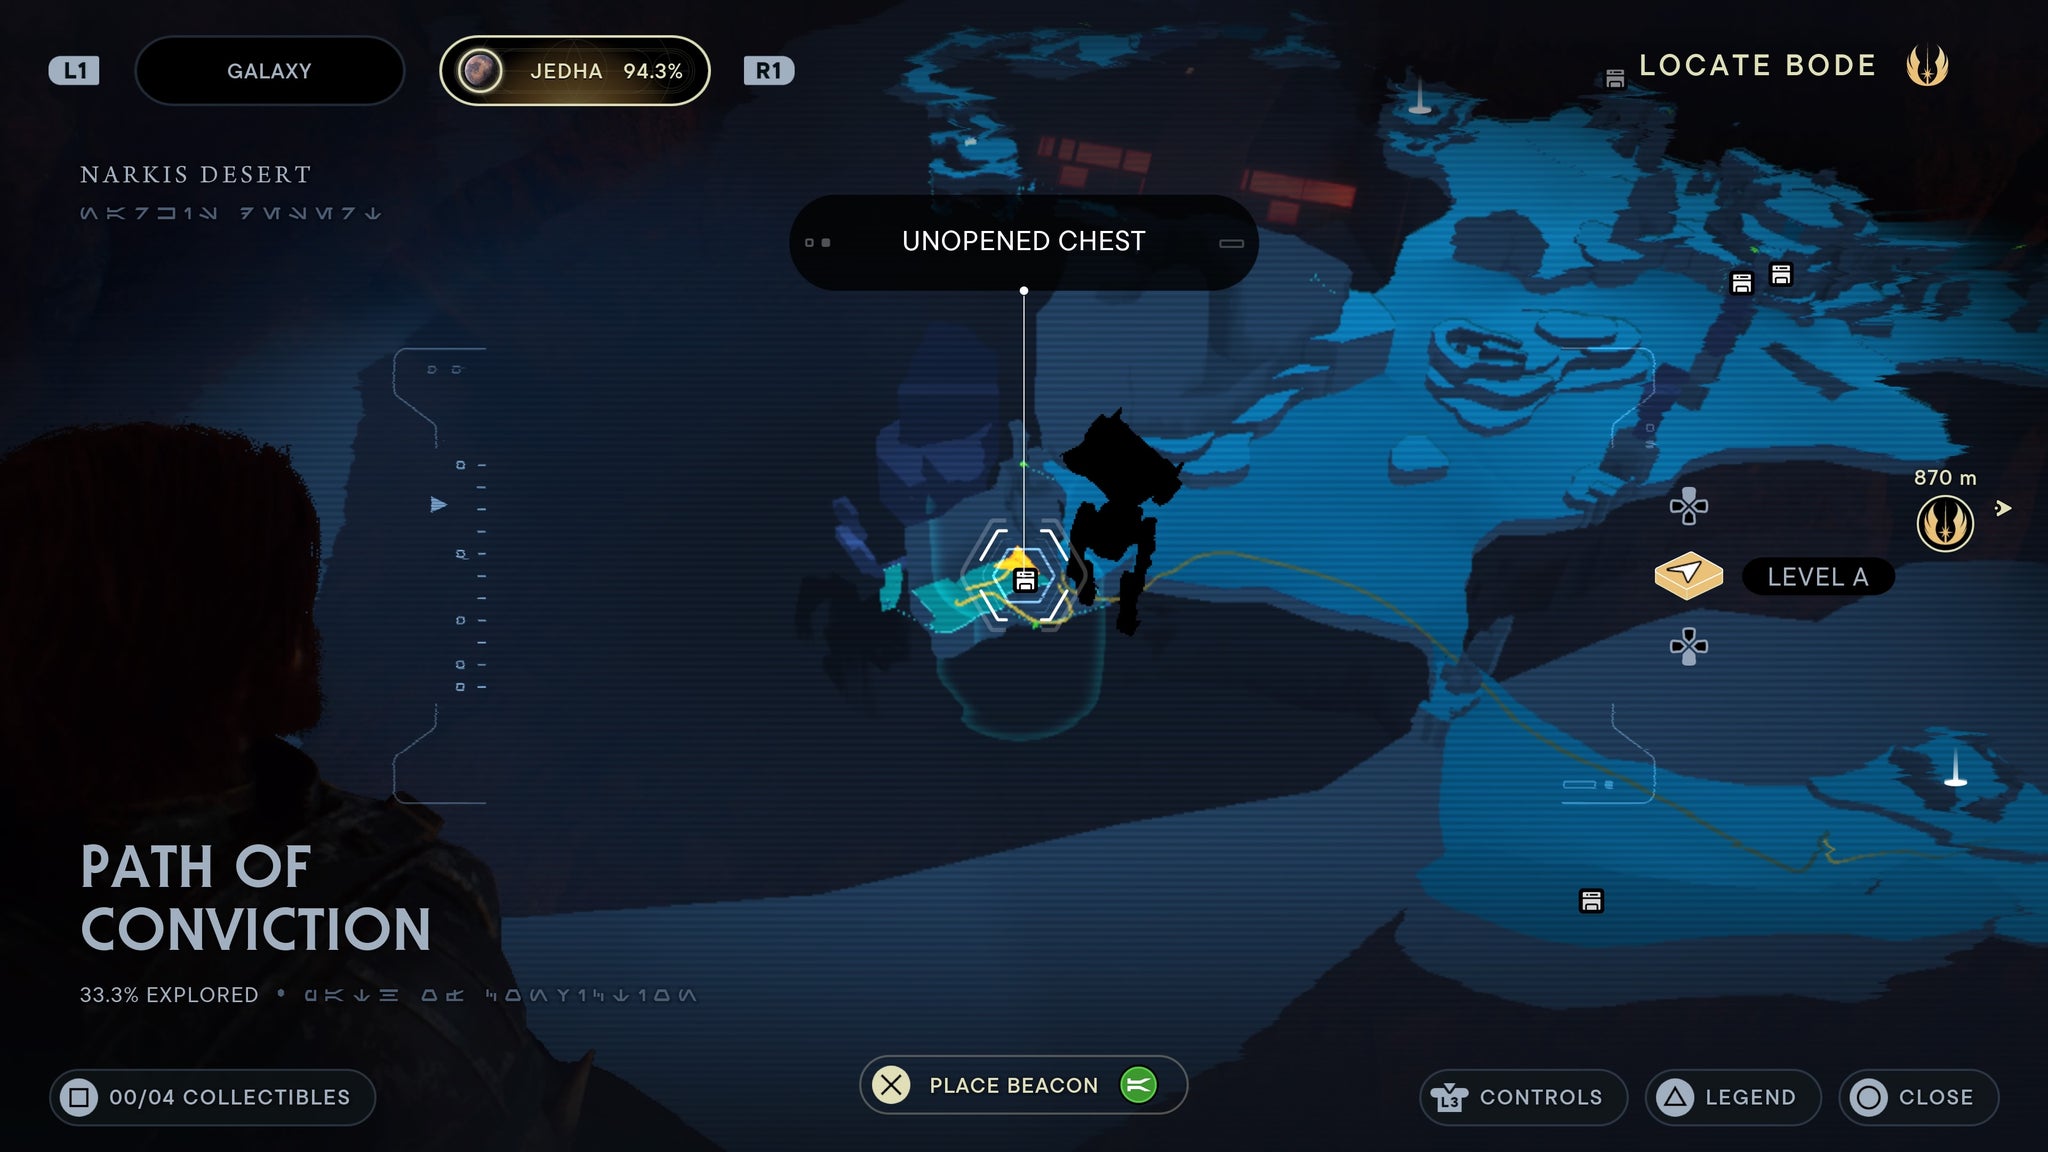
On the bottom floor!
Temperance Emitter
Requires balloon grapple. Located in the Desert Ridge. Climb to the top of the Path of Conviction, then use the relter to glide to the high platform where a chest is located.
Detachment Emitter
Requires balloon grapple. Found in Wayfinder ’s Tomb. Grapple across to the bridge towards the Arid Flats meditation point. There, you’ll find a chest.
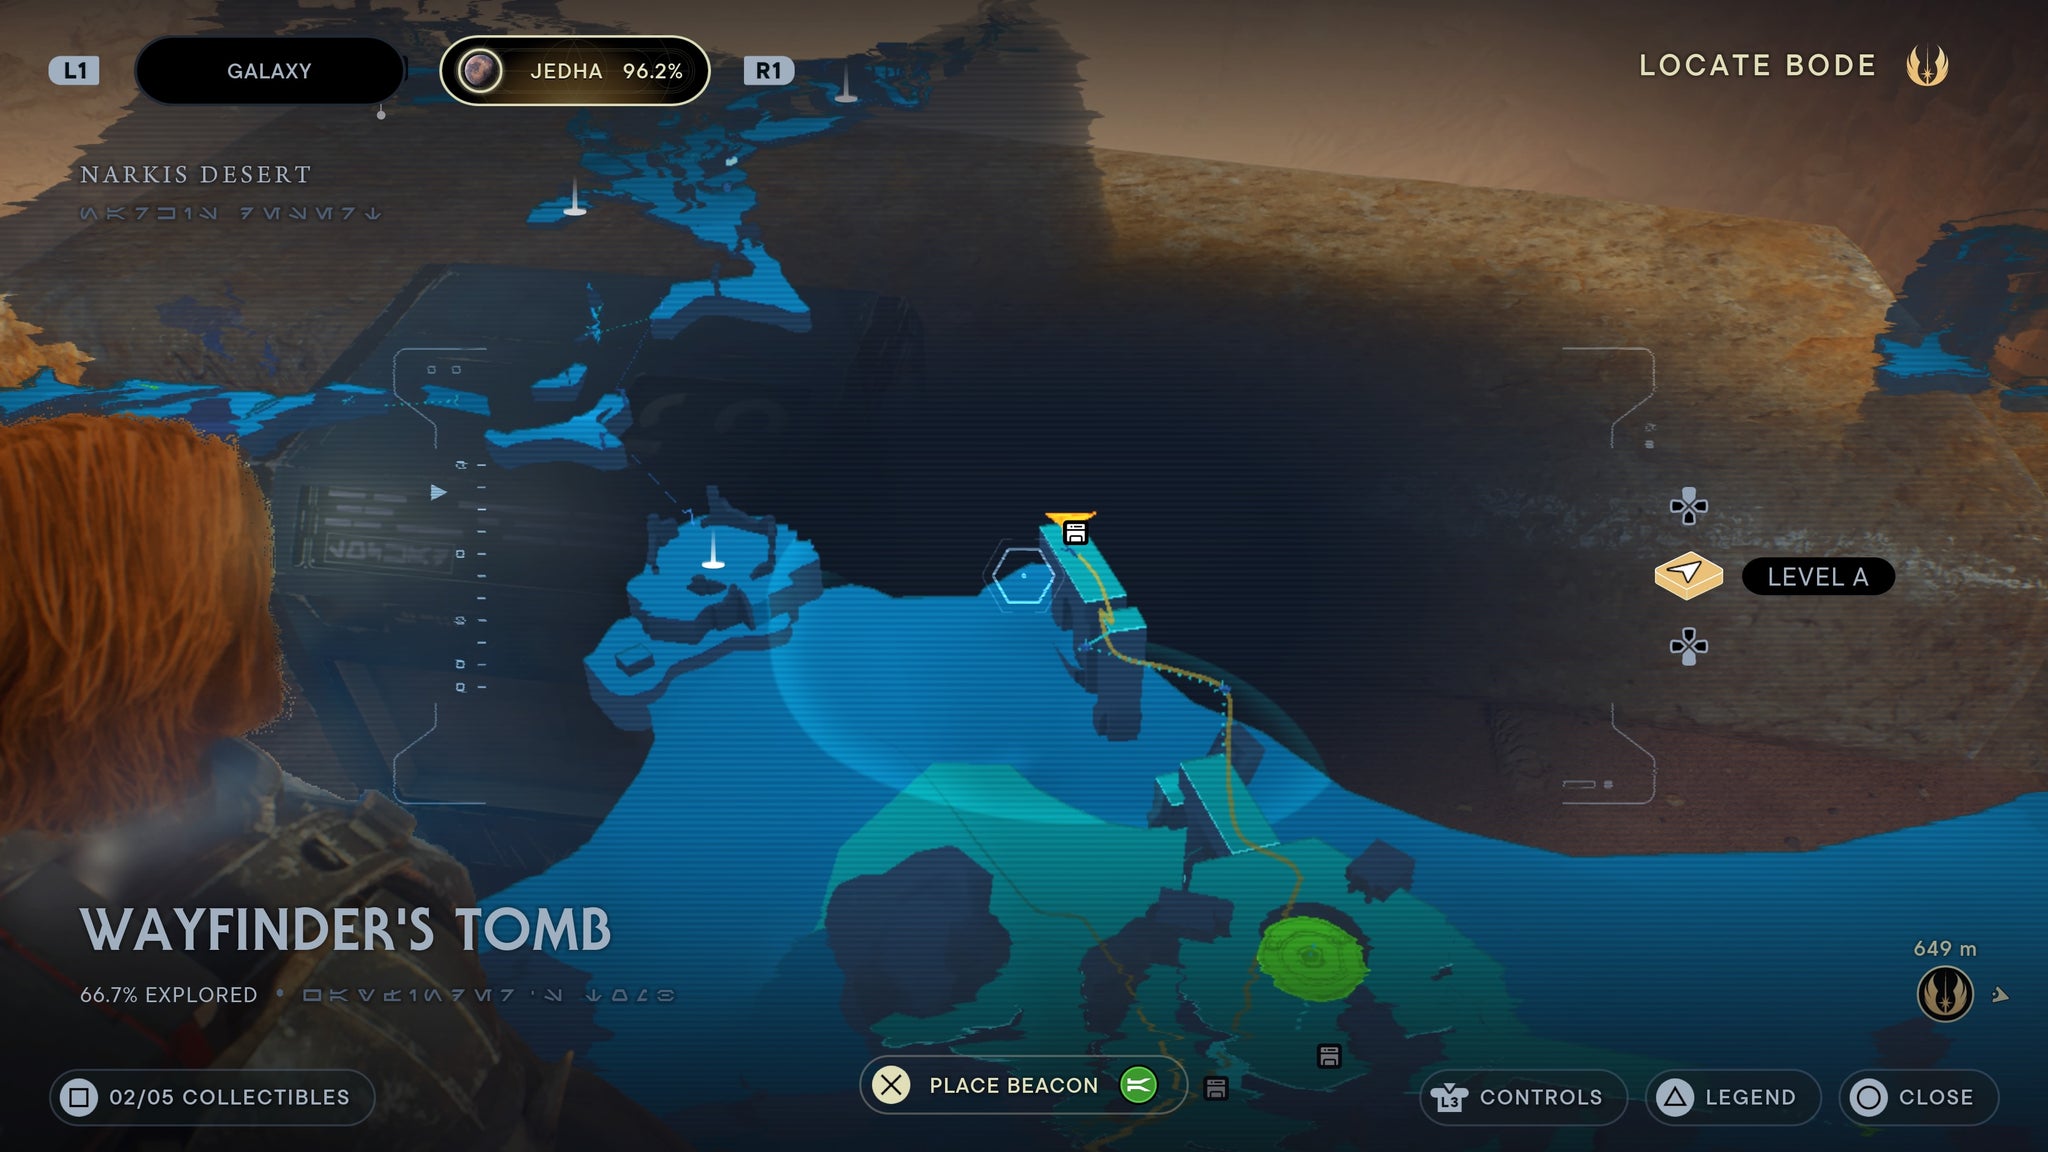
A bit of a grapple and the chest is yours!
Eno Cordova lightsaber (all parts)
Found in the Wayfinder’s Tomb. Requires Balloon grapple. You need to finish the three path puzzles found around the Arid Flats. Once they are all done, descend the elevator at the top of Wayfinder’s Tomb. Once down there, you’ll find a chest.

Your reward for completing all those puzzles!
Justice pommel
Found in the Blustery Mesa. Once you scale the slope and enter the mesa, walk to the far left side of the slope and you’ll find a chest.
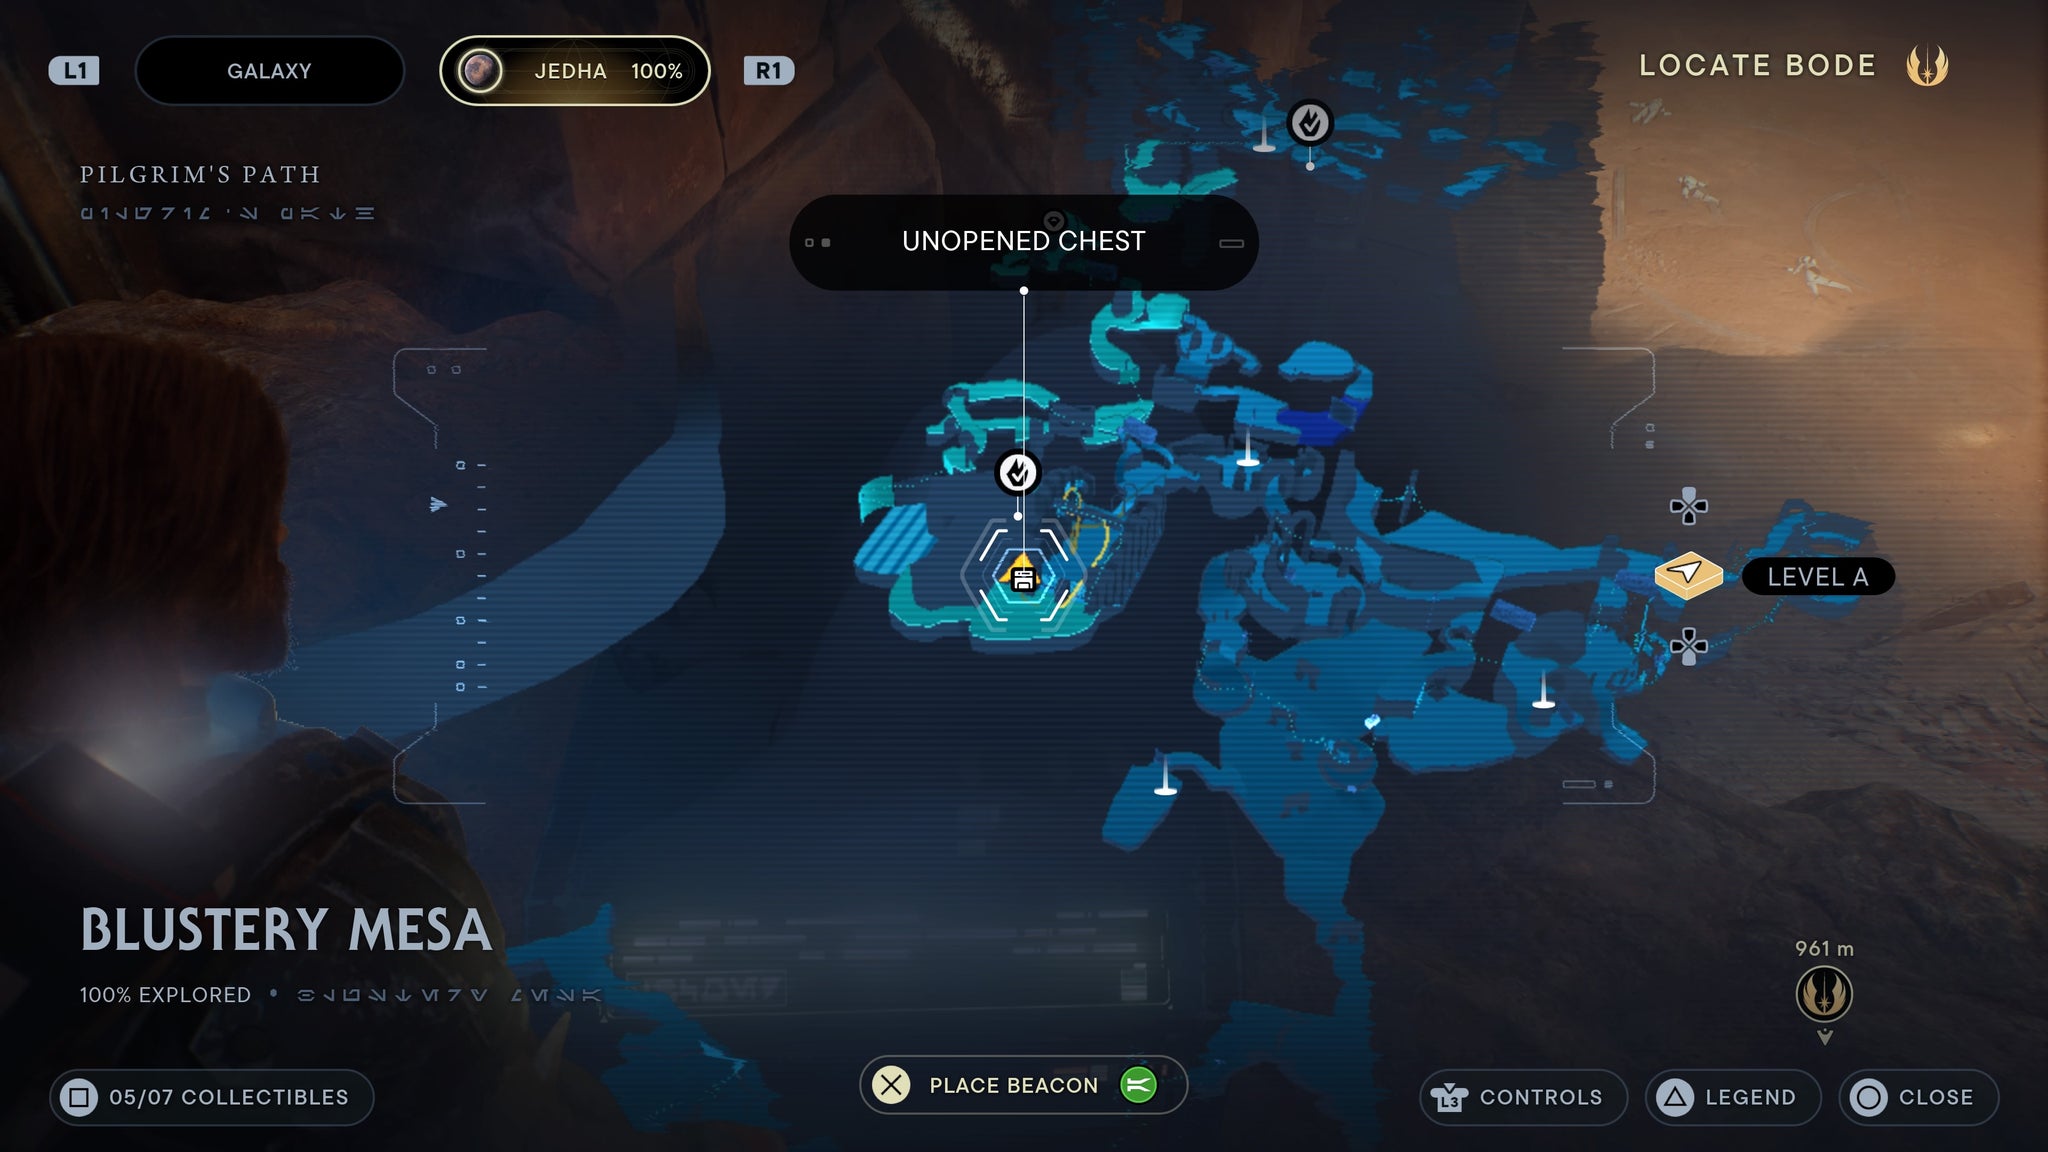
Overlooking the slope!
Shattered Moon Lightsaber parts
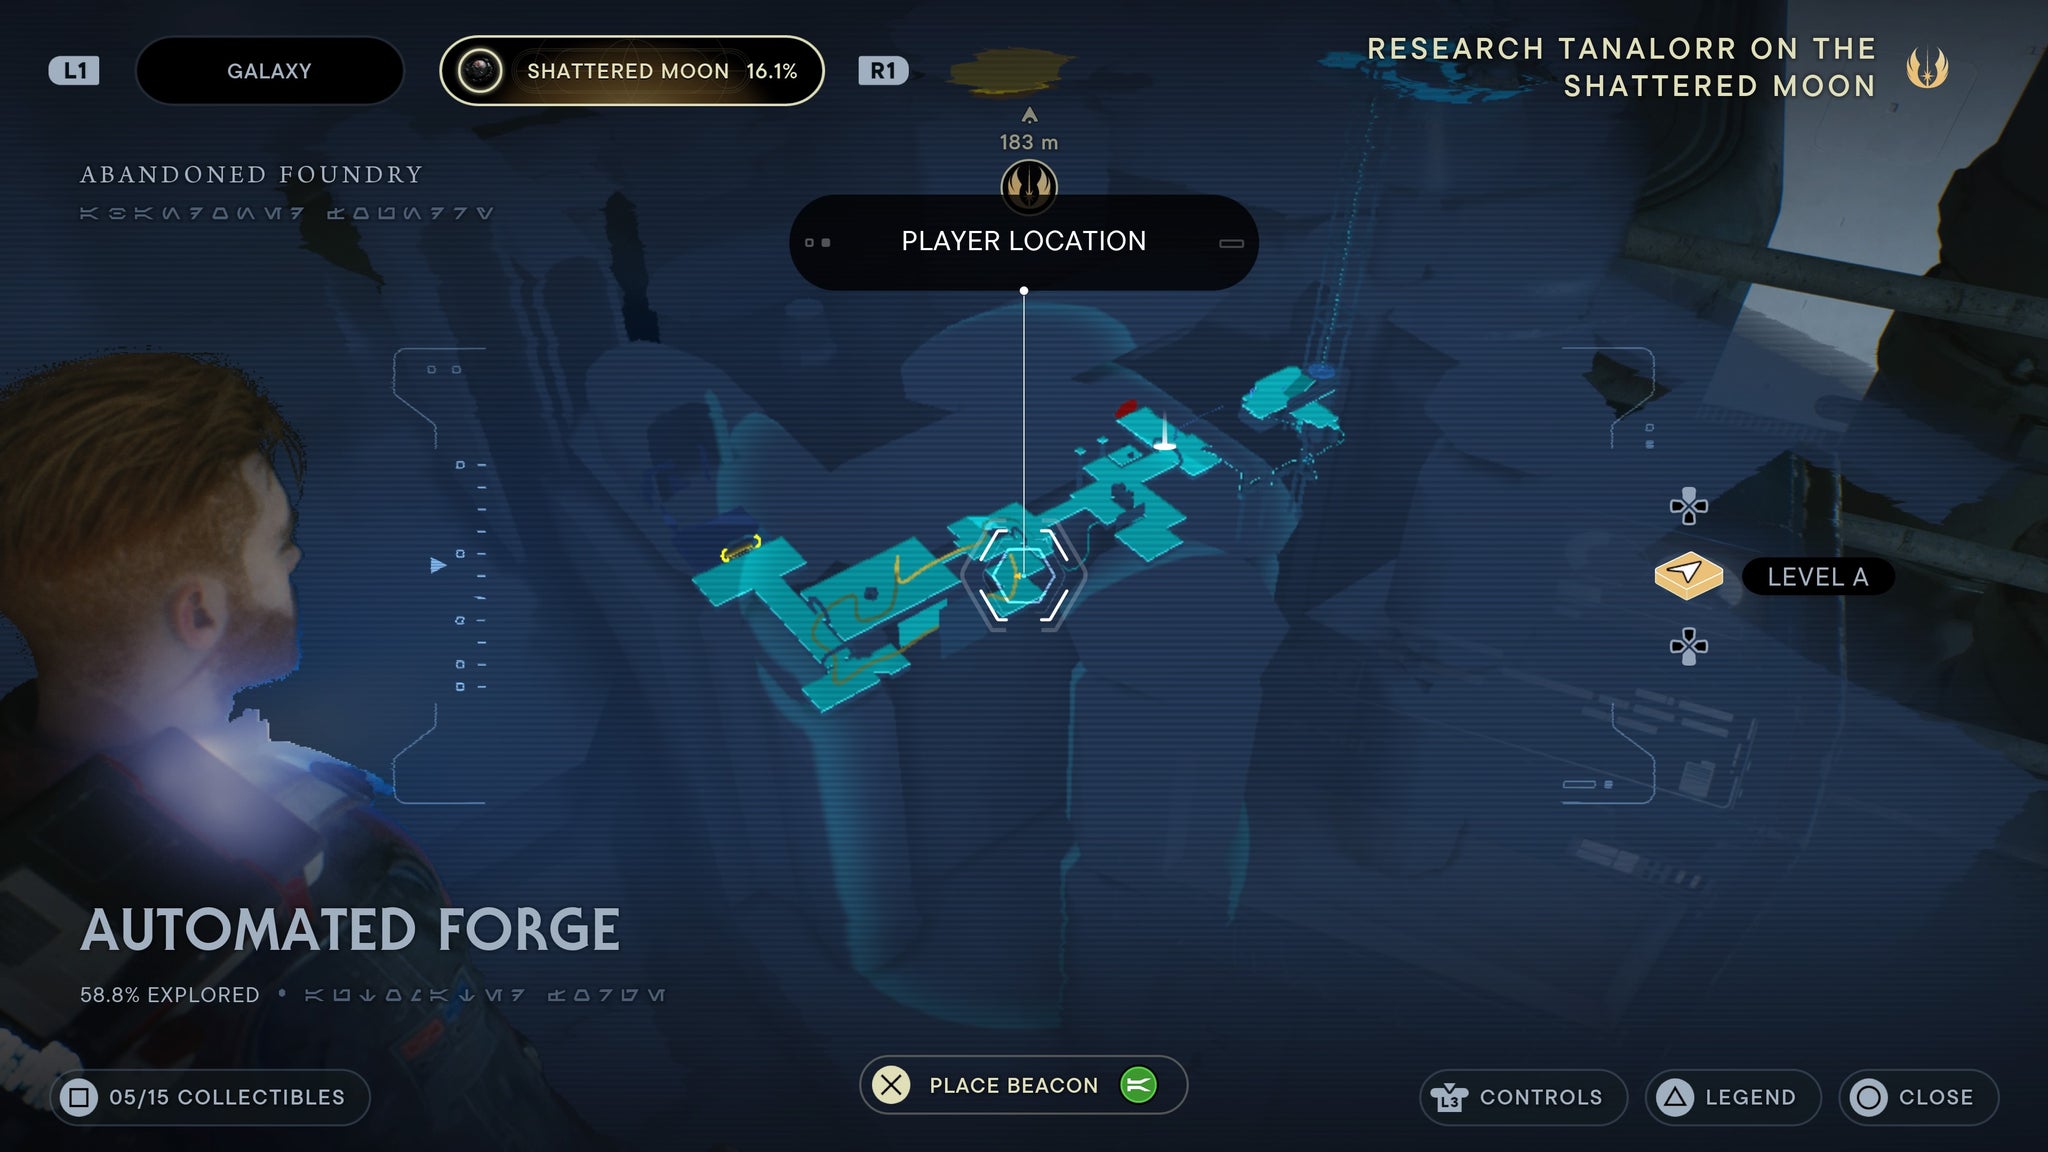
Harmony Grip
Found in the Automated Forge. From the meditation point, take a right and jump across two platforms shooting out steam. In a side room is a chest.
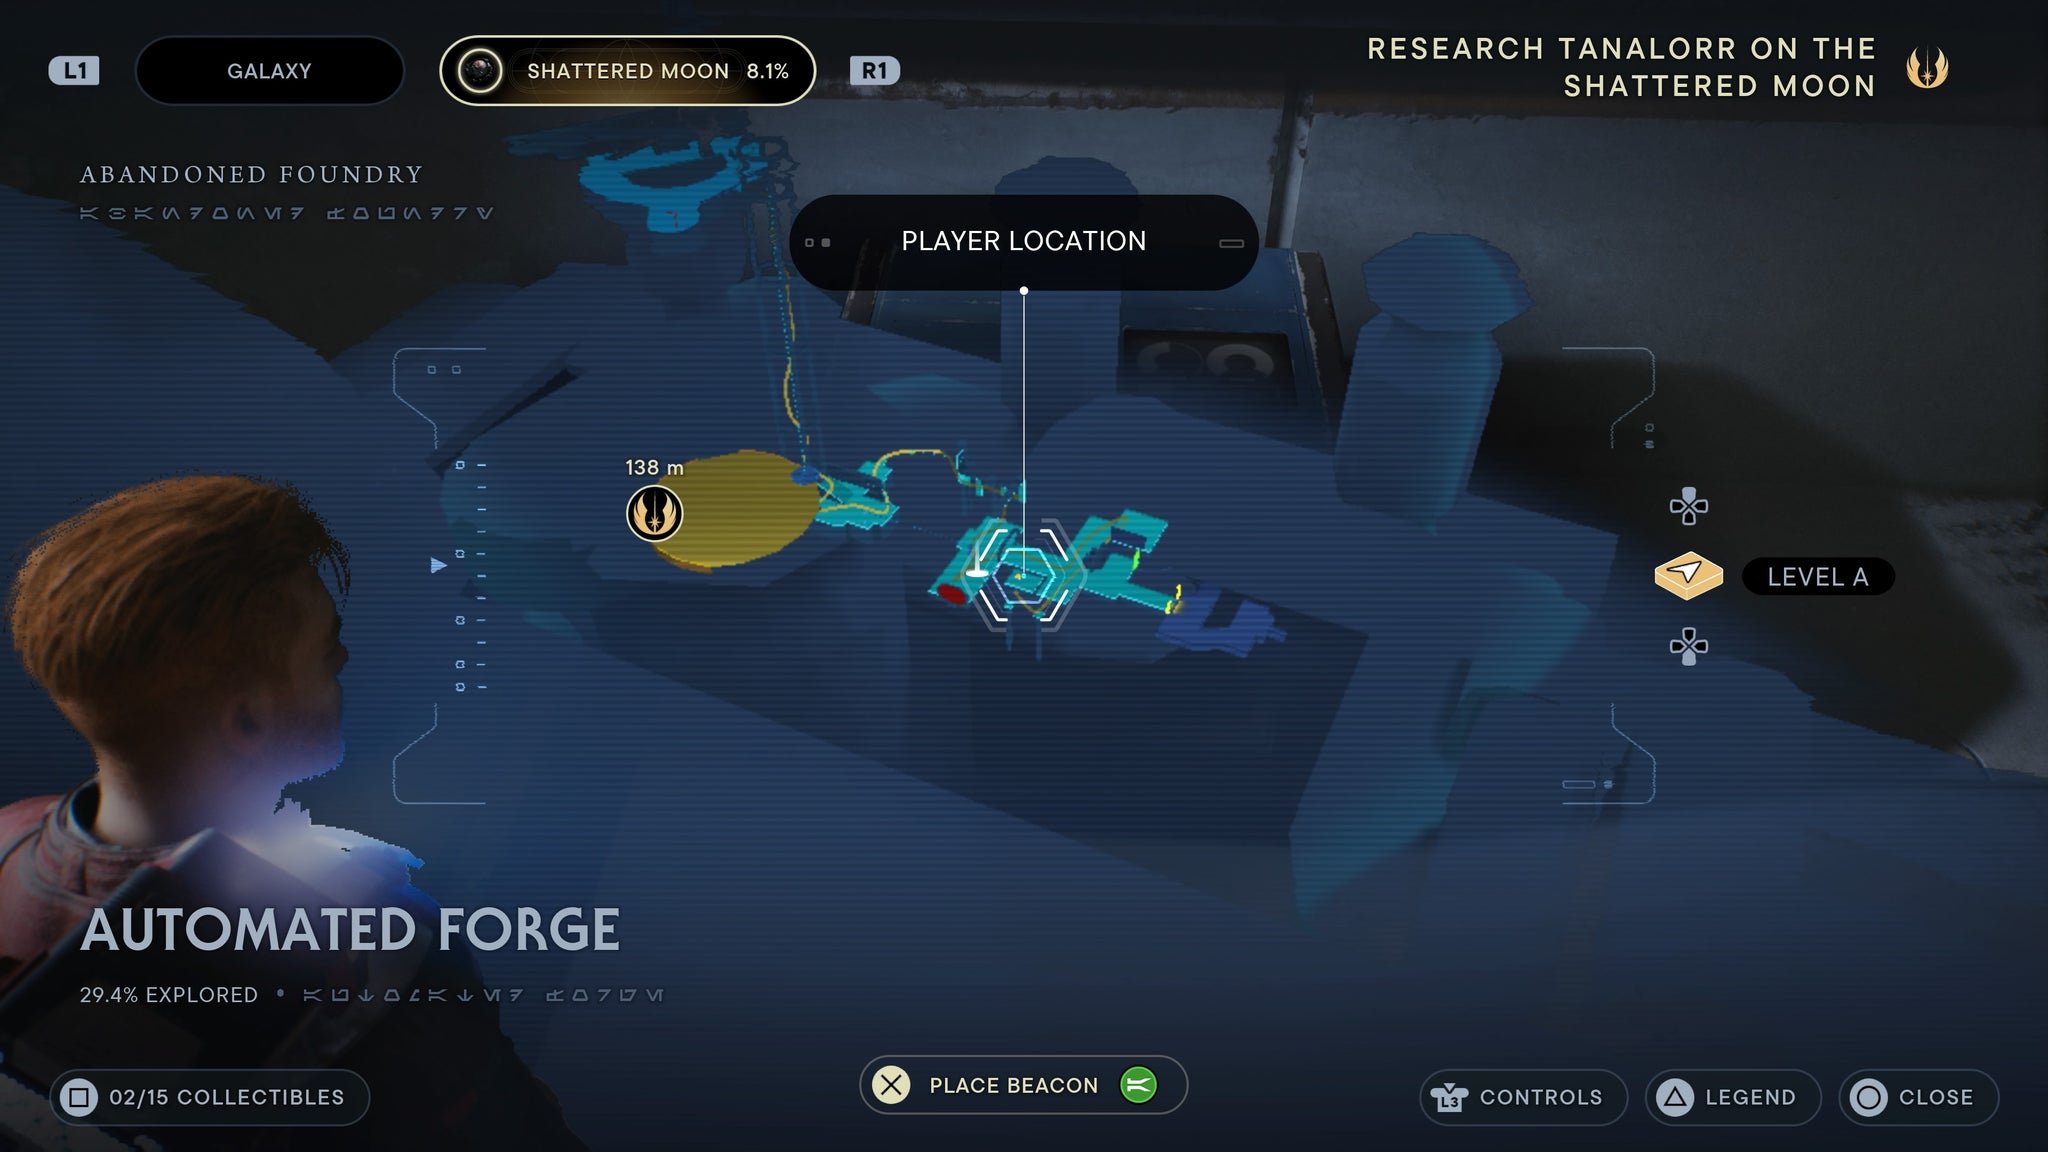
A few short jumps and you’re there.
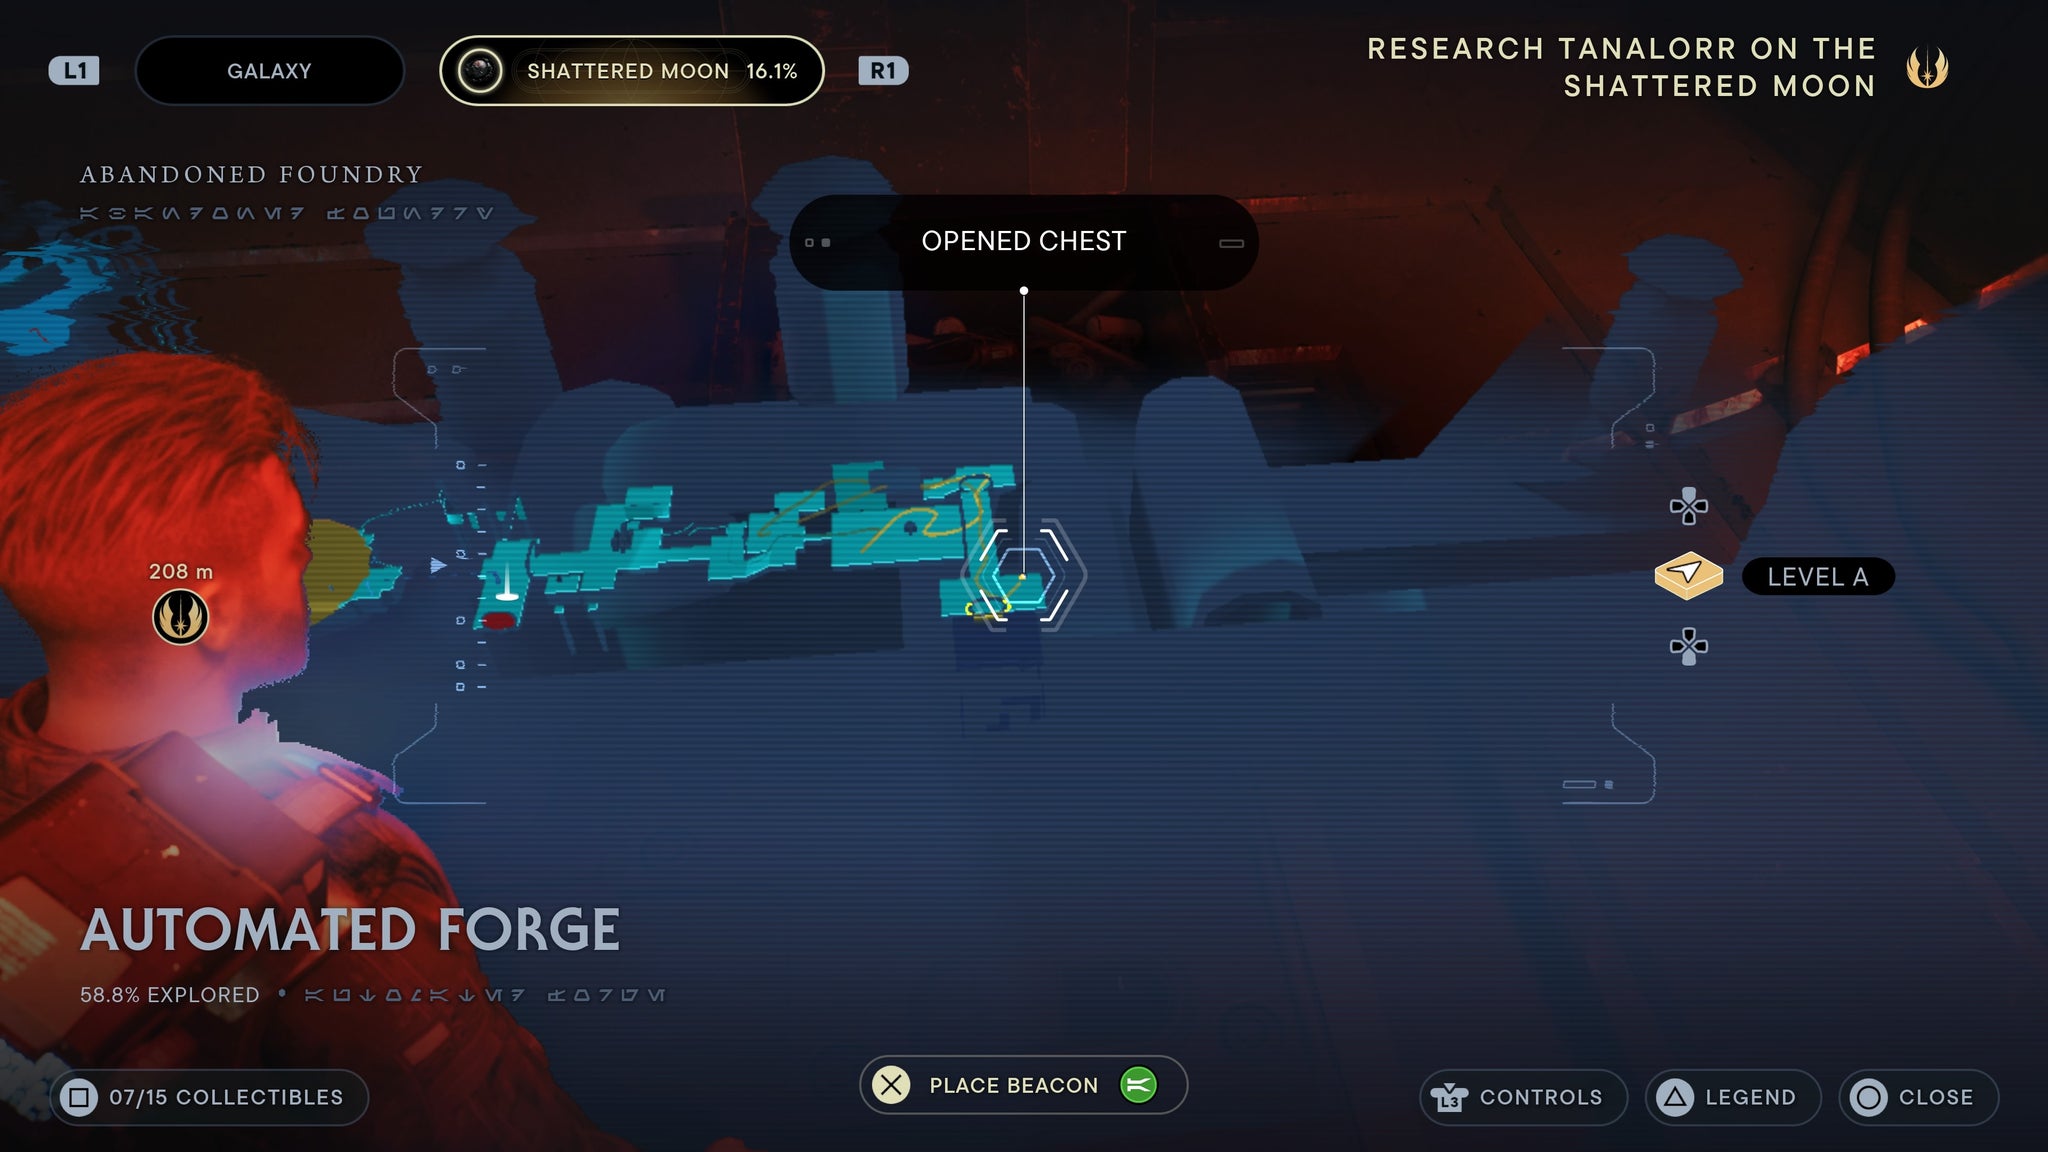
Unique Metal weapon material
Found in the Automated Forge. Walk past the large droid room, then take a left. Once outside, take a left and run across the nearby walls. Once across, you’ll find a chest.
it’s also by a shortcut.
Harmony Emitter
Found in the Automated Forge. In the room where you fight the Magnaguard. Turn left and you’ll find a chest you can unlock.
Kill the Magnaguard and this is your main reward.
Scrapyard Switch

A quick dash and it’s yours!
Requires forcefield dash. Found in The Archive. Enter the side room, squeeze through the gap, and dash through the forcefield. Once you do, look left for the chest.
RSKF-44 body
Found in the Republic Research Laboratory. Keep grappling around the central room until you reach a platform with two droids on it. Kill them, then look left for a machine you can shoot a dart at. Theis should open the chest nearby.
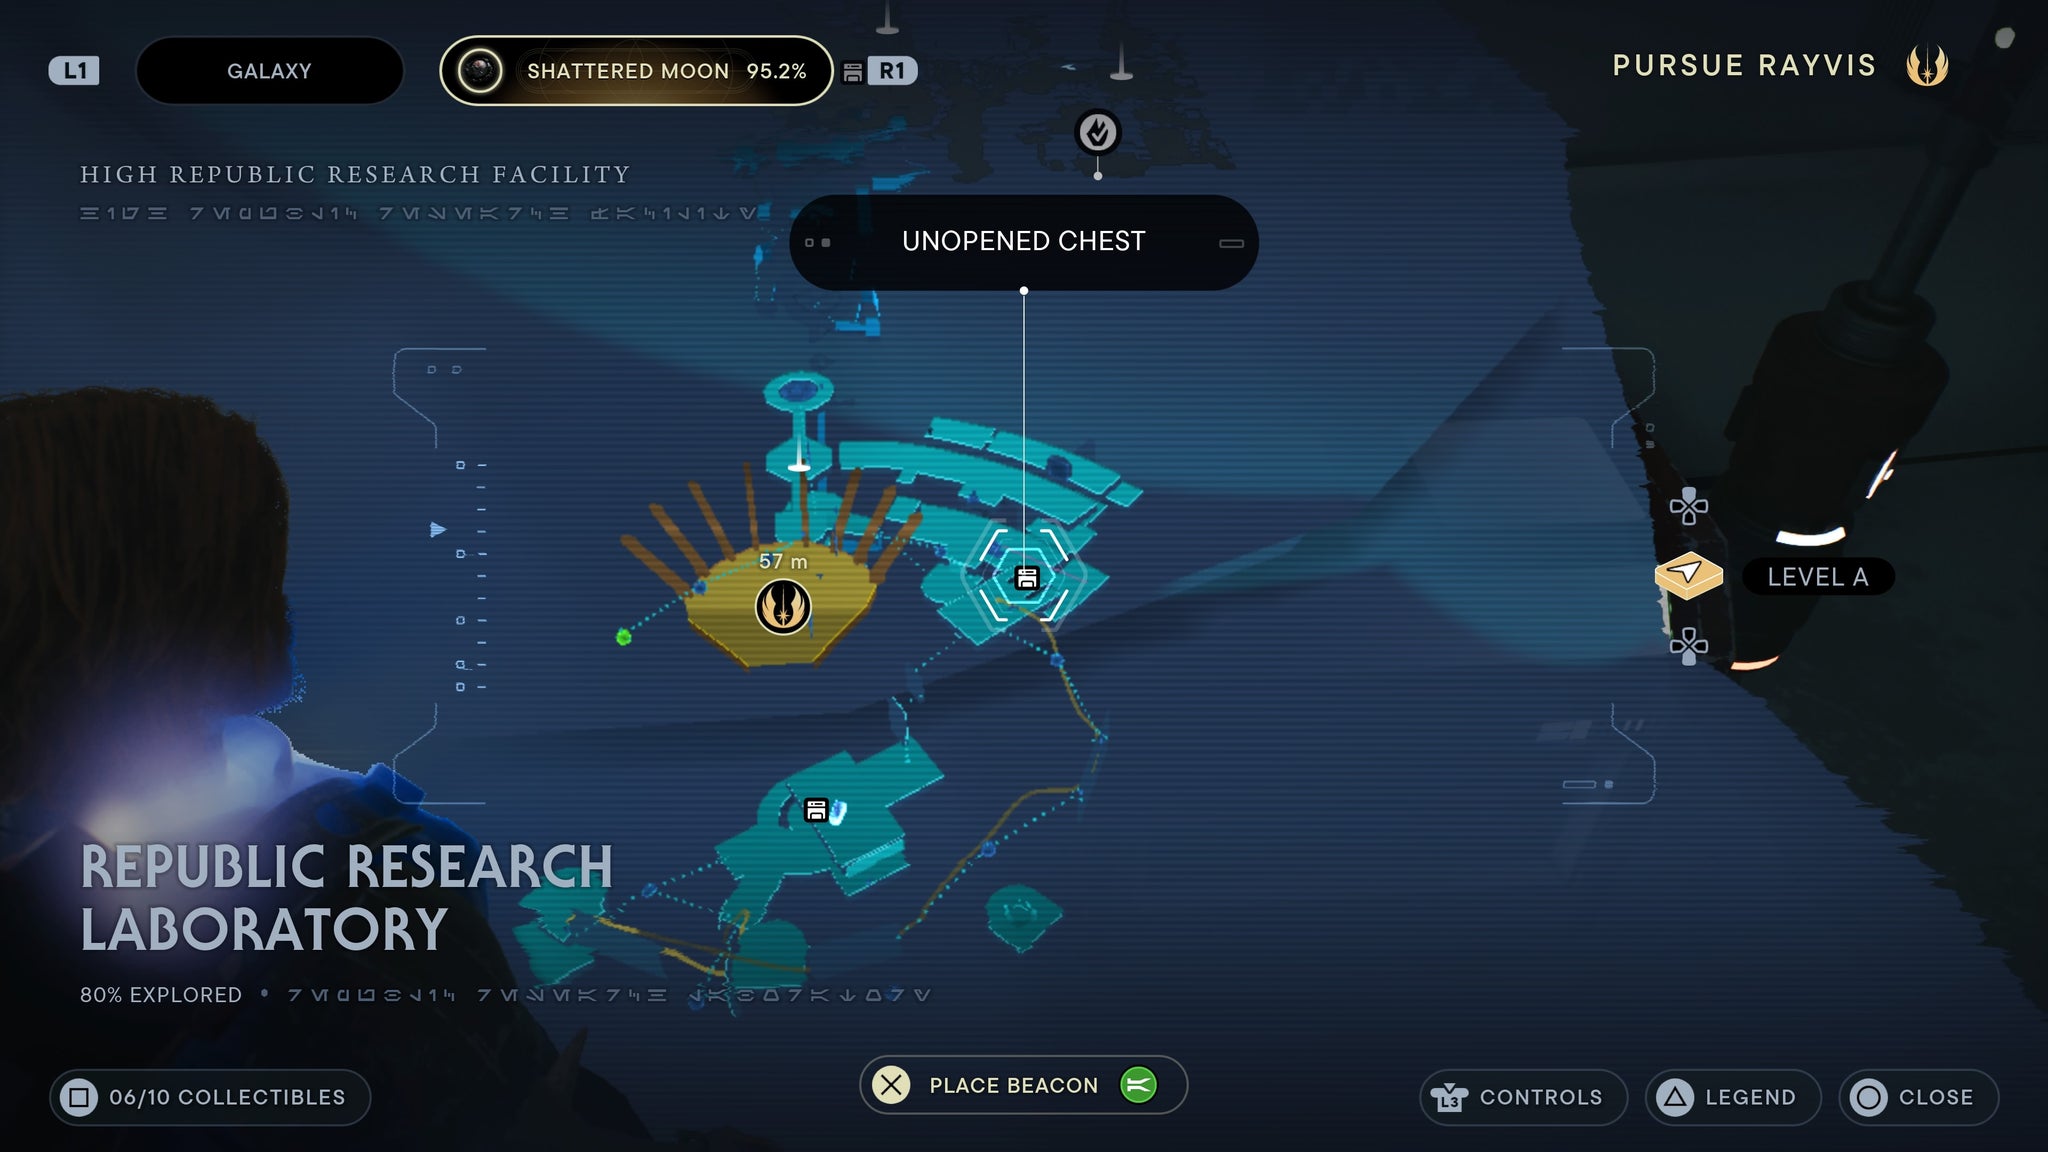
one snip between two antennas and the chest will unlock.
Model 13 body
Found in the Republic Research Laboratory. From the terminal you use to summon a balloon after the workbench, grapple to that balloon. Then, turn around and jump to the platform above this terminal. There you’ll find a chest.
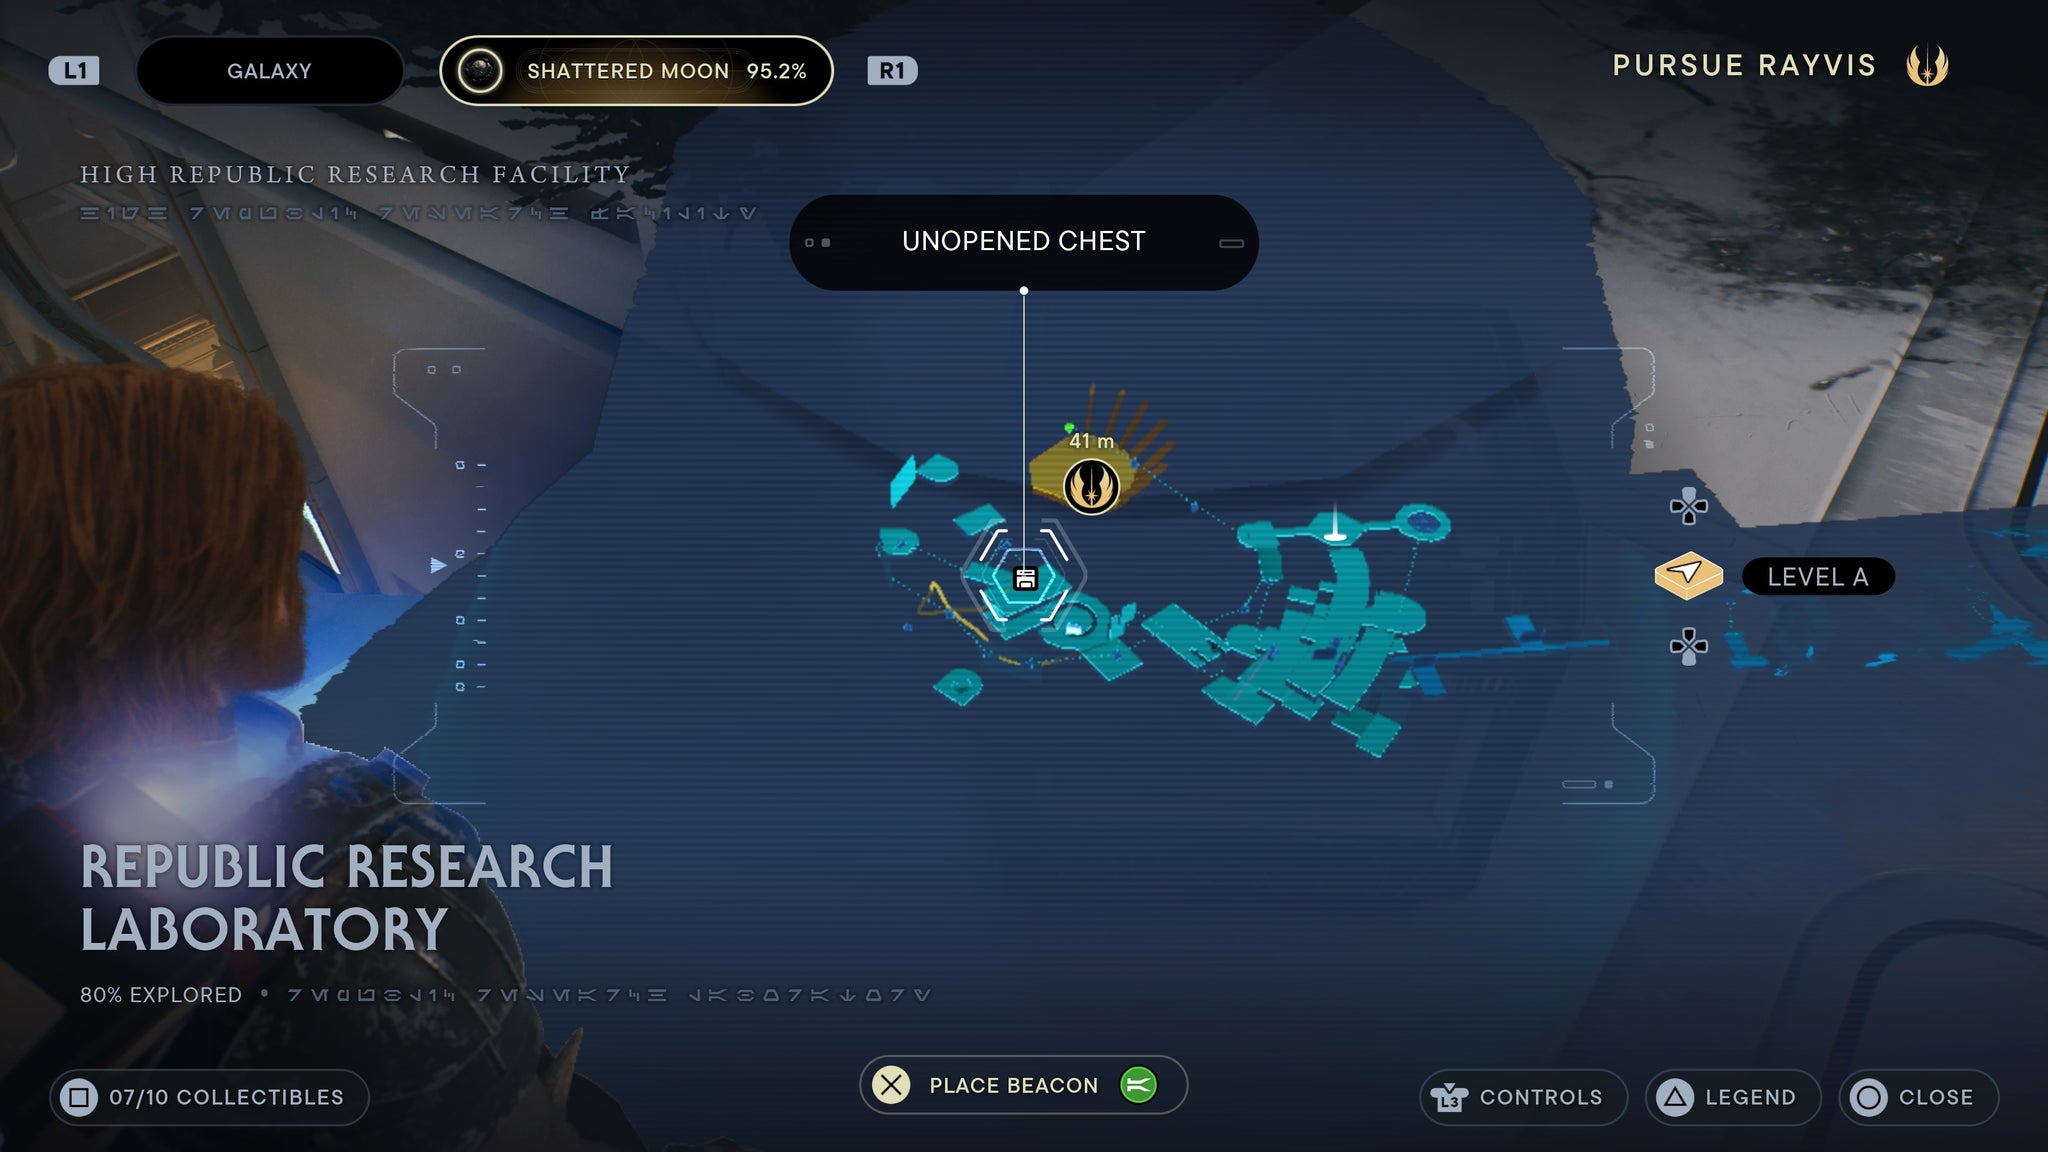
Grapple to a balloon then turn right around!
Nova Garon Lightsaber parts
Inquisitor Paint weapon material
Found in Central Command. Once you reach the top of the turning forcefield room, walk across the walkway until you reach a chest you can slice open.
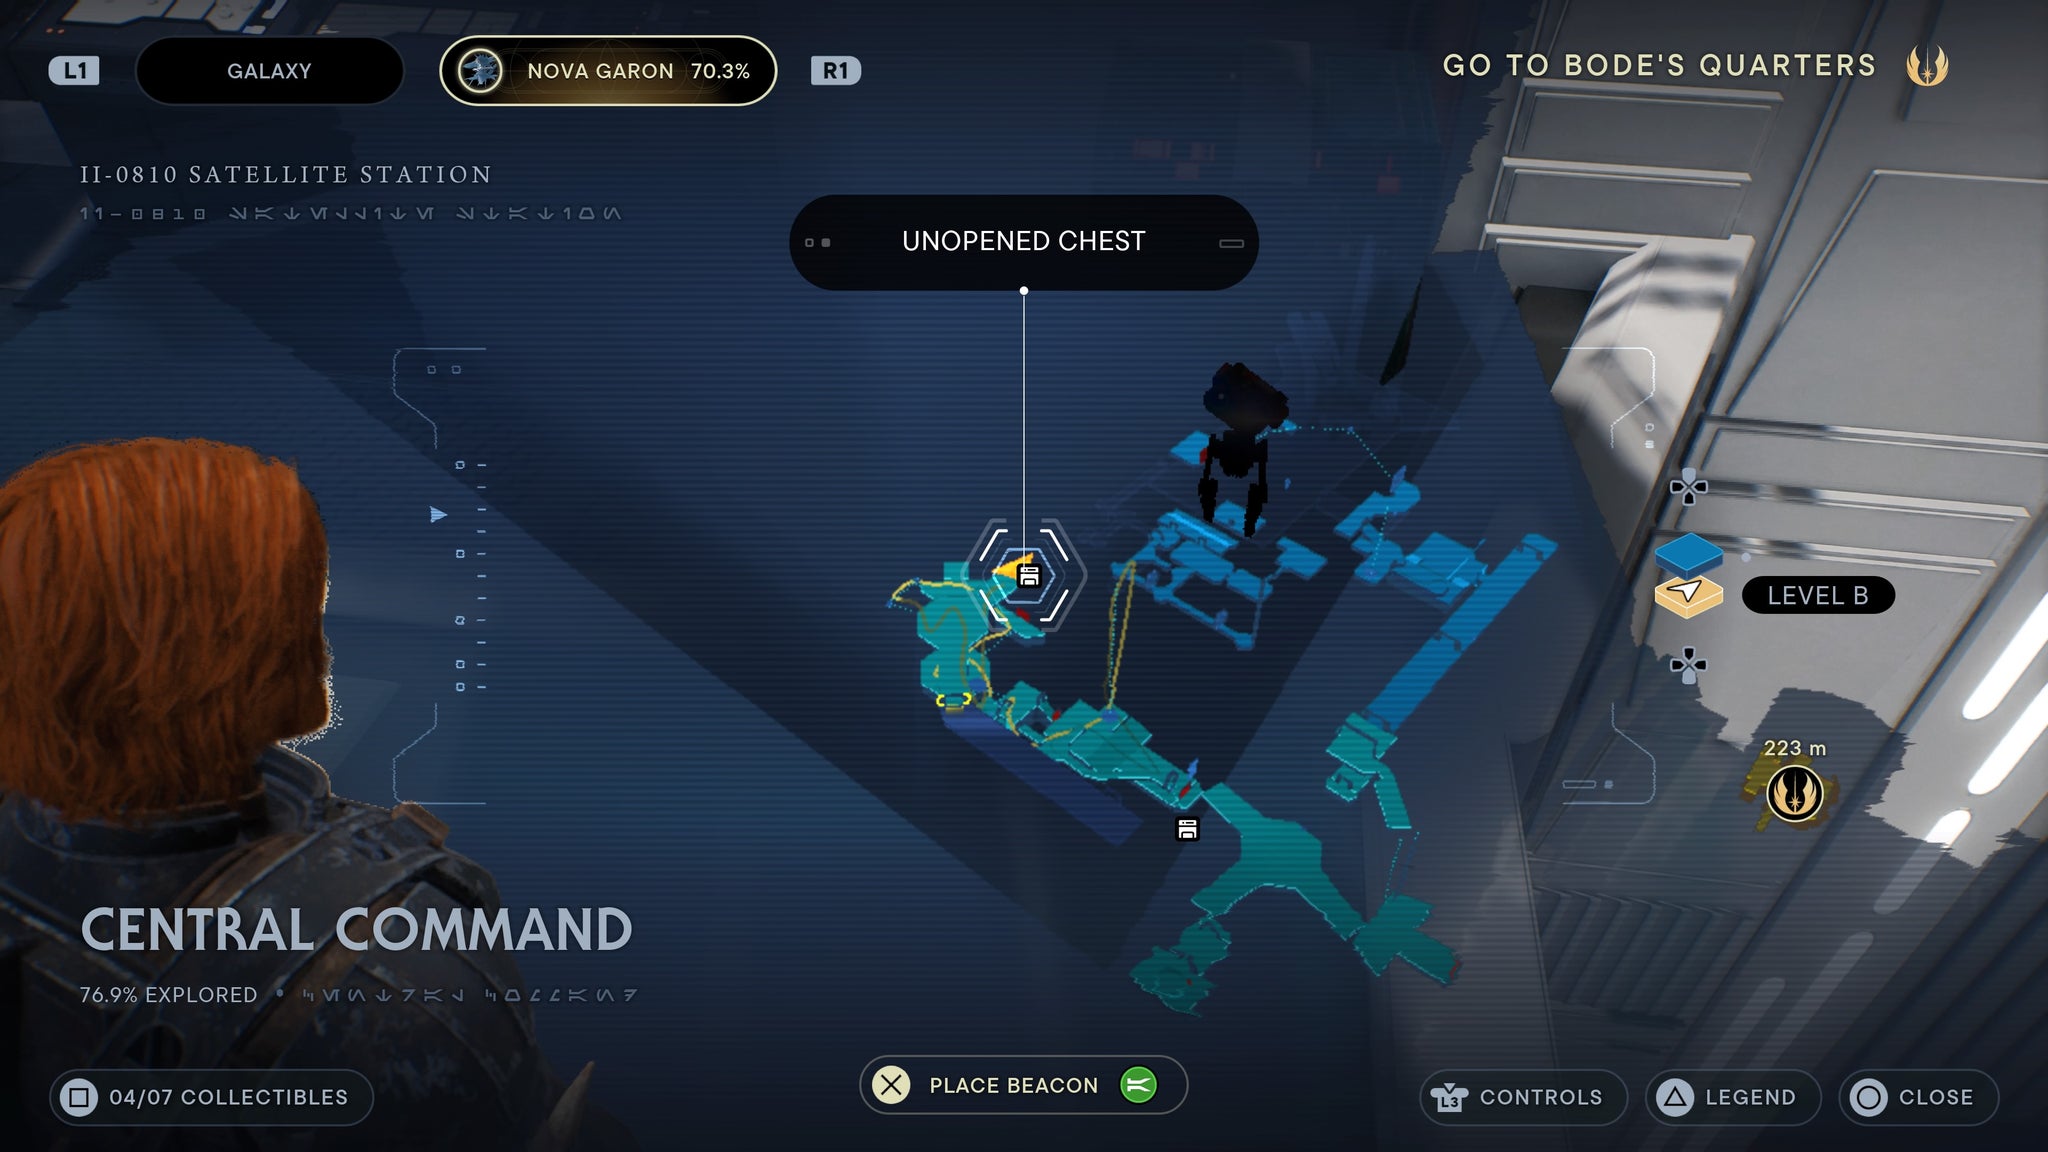
We’re done! We’re free!
Star Wars Jedi: Survivor
Video Game
Sign in and unlock a world of features

